(DIY) Black Headlight Housing *UPDATE*PICS*
 Mar 27, 2005, 10:43 AM
#1
Evolving Member
Thread Starter

Join Date: Jun 2004
Location: Maricopa, Az
Posts: 111
Likes: 0
Received 0 Likes
on
0 Posts
(DIY) Black Headlight Housing *UPDATE*PICS*
OK, I know there is already another thread on how to do blackouts on your headlights. Well, I took it upon myself to follow the exact directions given by DigDat and took FULL PICTURES to help people get an idea as well as added a few other options for those out there who are curious on doing this Modifcation.
Directions Brought To You By DigDat - make sure you give him props.
1. Pop the hood, remove 3 bolts per headlight. These are 10mm bolts.
2. Unplug the headlight bulbs
3. Pull headlight housing out and take inside
4. Pre-heat your oven to 275 degrees
5. Clean the headlight lenses
6. Remove all bulbs, unscrew and remove the wiring mounting brackets, set in safe place
7. Get a cookie sheet, grab a medium sized towel, make it moist with water, and place it on cookie sheet
8. After removing ALL bulbs from HL, stick on cookie sheet
9. Place cookie sheet with HL on it in oven for 5-6 minutes (not much more, one HL at a time)
10. Use oven gloves to remove cookie sheet
11. Gently bend the "clips" surrounding the housing upwards (they are black little over clips, which hold in the clear plastic, you will see them).
12. Pull the clear plastic away from the back housing, I used a screw driver and CAREFULLY/slowly pried small parts away around the housing and then pulled apart
13. Repeat steps 8-12 for 2nd headlight
14. Remove the inner chrome piece from the clear part of the headlight. You will need to unscrew 2 screws with a Phillips screw driver
15. You will see a clear plastic circle thing in the housing (blinker light cover). GENTLY remove this by pushing the clip on the top down. Be CAREFULL. I broke one of mine (this IMO is the hardest part of this project)
16. Sand the chrome housing somewhat with 400grit sand paper. This helps the paint stick (OPTIONAL)
17. Find a place to paint
18. Coat the chrome housing with black primer. Spray lightly, you will spray this 3 times total with primer
19. Let sit 15 minutes
20. Re-spray with primer
21. Let sit 15 minutes
22. Re-spray with primer
23. Let sit 15 minutes
24. Spray with the color you have chosen. Most do black, I did a gunmetal metallic flake
25. Let sit 15 minutes
26. Re-spray with color
27. Let sit 15 minutes
28. Re-spray with color
29. Let the light dry for a few hours in a warm area
30. After drying, re-insert the clear plastic circle thing in the housing, this should 'pop' back into place
31. Put the painted pieces back in the clear housing, re-screw them into place.
32. Stick the back housing and the clear part back together, get it lined up as close as possible
33. Stick back in oven (on cookie sheet) for 5 minutes to allow glue to soften
34. Push the headlight back into place, making sure the clips pop back into/over the holders
35. Put the bulbs back in and re-mount the wiring mounts
36. Re-install back into car
NOTE: When I had my headlights apart, I tinted the round clear lenses that cover the blinker light. I coated them each two times and it came out very nice. Dark to look like eyes, not too dark so that when my blinker is on, they don't "shine".
Now to the add on stuff from me: I know alot of people have had the concerns about leakeage and fogging. After reassembling my entire headlight housing together and heating it up and getting the glue back together i went and purchased Aquarium Sealant, silicone. I followed all the edges with the silicone and sealed up any "possible" areas that i was unsure about. Ever since i did that no leaking nor fogging and i tested it last night. I spent roughly a good 6-7 hours doing the entire project, so be prepared for some time down. here come the pics...
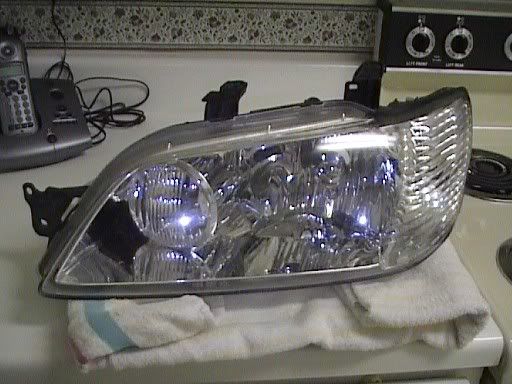
This is my headlight before going into the oven, notice the towel, i moistened the towel in water to keep the towel from burning and the metal melting the plastic on the headlight.
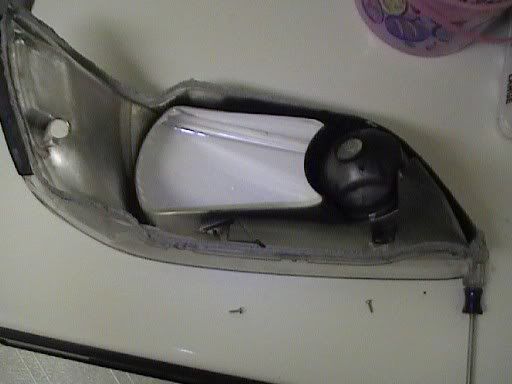
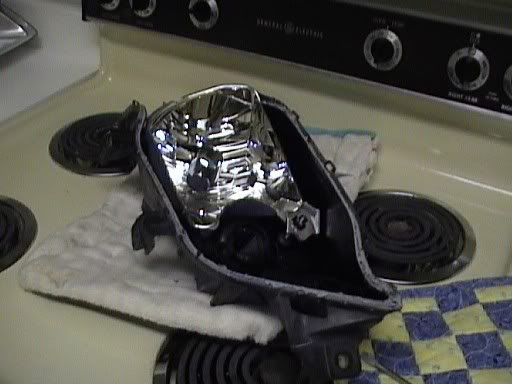
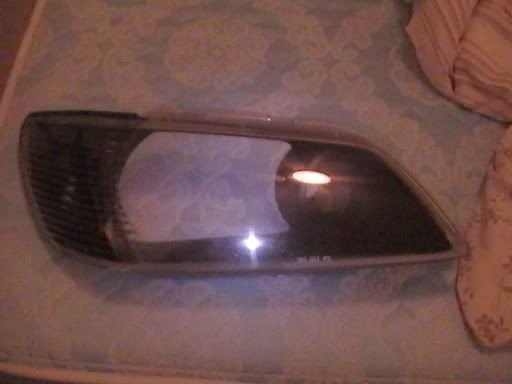
These two pictures are the headlight casing seperated, I allowed the headlights to sit in the oven for 6-7 minutes on 275degrees, again, pry the casing apart slowly. The grey stuff on the lining of the casing is the GLUE that holds the lights together.
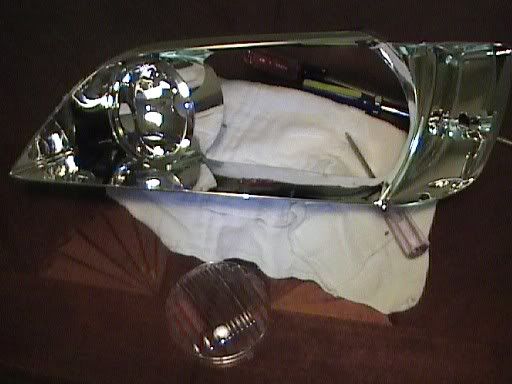
This is the chrome piece that unbolts with two screws (philips screwdriver).
This is the same chrome piece but no longer chrome, 4 coats of BLACK PRIMER. a place with a good ventilation is needed.

This part is the black slide out painted now and reattatched to the clear lens, I used rubbing alcohol to clean things up on the clear lens.
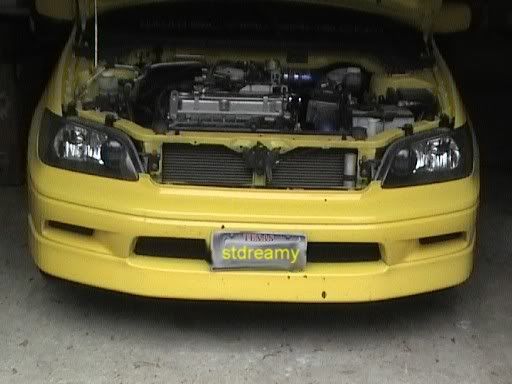
This is the end result...
Directions Brought To You By DigDat - make sure you give him props.
1. Pop the hood, remove 3 bolts per headlight. These are 10mm bolts.
2. Unplug the headlight bulbs
3. Pull headlight housing out and take inside
4. Pre-heat your oven to 275 degrees
5. Clean the headlight lenses
6. Remove all bulbs, unscrew and remove the wiring mounting brackets, set in safe place
7. Get a cookie sheet, grab a medium sized towel, make it moist with water, and place it on cookie sheet
8. After removing ALL bulbs from HL, stick on cookie sheet
9. Place cookie sheet with HL on it in oven for 5-6 minutes (not much more, one HL at a time)
10. Use oven gloves to remove cookie sheet
11. Gently bend the "clips" surrounding the housing upwards (they are black little over clips, which hold in the clear plastic, you will see them).
12. Pull the clear plastic away from the back housing, I used a screw driver and CAREFULLY/slowly pried small parts away around the housing and then pulled apart
13. Repeat steps 8-12 for 2nd headlight
14. Remove the inner chrome piece from the clear part of the headlight. You will need to unscrew 2 screws with a Phillips screw driver
15. You will see a clear plastic circle thing in the housing (blinker light cover). GENTLY remove this by pushing the clip on the top down. Be CAREFULL. I broke one of mine (this IMO is the hardest part of this project)
16. Sand the chrome housing somewhat with 400grit sand paper. This helps the paint stick (OPTIONAL)
17. Find a place to paint
18. Coat the chrome housing with black primer. Spray lightly, you will spray this 3 times total with primer
19. Let sit 15 minutes
20. Re-spray with primer
21. Let sit 15 minutes
22. Re-spray with primer
23. Let sit 15 minutes
24. Spray with the color you have chosen. Most do black, I did a gunmetal metallic flake
25. Let sit 15 minutes
26. Re-spray with color
27. Let sit 15 minutes
28. Re-spray with color
29. Let the light dry for a few hours in a warm area
30. After drying, re-insert the clear plastic circle thing in the housing, this should 'pop' back into place
31. Put the painted pieces back in the clear housing, re-screw them into place.
32. Stick the back housing and the clear part back together, get it lined up as close as possible
33. Stick back in oven (on cookie sheet) for 5 minutes to allow glue to soften
34. Push the headlight back into place, making sure the clips pop back into/over the holders
35. Put the bulbs back in and re-mount the wiring mounts
36. Re-install back into car
NOTE: When I had my headlights apart, I tinted the round clear lenses that cover the blinker light. I coated them each two times and it came out very nice. Dark to look like eyes, not too dark so that when my blinker is on, they don't "shine".
Now to the add on stuff from me: I know alot of people have had the concerns about leakeage and fogging. After reassembling my entire headlight housing together and heating it up and getting the glue back together i went and purchased Aquarium Sealant, silicone. I followed all the edges with the silicone and sealed up any "possible" areas that i was unsure about. Ever since i did that no leaking nor fogging and i tested it last night. I spent roughly a good 6-7 hours doing the entire project, so be prepared for some time down. here come the pics...
This is my headlight before going into the oven, notice the towel, i moistened the towel in water to keep the towel from burning and the metal melting the plastic on the headlight.
These two pictures are the headlight casing seperated, I allowed the headlights to sit in the oven for 6-7 minutes on 275degrees, again, pry the casing apart slowly. The grey stuff on the lining of the casing is the GLUE that holds the lights together.
This is the chrome piece that unbolts with two screws (philips screwdriver).
This is the same chrome piece but no longer chrome, 4 coats of BLACK PRIMER. a place with a good ventilation is needed.
This part is the black slide out painted now and reattatched to the clear lens, I used rubbing alcohol to clean things up on the clear lens.
This is the end result...
Last edited by stdreamy; Mar 27, 2005 at 08:42 PM.
 Mar 27, 2005, 10:49 AM
#2
Evolved Member
iTrader: (12)
Join Date: Feb 2005
Location: IL
Posts: 723
Likes: 0
Received 0 Likes
on
0 Posts
"unauthorized hotlinking" me thinks something is wrong, but you can see the pics by right clicking -> properties -> copy and paste the address
Last edited by PGDlancer; Mar 27, 2005 at 10:51 AM.
Mar 27, 2005, 08:57 PM
#5
Evolving Member
iTrader: (7)
Join Date: Dec 2002
Location: CT
Posts: 201
Likes: 0
Received 0 Likes
on
0 Posts
Looks good, Every time I see someone post a new how to on this it makes me more confident, I have the halo kit coming so am gonna do all in one shot, wish me luck. Good pics by the way.
Mar 28, 2005, 03:41 AM
#6
Evolving Member
Thread Starter
Join Date: Jun 2004
Location: Maricopa, Az
Posts: 111
Likes: 0
Received 0 Likes
on
0 Posts
Originally Posted by irulea2
Looks good, Every time I see someone post a new how to on this it makes me more confident, I have the halo kit coming so am gonna do all in one shot, wish me luck. Good pics by the way.
$250<$20
i paid exactly 20.85 for all parts
1 can of primer
1 can of black heat resistant paint
1 package of 400 grit sandpaper
1 package of rubber gloves (it'll keep the job clean as well as keep your oils off of the project)
1 package of cloth (removes dust and oils for a good clean surface to paint)
1 Import Tuner magazine (good for the wait while the paint dries)
Mar 28, 2005, 03:32 PM
#7
Evolving Member
iTrader: (14)
Join Date: Jun 2004
Location: sin city..
Posts: 331
Likes: 0
Received 0 Likes
on
0 Posts
yeup .... i paid 10 bucks to do my headlights!!! and 4 hours... nervous also at first but once your in the process... its fun... and ull be surprised how easy it really is.. i suggest everyone to do this cuz its so freakin easy... i hate that chrome piece!! black headlights all the way!
Trending Topics
Apr 11, 2005, 12:24 PM
#10
Newbie
iTrader: (1)
Join Date: Nov 2004
Location: Burlington,Ontario,Canada
Posts: 62
Likes: 0
Received 0 Likes
on
0 Posts
I did mine over the weekend, came out very good, that glue is just amazing tho, that stuff bonds to like anything!
http://www.gtalancers.ca/gallery/blacked-out-headlights
http://www.gtalancers.ca/gallery/blacked-out-headlights
Sep 1, 2008, 06:07 PM
#11
Newbie

Join Date: Sep 2008
Location: NY
Posts: 1
Likes: 0
Received 0 Likes
on
0 Posts
hey i'm sorry to bring an old topic up, but I just got an '02 lancer and I would like to do this to the headlights but i have a couple of questions.
1) Where can I find the Paint for this job?
2) What kind of glue do you use to seal it up after you finish?
1) Where can I find the Paint for this job?
2) What kind of glue do you use to seal it up after you finish?
Oct 15, 2008, 10:30 AM
#12
Evolving Member
Join Date: Jul 2003
Location: San Antonio Tx.
Posts: 102
Likes: 0
Received 0 Likes
on
0 Posts
and you dont need any glue to seal it up. just put the assembly back in the oven to melt the stock glue and press it together. you might wanna do this twice though to ensure a good seal. i had a good seal in my passanger side but my driver side i didnt. i didnt really care though.
mine have been done for 4 years now.

Thread
Thread Starter
Forum
Replies
Last Post
Evoryder
Evo How To Requests / Questions / Tips
90
Jun 22, 2017 03:26 AM
kelvar13
Evo X How Tos / Installations
38
Apr 3, 2015 05:43 PM
slowsrt4:(
Evo How Tos / Installations
11
Aug 3, 2014 02:49 PM