Evo X Boost Gauge Install ,No splicing, No firewall drilling,Pics+Vid= Clean As Hell
 Oct 11, 2008, 02:15 PM
#1
Evolving Member
Thread Starter
iTrader: (5)
Join Date: Mar 2007
Location: Minnesota
Posts: 283
Likes: 0
Received 0 Likes
on
0 Posts
Evo X Boost Gauge Install ,No splicing, No firewall drilling,Pics+Vid= Clean As Hell
Alright to start off this install uses No splicing--No drilling of firewall--And people with big hands can do this
The unit ill be installing is a Defi White Racer Gauge Standalone Requires No Control Unit, purchase of this gauge comes with everything needed to finish this install
WARNING : DEFI UNIT COMES WITH A LONG WIRING HARNESS OTHER GAUGES MIGHT NOT BEABLE TO ACCOMPLISH THIS ROUTE BASED ON WIRING LENGTH
Now just about everything is explained in the pictures for ease.
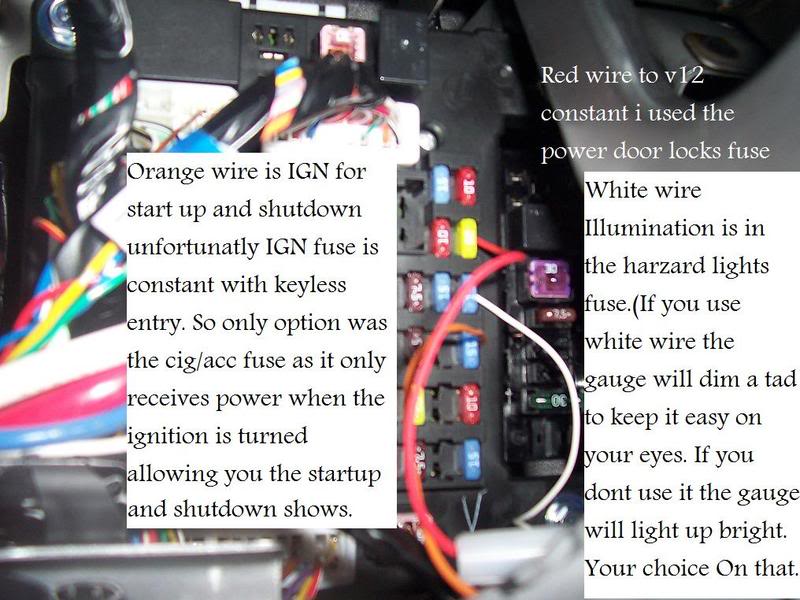
First off open the cover under the ADC control panel and you'll see the fuses i used. Just take out the fuse, wire cut and expose some wire and tap into the fuse slot just by inserting the exposed wire into it then put the fuse back in.Unfortunately Ive had no luck with the front fuse box to create a switch illumination so it turns on by headlights. So either have it dimmed using the white wire, or if you want it brighter don't use the white wire at all
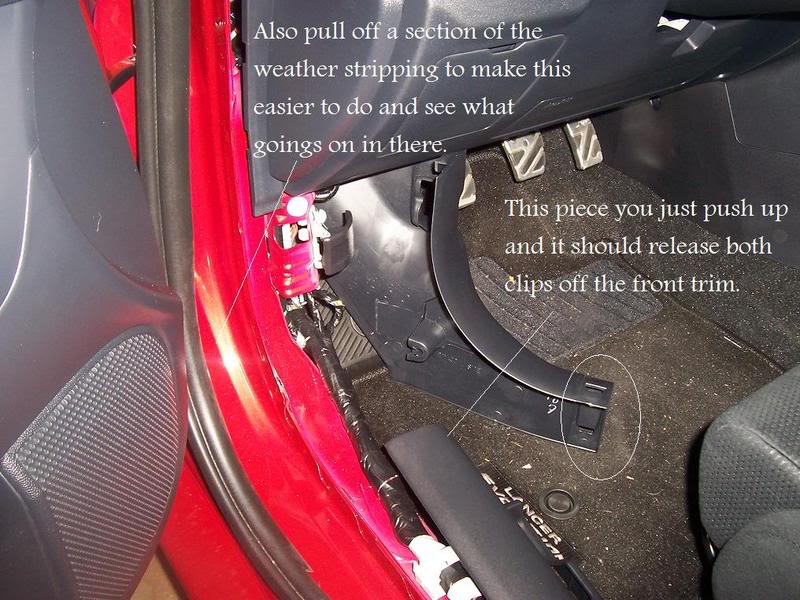
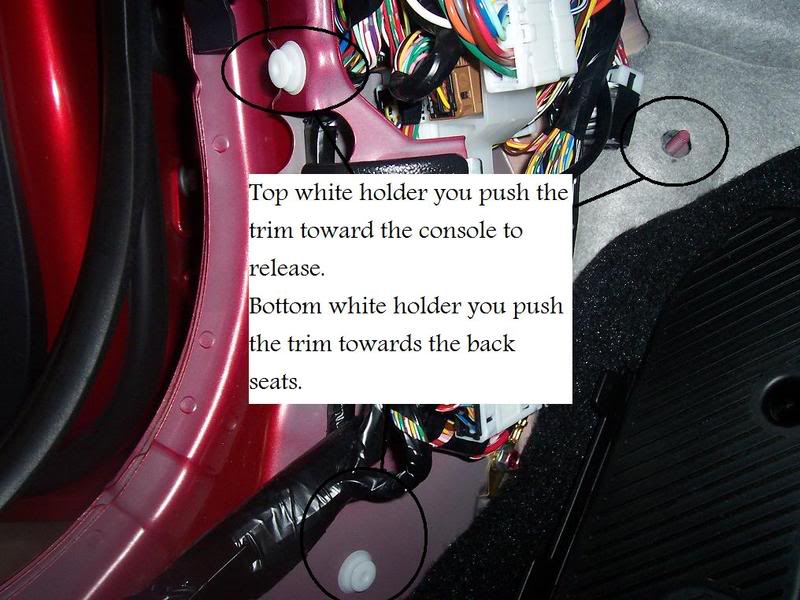
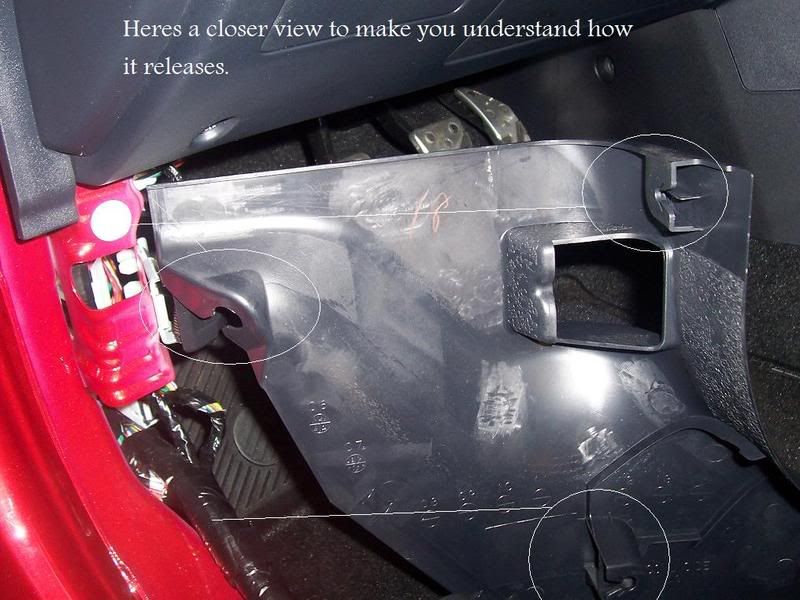
Now in the same spot start taking off the trim, but first pull a section of the weather stripping off to make this easier don't worry it'll go right back on just remember how it was when you took it off as some of the flaps on the weather stripping belongs under the trim.First start with the hood latch trip and pull it til its somewhat lose then the door sill trim just pull it up it should release. Then as the pic shows what direction and where the holders are located.
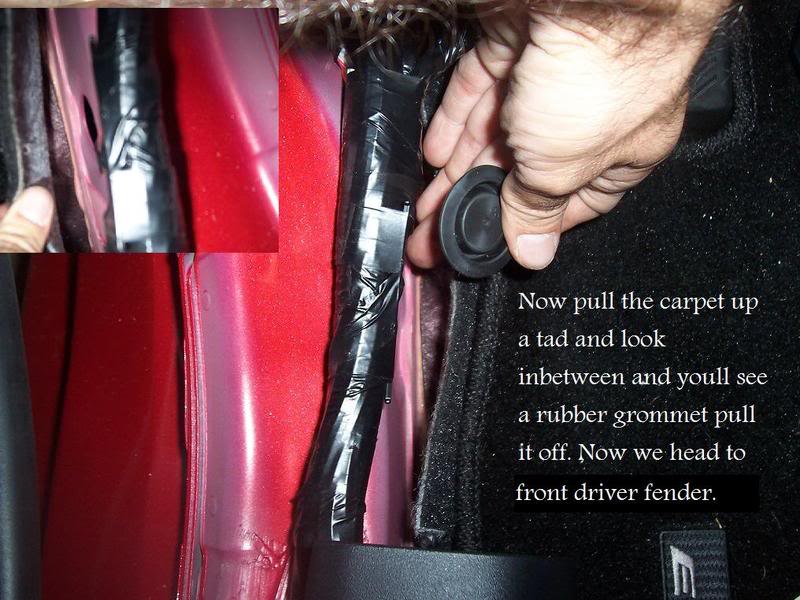
Once that is set and done. Take a closer look by the carpet just about right where the latch and sill trim connect pull up the top carpet piece and you'll find a grommet piece. Pull it off then drill or poke a decent hole don't worry as the rubber will expand and close your holeCaution with this grommet as its much weaker then the fender wall grommets,  Now leave that for now and we head to the fender wall.
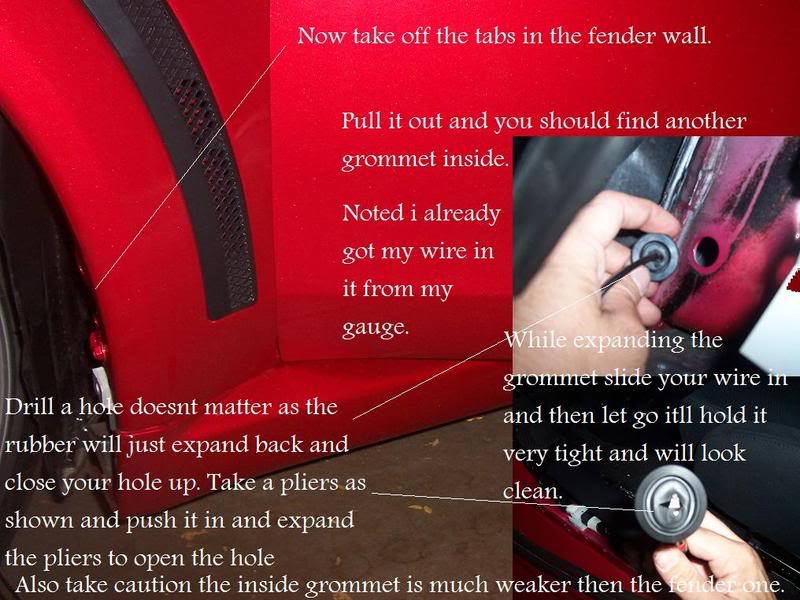
Now this isn't to hard just take off the tabs on the fender wall. a flathead usually does the trick. Pull it out a bit and take a peak in and you'll notice another black grommet. Pull that out drill a hole same thing will happen with expansion but you just take a pliers expand the hole run the wire through then let it expand back and it'll hold it nice and tight. Now run the wire through the grommet and give a good amount to reach your gauge.
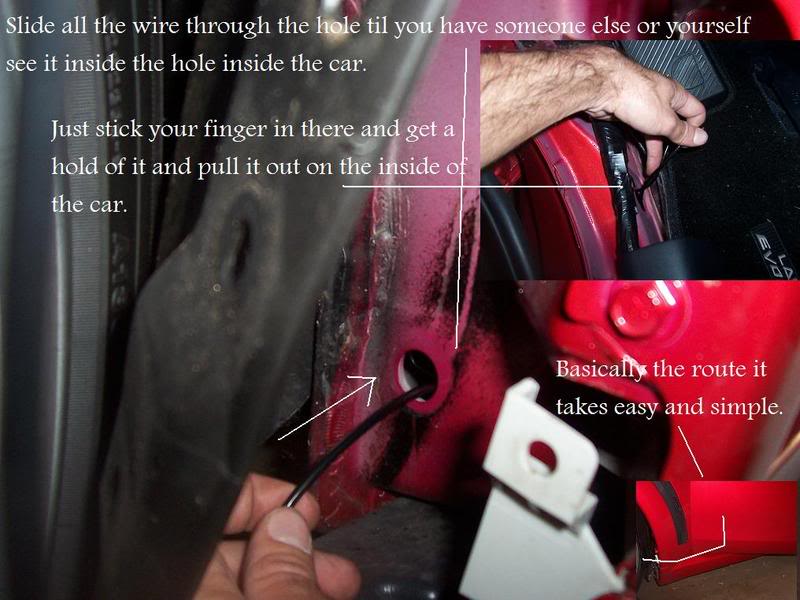
Run the wire through the hole til it reaches the other side and pull it out.
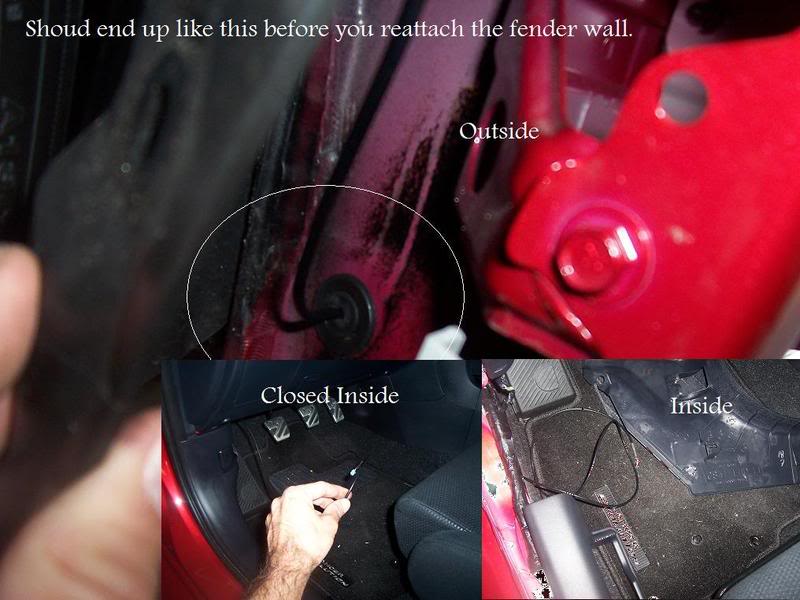
Then should end up looking like this.
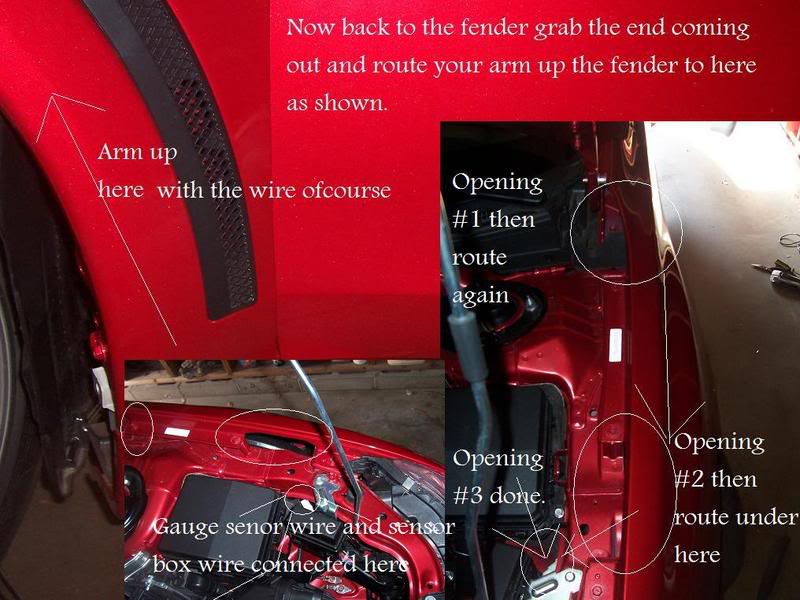
Now for the last part this is how i did it keeping the fender wall open. take the other side of the sensor wire and route it up the fender and up-to the hinge right by the hood. Then get up there and route again in the fender til you reach in-front of the fuse box. Then again just route it under that last piece and should look like this.
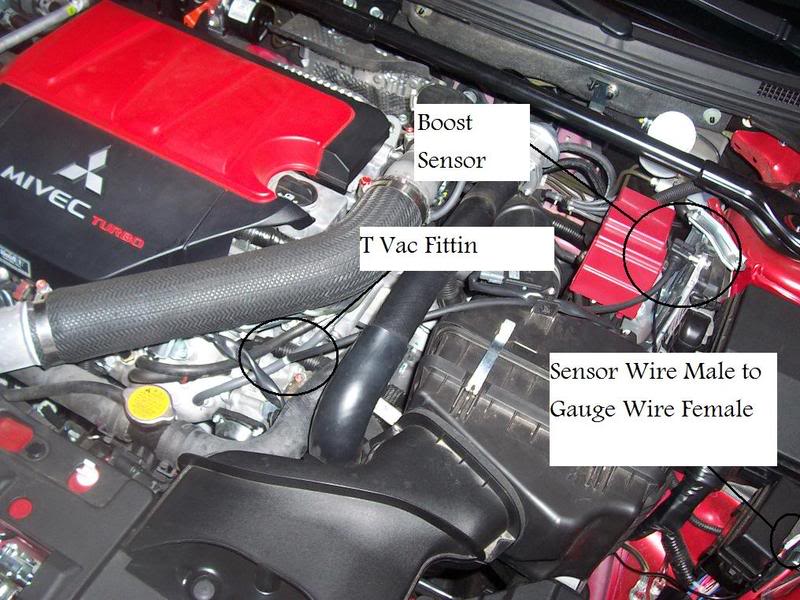
Cut the vac tube about right in the middle then use the T Joint with the horizontal fittings reconnect the hose back then use the last fitting thats perpendicular facing attach to the vac tube going to the sensor, Also i prob would get some clamps or zip-tie to hold it just because, although Defis T Joints are Expanded at the tips to hold the tube pretty damn good its already pretty tight, but you just spent $35k whats a dollar or two.
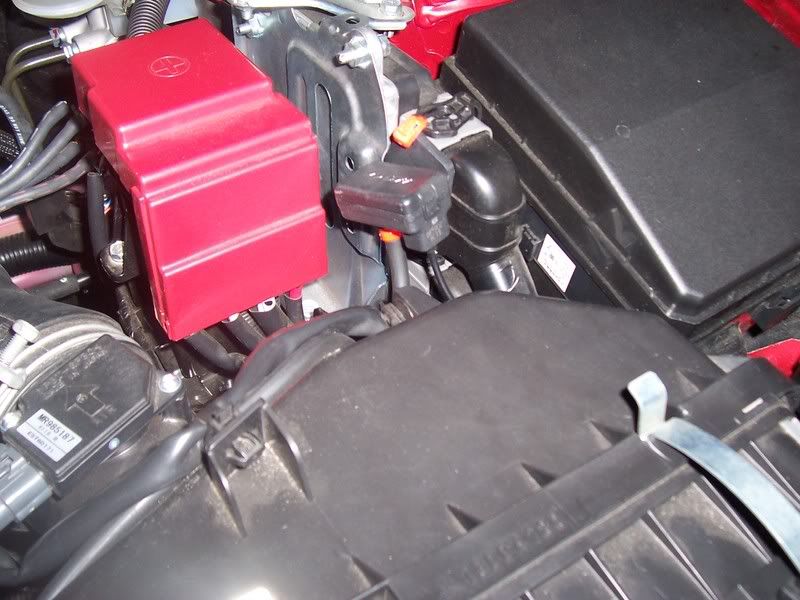
End engine result and i just put the sensor in-between to keep it there til i find a good place to mount it.
*Updated My Location For Sensor w/ red ziptie (camlight made it orange bleh)*
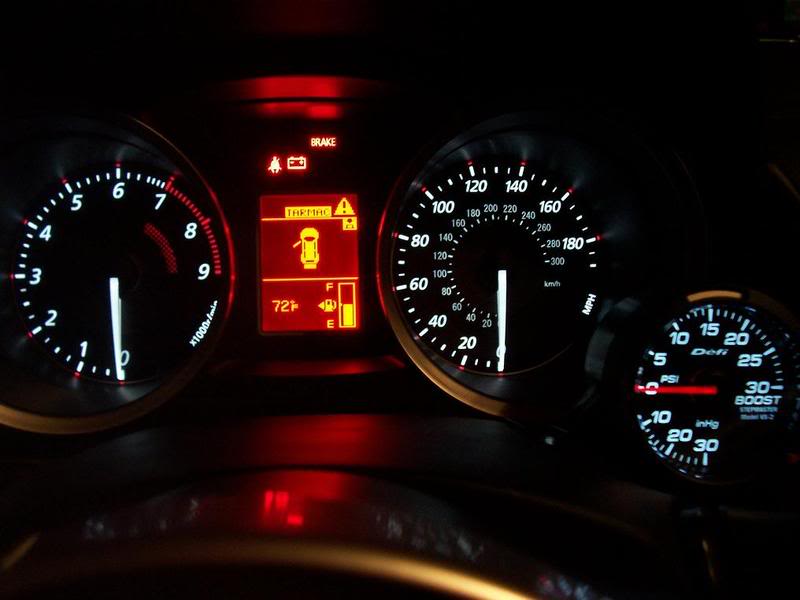
End result. This pic shows with white wire not used. As you can see its pretty bright, compared to the gauge cluster

This pic shows with white wire used. For some reason the camera registers this as blue color It is not blue at all trust me, just a camera reaction to dimmed colors
Movie clip with white wire not used.
Movie clip with white wire used. Its not blue the camera just for some reasons turns the color blue as it cannot register the color when its dimmed

Enjoy 
The unit ill be installing is a Defi White Racer Gauge Standalone Requires No Control Unit, purchase of this gauge comes with everything needed to finish this install
WARNING : DEFI UNIT COMES WITH A LONG WIRING HARNESS OTHER GAUGES MIGHT NOT BEABLE TO ACCOMPLISH THIS ROUTE BASED ON WIRING LENGTH
Now just about everything is explained in the pictures for ease.
First off open the cover under the ADC control panel and you'll see the fuses i used. Just take out the fuse, wire cut and expose some wire and tap into the fuse slot just by inserting the exposed wire into it then put the fuse back in.Unfortunately Ive had no luck with the front fuse box to create a switch illumination so it turns on by headlights. So either have it dimmed using the white wire, or if you want it brighter don't use the white wire at all
Now in the same spot start taking off the trim, but first pull a section of the weather stripping off to make this easier don't worry it'll go right back on just remember how it was when you took it off as some of the flaps on the weather stripping belongs under the trim.First start with the hood latch trip and pull it til its somewhat lose then the door sill trim just pull it up it should release. Then as the pic shows what direction and where the holders are located.
Once that is set and done. Take a closer look by the carpet just about right where the latch and sill trim connect pull up the top carpet piece and you'll find a grommet piece.
Pull it off then drill or poke a decent hole don't worry as the rubber will expand and close your holeCaution with this grommet as its much weaker then the fender wall grommets, Now leave that for now and we head to the fender wall.Now this isn't to hard just take off the tabs on the fender wall. a flathead usually does the trick. Pull it out a bit and take a peak in and you'll notice another black grommet. Pull that out drill a hole same thing will happen with expansion but you just take a pliers expand the hole run the wire through then let it expand back and it'll hold it nice and tight. Now run the wire through the grommet and give a good amount to reach your gauge.
Run the wire through the hole til it reaches the other side and pull it out.
Then should end up looking like this.
Now for the last part this is how i did it keeping the fender wall open. take the other side of the sensor wire and route it up the fender and up-to the hinge right by the hood. Then get up there and route again in the fender til you reach in-front of the fuse box. Then again just route it under that last piece and should look like this.
Cut the vac tube about right in the middle then use the T Joint with the horizontal fittings reconnect the hose back then use the last fitting thats perpendicular facing attach to the vac tube going to the sensor, Also i prob would get some clamps or zip-tie to hold it just because, although Defis T Joints are Expanded at the tips to hold the tube pretty damn good its already pretty tight, but you just spent $35k whats a dollar or two.
End engine result and i just put the sensor in-between to keep it there til i find a good place to mount it.
*Updated My Location For Sensor w/ red ziptie (camlight made it orange bleh)*
End result. This pic shows with white wire not used. As you can see its pretty bright, compared to the gauge cluster
This pic shows with white wire used. For some reason the camera registers this as blue color It is not blue at all trust me, just a camera reaction to dimmed colors
Movie clip with white wire not used.
Movie clip with white wire used. Its not blue the camera just for some reasons turns the color blue as it cannot register the color when its dimmed
Enjoy
Last edited by ZWingerRyRy; Apr 25, 2011 at 12:45 PM. Reason: Reloading Pics
 Oct 11, 2008, 04:18 PM
#5
Evolving Member
Thread Starter
iTrader: (5)
Join Date: Mar 2007
Location: Minnesota
Posts: 283
Likes: 0
Received 0 Likes
on
0 Posts
Change that i used Loctite Power Grab 6lb holding tape, cut it in pieces to make the Defi podstand points. Worked very nice tape wasnt bulky like some peoples tape they used this is also clear tape. So no sight of the tape usder the pod holds really nice i tried moving it with a lil force and drove around bumpy areas no movement at all. This tape is resistant to all weather conditions.
Last edited by ZWingerRyRy; Oct 11, 2008 at 05:06 PM. Reason: Worked
Oct 11, 2008, 05:45 PM
#7
Evolving Member
Thread Starter
iTrader: (5)
Join Date: Mar 2007
Location: Minnesota
Posts: 283
Likes: 0
Received 0 Likes
on
0 Posts
Ah, well ive just searched most DIY forums on this and not many had very clean routes, either involved going through the firewall, vents, or just wires hanging out, and etc.. The trim pieces are pretty cheapy stuff they just pop right off and the whole install i could do in 10 mins at most. It also works for both sides of the car. Just was offering some clean installs.
Trending Topics
Oct 11, 2008, 06:01 PM
#8
Newbie
iTrader: (1)
Join Date: Sep 2008
Location: Tallahassee, but currently reside @ Camp LeJeune
Posts: 96
Likes: 0
Received 0 Likes
on
0 Posts
i just ran a very small wire from the boost controller through the stearing wheel well to the light switch with a clamp connector
Oct 11, 2008, 06:04 PM
#10
Newbie
iTrader: (1)
Join Date: Sep 2008
Location: Tallahassee, but currently reside @ Camp LeJeune
Posts: 96
Likes: 0
Received 0 Likes
on
0 Posts
im not downing you or anything it just seems like you went the long route on this, i brought my boost tube right through that rubber grommet behind the steering wheel, small puncture self sealing no mess or anything very clean and a straight line from the t,lol
Last edited by RREvoX08; Oct 11, 2008 at 06:35 PM.
Oct 11, 2008, 06:46 PM
#12
Evolving Member
Thread Starter
iTrader: (5)
Join Date: Mar 2007
Location: Minnesota
Posts: 283
Likes: 0
Received 0 Likes
on
0 Posts


