Intake Manifold Removal and Install
 Dec 28, 2010, 03:16 PM
#1
Intake Manifold Removal and Install
Please Read all instructions Start to finish at least once before attempting to remove your intake manifold. I am writing this entirely from memory so if i have missed something please let me know and i will update it. Also I am not responsible for any damage to anything as a result of someone following this guide...
Tools
10mm 12mm 14mm many lengths and drives
3/8s and 1/2 drive ratchets
A good Reliable torque wrench
3'' 6'' and 10 or 12'' extension
regular multi-tool pliers
decent pair of cutters (I used wire cutters)
First of all... Start by Popping the hood. Obvious I know...
Next. remove the battery, the strut tower bar, the air box, and UICP. this clears enough room to work and gives you an area to move other items out of the way.
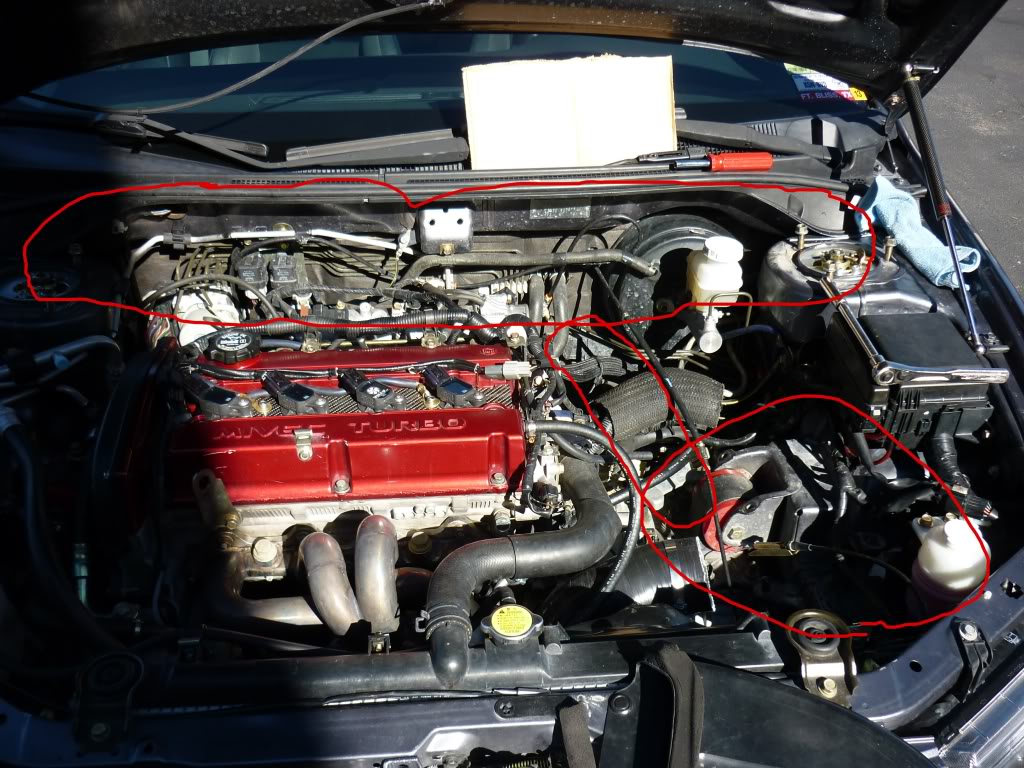
next disconnect the injectors egr solenoids fuel pressure solenoids bolt TB sensors and the MAP sensor. then unbolt the wiring harness from the intake and the valve cover. pulling it toward the opening where the battery sat before. Youll have to disconnect several of the vacuum lines to clear it.
next remove the rest of the vacuum lines. the 2 on the Throttle body. the brake boost, the fuel pressure reg and boost gauge, also remove the 2 10mm bolts securing the throttle cable to the intake and remove the cable from the throttle body once its unbolted... also unbolt the intake ground cable, again its a 10mm bolt.
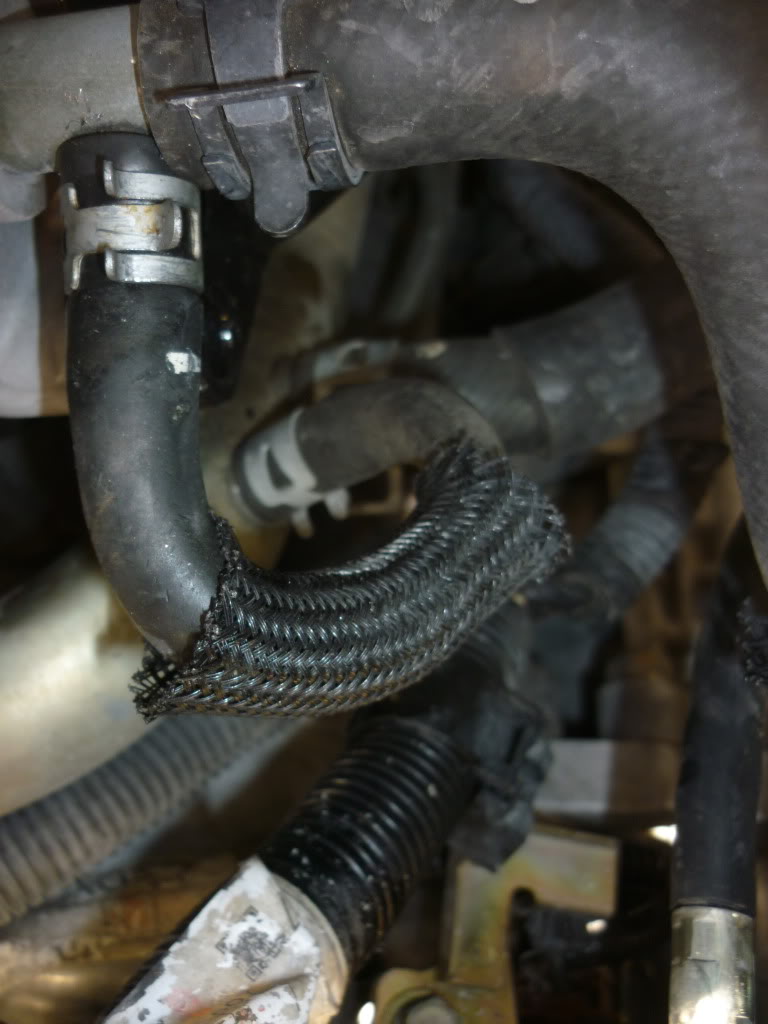
next remove the Throttle body. you have to remove the two coolant lines. you can use a old spark plug to plug these lines or you can loop the lower line onto the hard line of the upper line and have the coolant bypass the TB all together... remove the 4 12mm bolts and set the TB somewhere safe.

then the rear engine hoist bracket has 1 12mm and 1 14mm bolt securing it.
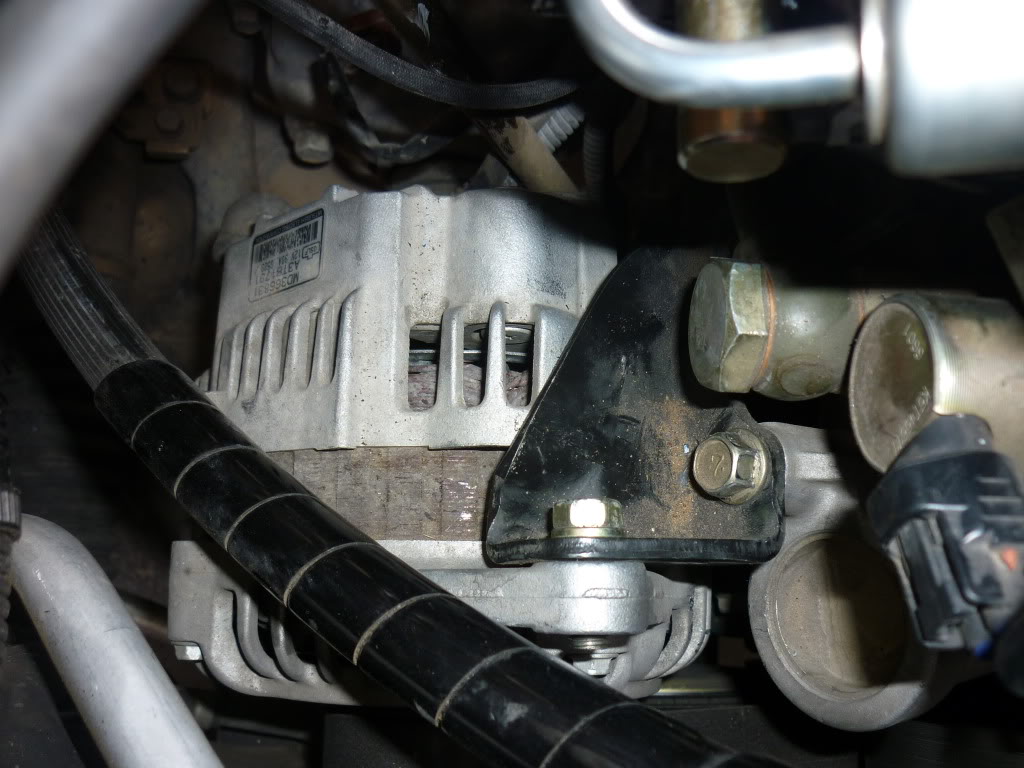
next on the passenger side under the Intake remove the alternator support bracket 1 12mm bolt secures it to the intake and 2 12mm bolts connect it to the alternator and water pump...
there is a 12mm bolt connecting the oil dipstick to the intake. remove that
Now that everything is clear remove the 2 12mm bolts from the fuel rail. gently lift up and slide the two black spacers from under the fuel rail. they are a PITA to find once lost. if you do however http://www.streettunedmotorsports.co...il_spacers.htm
Rerouted coolant lines
now pull the fuel rail into the space where the battery was. i then took a bowl and held the last injector over it. i pulled the 4th injector and drained the fuel to keep from making a mess. once it starts flowing pull the 1st injector to help it flow...
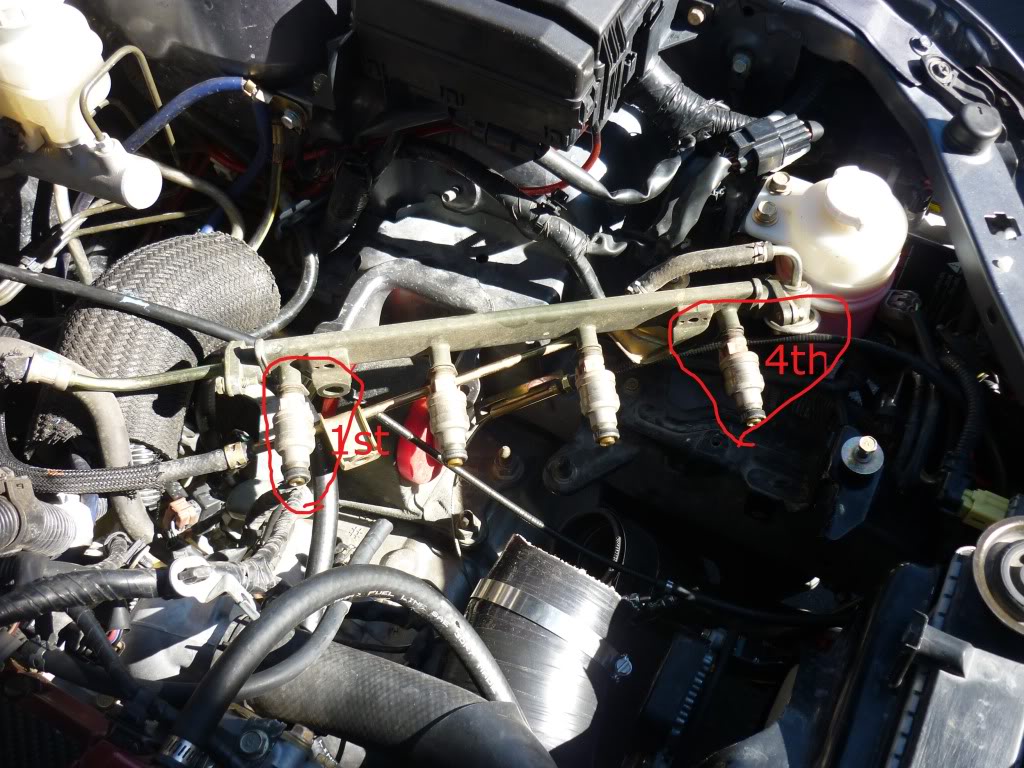
now remove the other two injectors place all four in the bowl and place it somewhere safe...
finally there are two 14mm bolts on the underside of the intake bolting it to a support bracket. there should now be enough room to maneuver the 1/2driver ratchet in and brake them loose.
now with all the bs out of the way the intake should be clear for removal. total there are 3 14mm and 7 12mm bolts securing it to the head. 1 14mm bolt and 1 12mm were removed with the alternator and engine hoist brackets. the top bolts are easy to remove. i used the 12mm wrench with a 3/4in wrench as a breaker to break them free and fingered them out. the 14mm is a PITA and was torqued tight i used the 1/2 drive 14mm to remove it. the bottom has 1 14mm that's behind the coolant lines by the TB again high torque for the lower 12mm bolts i had to use a 3 and 6'' ext. with a shallow 12mm socket to remove them if you are like me and have the flexibility of a Chinese gymnast these become no problem. reach between the block and the intake support and guide the socket in. then untorque. if you drop any of these bolts have no fear removing the intake leaves almost no place for them to hide on the cross member.
now finagle the intake manifold out from behind the head. be gentle two of the 14mm bolts are studs that are left in the head and if you are using the intake for a core or doing and R&R then you don't want to damage the delicate vacuum fittings
Now is a good time to remove the EGR equipment if you intend too and plug the egr port in the head. https://www.evolutionm.net/forums/ev...-canister.html
I also installed the Phenolic spacer and rerouted the TB coolant line.
Now to reinstall the intake and torque the bolts to these specs.
Intake manifold
Air control valve bracket bolt 23 � 4 (17 � 2 ft-lb)
Bracket bolt 11 � 1 (98 � 8 in-lb)
Engine hanger bolt 22 � 4 (17 � 2 ft-lb)
Intake manifold bolt M8 20 � 2 (15 � 1 ft-lb)
Intake manifold bolt, nut M10 36 � 6 (26 � 4 ft-lb)
Intake manifold stay bolt 31 � 3 (23 � 2 ft-lb)
MAP sensor bolt 5.0 � 1.0 (45 � 8 in-lb)
be sure no to over tighten them by to much if at all... since everything is aluminum it is easy to strip the threads. if you plugged the egr port you may have noticed how soft the metal is...
after the intake is torqued to spec install the rest of the items in reverse
to help realign the alternator bracket i used the box end of my 3/4 wrench to pry against the water pump while i threaded the 12mm bolt back in..
I didn't bolt the intake back to the support bracket but left the bracket installed without issue so far. total including removal of the EVAP and EGR systems and plug in the EGR port in the head it took me just over 4 hours start to finish. Just be careful and take your time. if you rush and lose something then your EVO wont run for a lot long then if you'd taken your time and paid attention.
Tools
10mm 12mm 14mm many lengths and drives
3/8s and 1/2 drive ratchets
A good Reliable torque wrench
3'' 6'' and 10 or 12'' extension
regular multi-tool pliers
decent pair of cutters (I used wire cutters)
First of all... Start by Popping the hood. Obvious I know...
Next. remove the battery, the strut tower bar, the air box, and UICP. this clears enough room to work and gives you an area to move other items out of the way.
next disconnect the injectors egr solenoids fuel pressure solenoids bolt TB sensors and the MAP sensor. then unbolt the wiring harness from the intake and the valve cover. pulling it toward the opening where the battery sat before. Youll have to disconnect several of the vacuum lines to clear it.
next remove the rest of the vacuum lines. the 2 on the Throttle body. the brake boost, the fuel pressure reg and boost gauge, also remove the 2 10mm bolts securing the throttle cable to the intake and remove the cable from the throttle body once its unbolted... also unbolt the intake ground cable, again its a 10mm bolt.
next remove the Throttle body. you have to remove the two coolant lines. you can use a old spark plug to plug these lines or you can loop the lower line onto the hard line of the upper line and have the coolant bypass the TB all together... remove the 4 12mm bolts and set the TB somewhere safe.
then the rear engine hoist bracket has 1 12mm and 1 14mm bolt securing it.
next on the passenger side under the Intake remove the alternator support bracket 1 12mm bolt secures it to the intake and 2 12mm bolts connect it to the alternator and water pump...
there is a 12mm bolt connecting the oil dipstick to the intake. remove that
Now that everything is clear remove the 2 12mm bolts from the fuel rail. gently lift up and slide the two black spacers from under the fuel rail. they are a PITA to find once lost. if you do however http://www.streettunedmotorsports.co...il_spacers.htm
Rerouted coolant lines
now pull the fuel rail into the space where the battery was. i then took a bowl and held the last injector over it. i pulled the 4th injector and drained the fuel to keep from making a mess. once it starts flowing pull the 1st injector to help it flow...
now remove the other two injectors place all four in the bowl and place it somewhere safe...
finally there are two 14mm bolts on the underside of the intake bolting it to a support bracket. there should now be enough room to maneuver the 1/2driver ratchet in and brake them loose.
now with all the bs out of the way the intake should be clear for removal. total there are 3 14mm and 7 12mm bolts securing it to the head. 1 14mm bolt and 1 12mm were removed with the alternator and engine hoist brackets. the top bolts are easy to remove. i used the 12mm wrench with a 3/4in wrench as a breaker to break them free and fingered them out. the 14mm is a PITA and was torqued tight i used the 1/2 drive 14mm to remove it. the bottom has 1 14mm that's behind the coolant lines by the TB again high torque for the lower 12mm bolts i had to use a 3 and 6'' ext. with a shallow 12mm socket to remove them if you are like me and have the flexibility of a Chinese gymnast these become no problem. reach between the block and the intake support and guide the socket in. then untorque. if you drop any of these bolts have no fear removing the intake leaves almost no place for them to hide on the cross member.
now finagle the intake manifold out from behind the head. be gentle two of the 14mm bolts are studs that are left in the head and if you are using the intake for a core or doing and R&R then you don't want to damage the delicate vacuum fittings
Now is a good time to remove the EGR equipment if you intend too and plug the egr port in the head. https://www.evolutionm.net/forums/ev...-canister.html
I also installed the Phenolic spacer and rerouted the TB coolant line.
Now to reinstall the intake and torque the bolts to these specs.
Intake manifold
Air control valve bracket bolt 23 � 4 (17 � 2 ft-lb)
Bracket bolt 11 � 1 (98 � 8 in-lb)
Engine hanger bolt 22 � 4 (17 � 2 ft-lb)
Intake manifold bolt M8 20 � 2 (15 � 1 ft-lb)
Intake manifold bolt, nut M10 36 � 6 (26 � 4 ft-lb)
Intake manifold stay bolt 31 � 3 (23 � 2 ft-lb)
MAP sensor bolt 5.0 � 1.0 (45 � 8 in-lb)
be sure no to over tighten them by to much if at all... since everything is aluminum it is easy to strip the threads. if you plugged the egr port you may have noticed how soft the metal is...
after the intake is torqued to spec install the rest of the items in reverse
to help realign the alternator bracket i used the box end of my 3/4 wrench to pry against the water pump while i threaded the 12mm bolt back in..
I didn't bolt the intake back to the support bracket but left the bracket installed without issue so far. total including removal of the EVAP and EGR systems and plug in the EGR port in the head it took me just over 4 hours start to finish. Just be careful and take your time. if you rush and lose something then your EVO wont run for a lot long then if you'd taken your time and paid attention.
Last edited by joseph143; Jan 7, 2011 at 06:58 PM.


Trending Topics
Aug 27, 2013, 06:32 AM
#12
Its really not that bad so I wouldnt worry about it. Removing all the vacuum lines and sensors is cake. The only tricky part is getting off that infamous bracket and snaking your arms down under the IM to break loose some of those bolts that secure the IM flange to the head.
I've taken it off a couple times now and I will say that it takes a little bit the first time around but now that I know how to gain access its went significantly quicker the second time.
I've taken it off a couple times now and I will say that it takes a little bit the first time around but now that I know how to gain access its went significantly quicker the second time.
Feb 19, 2014, 07:42 AM
#14
Evolved Member
iTrader: (10)
Join Date: Mar 2013
Location: Chicago
Posts: 890
Likes: 0
Received 0 Likes
on
0 Posts
Aren't those gaskets like $11? Why would you want to reuse it? I'm pretty sure the way it was explained to me is the gasket works like a crush washer on your drain plug so once its used you can't re-crush it down again. I know for a fact the throttle body gaskets is similar and should not be reused.

Thread
Thread Starter
Forum
Replies
Last Post
fostytou
Evo How To Requests / Questions / Tips
338
Nov 10, 2023 11:55 AM
anthonypazsd
Evo How Tos / Installations
1
Jan 31, 2010 03:01 AM