DIY billet oil catch can for about $20
 Mar 7, 2007, 01:49 PM
#1
DIY billet oil catch can for about $20
I first tried this project in the fall of 2006 and have been using it since, testing it, and trying different configurations of it before I shared it. I wasn’t sure if it was going to work, but after 4-6 months of use from mostly daily driving/commuting and some hard driving, I can attest to the fact that is does in fact work very well. My engine seems to be in great running condition but the can has still separated what I would guess to be at least a tablespoon of oil from blow-by. I cannot be exactly sure of this amount though, because some of the oil separated may still be clinging to the baffle material and inside of the tank, and in addition, my dyslexic @$$ left the petcock open, letting the oil it trapped drip out. D’oh! Oh well, it’s better than having it go into the intake, so I’m not too mad
I did this project because I wanted to keep oil out of my intake tract but wasn’t very eager to spend $90-150 on a big brand name oil catch can. In addition, despite their high price tags, many of these tanks didn't even have any type of baffle material inside them, limiting their effectiveness. I also wanted something other than the common PVC or air compressor filter/valve ones many people make. While these can work just fine, I wanted something nicer without spending much, if any, more. Cheap (under $50), effective, and nice looking were my requirements.
After searching around for inexpensive universal tanks, I found this:
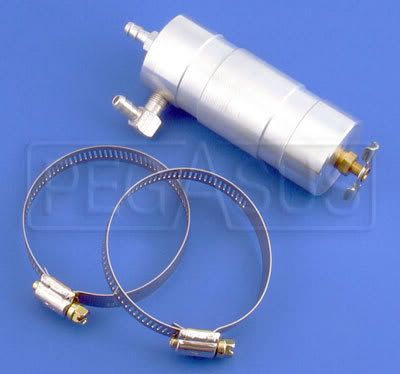
http://www.pegasusautoracing.com/pro...asp?RecId=4703. (Pegasus Racing Part Number 9847) This tank includes �” fittings and about two feet of 5/16” hose, as well as some worm drive clamps.
It does not come with any baffle/element material inside, and there was no ready way to disassemble the tank itself to install any, and the fittings are rather close together at the top of the can (something even manufacturers of most of the expensive tanks don’t take into consideration either). But I had an idea for a baffle solution and the price and dimensions (5.5 x 1.75” and less than half a pound) were exactly what I was looking for.
You will need:
Pegasus Racing Catch Can (Part Number 9847)- $15.49
About 4 feet of 7.9mm fuel/emissions hose (or more depending where you want to mount your tank. I personally believe it is best to mount it as low and close as possible. This is the diameter you will need instead of the supplied hose)- $4.76
One new, clean stainless scouring pad (NOT steel wool! The kind with the big coarse strips)- $1.25
here is a link to kind of what I used, close enough:
http://images.google.com/imgres?imgu...%3Den%26sa%3DG
11mm wrench or the closest English equivalent
Narrow Teflon tape
Some robust cable ties or small clamps for the hoses
I also used four worm drive clamps for $1.99 because the included ones were too big for my liking.
You may need a couple of dollars worth of random bits from a hardware store depending on how you want to mount yours. I used a $.65 shelving bracket and a nut and bolt I had lying around to mount it where I did.
About 1.5-3 hours to assemble and install it
DISCLAIMER- Any modifications you perform to your vehicle, including this one are done at your own risk. I am in no way responsible for any injury, damage, legal trouble, or other negative effects as a result of you trying this mod on your or anyone else’s car. That being said, this is a pretty safe and effective mod to do unless you royally screw up.
1. Put the baffle material inside the can. You will use the stainless material of the scouring pad as baffle. The idea is that as the blow-by vapor passes through the baffle, it will condensate and catch on the baffle, separating it from the blow-by as it passes back into the intake tract. Grab a refreshing beverage of your choice and sit down and watch some TV or something while you do this because this step is tedious and boring. Take your stainless scouring pad and pull until you unravel a bit and begin stuffing it into the can through one of the holes in the end of it. Stuff it in one continuous piece. I used about half a scouring bad as baffle until it was packed inside the can pretty densely. I then neatly snipped off the excess and pushed whatever was sticking out or close to the opening in with a small pen. It took me about 30 minutes of leisurely stuffing while watching Comedy Central to fill the can with baffle material. Don’t cut or tear or grind the baffle material etc. as you put it into the can, as you don’t want to create any metal particles. sorry I didn't take pics of this part, but it's pretty self-explanitory.
2. Wrap all the thread fittings with Teflon tape. I found about 3 layers to be sufficient
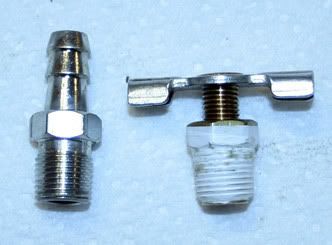
3. Assemble the fittings as shown in the pic. Make sure they are really nice and snug.
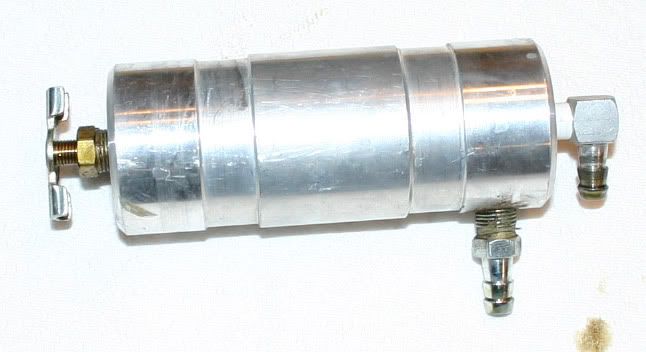
(shown here with the petcock CLOSED. This is just mockup assembly hence not every fitting is teflon taped. Make sure yours are or they WILL leak oil!)
4. Disconnect your battery.
5. Figure out where and how you want to mount the can. I chose to mount it on the intercooler pipe support bracket where it bolts up to the airbox support bracket. I used a srtight pice of metal with holes in it and a bolt to secure it to the bracket, then secured the cn to this post using the worm drive clamps.There are several other options, especially if you have an aftermarket intake.
6. Mount your can!
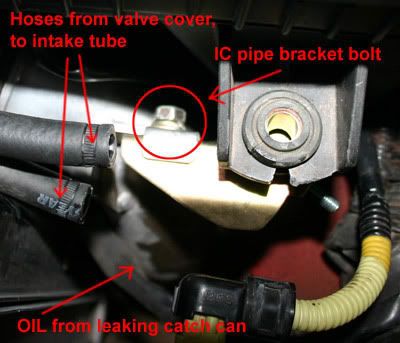
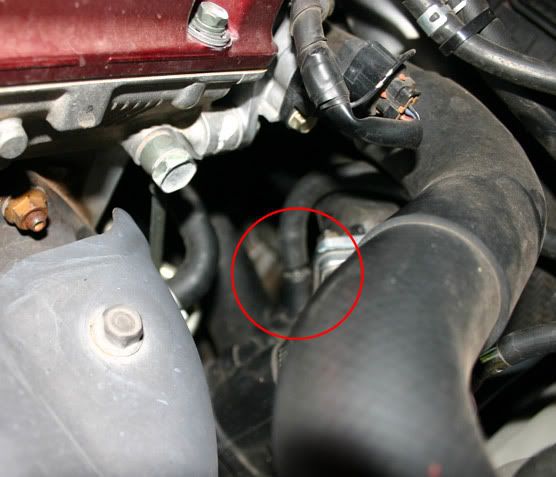
7. Remove the intake tube end of the vacuum line from your valve cover. In my case this was sufficient length to reach the can where I mounted it. If not, cut off an appropriate length of fuel/emissions hose and connect the vent valve on the valve cover to the top fitting on the tank.
8. Use the rest of the hose to connect the fitting on the side of the can to the bung/fitting on the intake tube.
9. Clamp or ziptie/cable tie the ends of the hoses secure.
please excuse the embarassingly filthy engine bay. It's always dusty here in NM and being winter with lots of vents into the engine bay= gets filthy
Don't mind the weaksauce cable ties on the hoses. All my beefy ones were busy holding the front end of my roommate's Lagacy together
shown here with an aftermarket intake. Looks pretty good!
10. Make sure the petcock is CLOSED, i.e. the threaded butterfly knob is fully EXTENDED. It is reverse threaded, so be sure it isn’t going to leak like mine did (see above pic) when I forgot to close it. If you do leave it open, you'll know for sure when it's working! you can see the oil where it leaked onto the IC pipe below the can in the pic above
11. Reconnect your battery. Reset clock and radio stations if necessary.
12. Admire how nice your new shiny aluminum catch can looks cleanly mounted in your engine bay. Looks almost OEM doesn’t it?
13. Bask in the satisfaction of having done something yourself that will prevent your intake tract and turbo from getting all gunked up with oil, all for about $20 and 3 hours or less. Now go for a drive already! Maybe even take yourself and someone out for a treat with all the money you saved on your catch can
*I am in the process of finding an even better way to do this in addition to the stainless steel baffle material. A tube from the top fitting to the bottom of the can, cut off at an angle at the bottom is the best way to ensure that the vapor will need to travel through the most amount of baffle material surface before it reaches the side/exit fitting. In the meantime though, this method is quite effective so I posted it up anyway. If you try this next step, please share your results with us!
I did this project because I wanted to keep oil out of my intake tract but wasn’t very eager to spend $90-150 on a big brand name oil catch can. In addition, despite their high price tags, many of these tanks didn't even have any type of baffle material inside them, limiting their effectiveness. I also wanted something other than the common PVC or air compressor filter/valve ones many people make. While these can work just fine, I wanted something nicer without spending much, if any, more. Cheap (under $50), effective, and nice looking were my requirements.
After searching around for inexpensive universal tanks, I found this:
http://www.pegasusautoracing.com/pro...asp?RecId=4703. (Pegasus Racing Part Number 9847) This tank includes �” fittings and about two feet of 5/16” hose, as well as some worm drive clamps.
It does not come with any baffle/element material inside, and there was no ready way to disassemble the tank itself to install any, and the fittings are rather close together at the top of the can (something even manufacturers of most of the expensive tanks don’t take into consideration either). But I had an idea for a baffle solution and the price and dimensions (5.5 x 1.75” and less than half a pound) were exactly what I was looking for.
You will need:
Pegasus Racing Catch Can (Part Number 9847)- $15.49
About 4 feet of 7.9mm fuel/emissions hose (or more depending where you want to mount your tank. I personally believe it is best to mount it as low and close as possible. This is the diameter you will need instead of the supplied hose)- $4.76
One new, clean stainless scouring pad (NOT steel wool! The kind with the big coarse strips)- $1.25
here is a link to kind of what I used, close enough:
http://images.google.com/imgres?imgu...%3Den%26sa%3DG
11mm wrench or the closest English equivalent
Narrow Teflon tape
Some robust cable ties or small clamps for the hoses
I also used four worm drive clamps for $1.99 because the included ones were too big for my liking.
You may need a couple of dollars worth of random bits from a hardware store depending on how you want to mount yours. I used a $.65 shelving bracket and a nut and bolt I had lying around to mount it where I did.
About 1.5-3 hours to assemble and install it
DISCLAIMER- Any modifications you perform to your vehicle, including this one are done at your own risk. I am in no way responsible for any injury, damage, legal trouble, or other negative effects as a result of you trying this mod on your or anyone else’s car. That being said, this is a pretty safe and effective mod to do unless you royally screw up.
1. Put the baffle material inside the can. You will use the stainless material of the scouring pad as baffle. The idea is that as the blow-by vapor passes through the baffle, it will condensate and catch on the baffle, separating it from the blow-by as it passes back into the intake tract. Grab a refreshing beverage of your choice and sit down and watch some TV or something while you do this because this step is tedious and boring. Take your stainless scouring pad and pull until you unravel a bit and begin stuffing it into the can through one of the holes in the end of it. Stuff it in one continuous piece. I used about half a scouring bad as baffle until it was packed inside the can pretty densely. I then neatly snipped off the excess and pushed whatever was sticking out or close to the opening in with a small pen. It took me about 30 minutes of leisurely stuffing while watching Comedy Central to fill the can with baffle material. Don’t cut or tear or grind the baffle material etc. as you put it into the can, as you don’t want to create any metal particles. sorry I didn't take pics of this part, but it's pretty self-explanitory.
2. Wrap all the thread fittings with Teflon tape. I found about 3 layers to be sufficient
3. Assemble the fittings as shown in the pic. Make sure they are really nice and snug.
(shown here with the petcock CLOSED. This is just mockup assembly hence not every fitting is teflon taped. Make sure yours are or they WILL leak oil!)
4. Disconnect your battery.
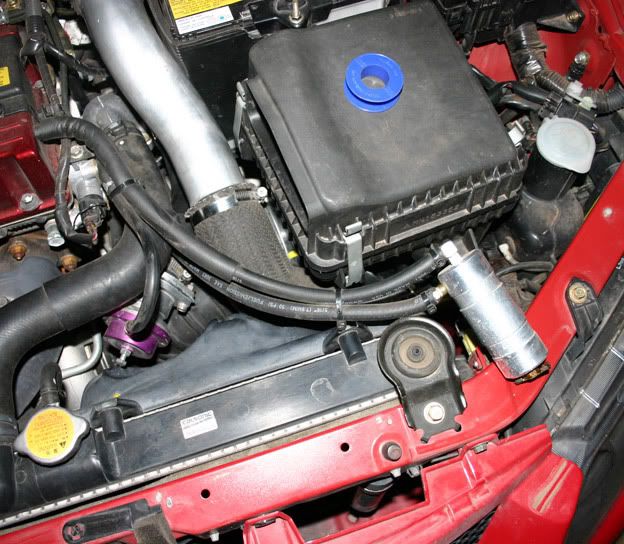
5. Figure out where and how you want to mount the can. I chose to mount it on the intercooler pipe support bracket where it bolts up to the airbox support bracket. I used a srtight pice of metal with holes in it and a bolt to secure it to the bracket, then secured the cn to this post using the worm drive clamps.There are several other options, especially if you have an aftermarket intake.
6. Mount your can!
7. Remove the intake tube end of the vacuum line from your valve cover. In my case this was sufficient length to reach the can where I mounted it. If not, cut off an appropriate length of fuel/emissions hose and connect the vent valve on the valve cover to the top fitting on the tank.
8. Use the rest of the hose to connect the fitting on the side of the can to the bung/fitting on the intake tube.
9. Clamp or ziptie/cable tie the ends of the hoses secure.
please excuse the embarassingly filthy engine bay. It's always dusty here in NM and being winter with lots of vents into the engine bay= gets filthy
Don't mind the weaksauce cable ties on the hoses. All my beefy ones were busy holding the front end of my roommate's Lagacy together
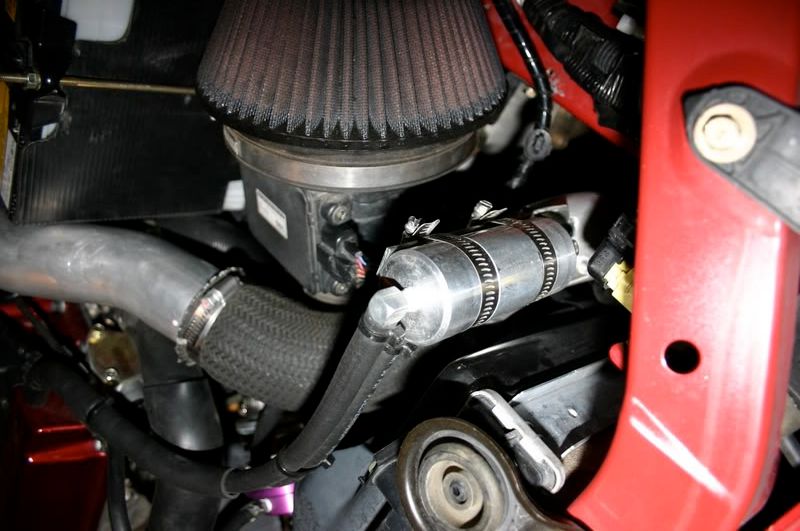
shown here with an aftermarket intake. Looks pretty good!
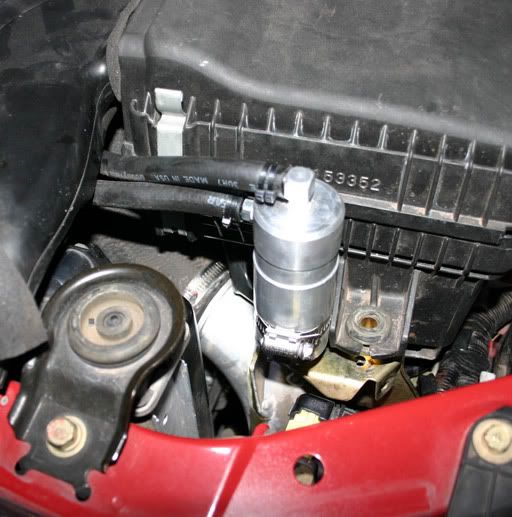
10. Make sure the petcock is CLOSED, i.e. the threaded butterfly knob is fully EXTENDED. It is reverse threaded, so be sure it isn’t going to leak like mine did (see above pic) when I forgot to close it. If you do leave it open, you'll know for sure when it's working!
you can see the oil where it leaked onto the IC pipe below the can in the pic above11. Reconnect your battery. Reset clock and radio stations if necessary.
12. Admire how nice your new shiny aluminum catch can looks cleanly mounted in your engine bay. Looks almost OEM doesn’t it?
13. Bask in the satisfaction of having done something yourself that will prevent your intake tract and turbo from getting all gunked up with oil, all for about $20 and 3 hours or less. Now go for a drive already! Maybe even take yourself and someone out for a treat with all the money you saved on your catch can
*I am in the process of finding an even better way to do this in addition to the stainless steel baffle material. A tube from the top fitting to the bottom of the can, cut off at an angle at the bottom is the best way to ensure that the vapor will need to travel through the most amount of baffle material surface before it reaches the side/exit fitting. In the meantime though, this method is quite effective so I posted it up anyway. If you try this next step, please share your results with us!
Last edited by hokiruu; Mar 15, 2008 at 02:30 AM.
 Mar 8, 2007, 10:11 PM
#2
Evolved Member
iTrader: (26)
Join Date: Nov 2005
Location: San Diego, CA
Posts: 717
Likes: 0
Received 0 Likes
on
0 Posts
This tank looks like all the other ones but for a much cheaper price. Thanks for the link! I think I'm going to give this a try and try to do the setup you were talking about doing next. The one where you hook a hose to the inlet barb on the inside of the tank in order to direct the dirty air to the bottom before it comes back up and through the outlet barb. Heck, I'll order two and try doing a twin catch catch can design!
Last edited by silex; Mar 8, 2007 at 10:48 PM.
 Mar 19, 2007, 08:47 AM
#4
Because it probably works better. Just any tank with two hoses is not necessarily an effective a catch tank, all are not equal. You don't have to use my design, but please don't call it dumb until you have tried and tested something. Please post a pic of the tank you bought, installed.
I'm willing to bet it is uselessly oversized and doesn't have any type of baffle material inside whatsoever, limiting its effectiveness. Many "oil catch tanks" have designes more suitable for coolant overflow, and are still less than ideal for that purpose.
I'm willing to bet it is uselessly oversized and doesn't have any type of baffle material inside whatsoever, limiting its effectiveness. Many "oil catch tanks" have designes more suitable for coolant overflow, and are still less than ideal for that purpose.
Last edited by hokiruu; Mar 19, 2007 at 10:11 AM.
 Mar 19, 2007, 09:58 AM
#6
This tank looks like all the other ones but for a much cheaper price. Thanks for the link! I think I'm going to give this a try and try to do the setup you were talking about doing next. The one where you hook a hose to the inlet barb on the inside of the tank in order to direct the dirty air to the bottom before it comes back up and through the outlet barb. Heck, I'll order two and try doing a twin catch catch can design!
Dual can setups like Saikou-Michi's are effective because they provide sufficient surface area for the oil to condense upon. After traveling through a hose, down a tube inside the chamber, and up through the baffle element, I think that all the significant oil will be collected.
Mar 20, 2007, 10:58 AM
#7
Evolved Member
iTrader: (26)
Join Date: Nov 2005
Location: San Diego, CA
Posts: 717
Likes: 0
Received 0 Likes
on
0 Posts
I will for sure take some pics once I am done with the setup. I believe a dual catch can setup is used for both values coming out of the head, the pcv and breather valve. The more cans the merrier I guess, hehe.
Trending Topics

 Jun 18, 2007, 07:38 PM
#10
Newbie
Join Date: Apr 2006
Location: Brooklyn
Posts: 18
Likes: 0
Received 0 Likes
on
0 Posts
Ok, nice right up but from your pictures and explanation I think you have a missunder standing of how to hook up a catch can. In your pic you are showing the breather valve of the valve cover not the pcv. The pcv is located in the back of the valve cover with a hose going to the intake manifold. The proper way to install a oil catch can would be to run one line from the pcv (in the rear of valve cover) to the catch can, then run the other line from the catch can to the inlet side of the turbo. Then you block off the intake manifold (where the pcv was pluged up). Leaving the breather connected to its origanal place. From the way you have it hooked up in the picture I believe your pcv is block up and the oil is now finding a new way out through your breather. This is just my opinion. But I would sugest you check the pcv (in back of valve cover).
The pcv is a one way check valve for the crankcase. When the car is at idle and not in boost the breather is taken in fresh air into the crankcase and the pcv is letting out the blowby into the intake manifold. Under boost the intake becomes pressurized and the pcv check valve becomes closed and the crankcase cannot let out the blowby. This is why you are seeing oil come out of the breather..
The pcv is a one way check valve for the crankcase. When the car is at idle and not in boost the breather is taken in fresh air into the crankcase and the pcv is letting out the blowby into the intake manifold. Under boost the intake becomes pressurized and the pcv check valve becomes closed and the crankcase cannot let out the blowby. This is why you are seeing oil come out of the breather..
Last edited by Spicy; Jun 18, 2007 at 08:23 PM.
 Jun 19, 2007, 09:15 PM
#13
Newbie
Join Date: Apr 2006
Location: Brooklyn
Posts: 18
Likes: 0
Received 0 Likes
on
0 Posts
The positive crankcase ventilation system exists to relieve positive air pressure from the crankcase. Pressure in the crankcase is created by piston ring blow by and by the up and down motion of the pistons (just as the piston seals the top of the combustion chamber it seals the bottom of the cylinder, pulling air in on the compression and exhaust stroke, pushing air on the intake and power stroke). In order to relieve this pressure, a vacuum pressure sucks the pressure out of the crankcase through the PCV system. If the pressure is not vented piston ring and piston ring land damage can occur from the rings being jostled around as the piston is drawn down towards the crankcase, fighting against the pressure. In a turbo application this system must be modified or it will not work. The problem when a turbocharger is added is that the intake pipe and intake manifold become pressurized. If the fitting on the valve cover is still connected to the pressurized intake pipe it will pressurize the crankcase too. At the same time, the PCV valve will close when pressure is exerted on the top half of the valve, sealing the crankcase. If no modifications are made to the system a pressurized and sealed crankcase will occur when the boost kicks in, this is the worst possible time to have a sealed and pressurized crankcase.
Jun 26, 2007, 08:31 AM
#15
From the way you have it hooked up in the picture I believe your pcv is block up and the oil is now finding a new way out through your breather. This is just my opinion. But I would sugest you check the pcv (in back of valve cover).
The pcv is a one way check valve for the crankcase. When the car is at idle and not in boost the breather is taken in fresh air into the crankcase and the pcv is letting out the blowby into the intake manifold. Under boost the intake becomes pressurized and the pcv check valve becomes closed and the crankcase cannot let out the blowby. This is why you are seeing oil come out of the breather..
The pcv is a one way check valve for the crankcase. When the car is at idle and not in boost the breather is taken in fresh air into the crankcase and the pcv is letting out the blowby into the intake manifold. Under boost the intake becomes pressurized and the pcv check valve becomes closed and the crankcase cannot let out the blowby. This is why you are seeing oil come out of the breather..
Last edited by hokiruu; Jun 26, 2007 at 08:36 AM.