How To Install Laile: Beatrush Undertray Mitsubishi Evolution VII-IX
 Apr 25, 2007, 11:18 AM
#1
Evolved Member
Thread Starter
iTrader: (28)
Join Date: Jun 2003
Location: York, PA 17404
Posts: 587
Likes: 0
Received 0 Likes
on
0 Posts
How To Install Laile: Beatrush Undertray Mitsubishi Evolution VII-IX
How To Install:
Laile: Beatrush Undertray Mitsubishi Evolution VII-IX
Note: This undertray was designed for the Evo IX model but should fit the Evo VII & VIII as well.
Note: This How To is to be used with the factory Japanese Instruction Manual that accompanies the Laile: Beatrush Undertray. Each Step detailed below is numbered in conjunction with the Beatrush Instruction Manual numbered diagrams. It will make sense once you use both of these together.
*Start out by unpacking all of your parts and separating like nuts, bolts, washers and screws. This step will help you out greatly because as you can see all the directions are in Japanese and the parts descriptions are hard to understand�unless you can read Japanese!
Of course the real Step one is to remove your OEM Factory Undertray for all those that need to be told!
Step One (Diagram #2): Install the Four Air Diverters.
Take the Large Front Under Panel and peel off the blue protective backing. You will then install the (4) Air Diverters on this panel. There are (2) Long (one for each side) and (2) Small (Again, one for each side). Take each air diverter and slide them into their proper slots and secure with the proper Allen Head Bolt, Crush Washer and Nut. Make sure you install these on the proper side of the Large panel, because I know someone who installed them on the wrong side and had to redo this step right off the bat! Yes, I am an idiot! Hint: The vents on the panel face down!
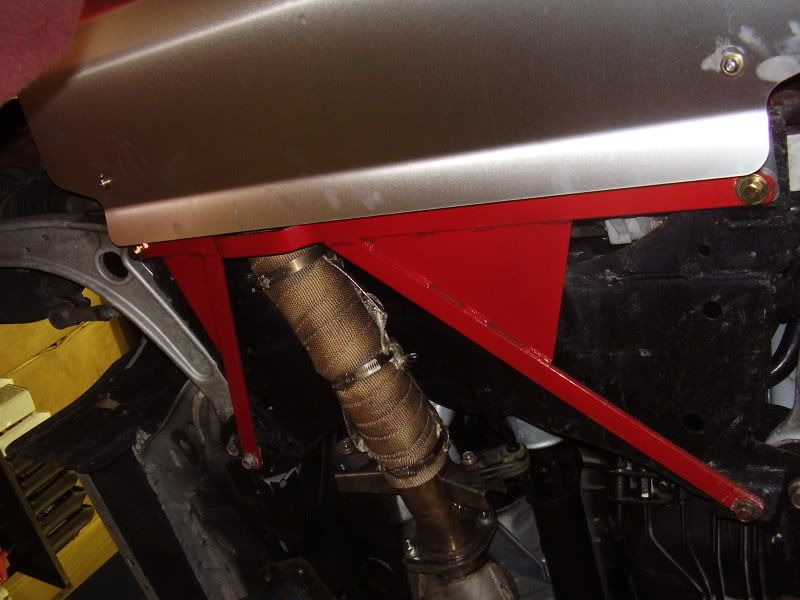
Step Two (Diagram #3): Install Front Tow Hook Surround Bracket, FMIC Tab Extension Bracket, and Lower Arm Bar Extension Brackets.
Remove the OEM Center Plastic Bracket that is directly behind the Front Tow Hook. Replace this Bracket with the aluminum Beatrush Bracket that is supplied with your undertray. Use the proper bolt; crush washer and nuts for this step. The bolts go up from the bottom as detailed in the diagram. The second part of this step is to fasten the Beatrush Extension to the OEM FMIC center undertray tab as well (If you have an aftermarket FMIC you will probably skip this step since most aftermarket FMICs don�t have this tab.) The bolts go up from the bottom as detailed in the diagram. Next remove the 2 large bolts that hold your front OEM or Aftermarket Chassis stiffening bar in place (One on each side). And install the Beatrush Undertray Brackets so that the lower end w/ Welded Nut is facing forward (see Diagram, Bottom of Illustration #3). If you are using an Aftermarket Chassis Lower Arm Bar such as the Beatrush or Cusco and are using spacers install the Beatrush Brackets underneath your spacers so the rear of the tray doesn�t rattle!
Step Three (Diagram #4): Install the Lower Fender Liner Bracket Vents/Extensions for the bottom of the Fender Liners.
Now we will install the Lower Rear Fender Liner Vents/Brackets. Take the (2) �Sandwich Brackets�(One for each side). These brackets have the nuts already welded onto the top of them. And place them on the inside of the bottom fender liner. Line them up with the lower bottom fender liner holes (2). Take the Beatrush Fender Liner Vents/Brackets and peel off the blue protective covering and line them up with the Fender liner holes with the Lower part of this bracket facing the front to the car and bolt them onto the �Sandwich Brackets� The (2) bolts will go up through the bottom of the Beatrush Vent/Liner Extension, through the OEM Fender Liner Holes, into the Nuts that are welded on the Beatrush �Sandwich Brackets�. The Lower Rear Fender Liner Vents/Brackets have nuts welded into the bottoms as well to help secure the Undertray in the next couple of steps. Again, Use the proper bolts and washers for this step.
Step Four (Diagram #5): Install the �Nut Tabs� onto the Rear Second Half of the Beatrush Lower Undertray.
This step is pretty much self-explanatory once you see the diagram. Take the (3) �Nut Tabs� and place them over top of the holes on the rear of the undertray after you have removed the protective blue covering. Make sure to put the tabs on the correct side�Hint: The vents should be facing down. And the �Nut Tabs� should have the nuts on the other side of the panel.
Step Five (Diagram #6): Assemble the �Air Buffers�.
Locate the (2) Rubber Buffers and their Mounting brackets. To assemble these you will take the Mounting Bracket with the Upper Mount facing forward and install the (3) Allen Head Bolts through the Holes in the Bracket. Now take your Rubber Buffer and install it behind the mounting bracket onto the exposed Allen Head Bolts. Take (3) Washers and (3) Nuts and secure them onto the exposed Allen Head Bolts. It should go Allen Head Bolt, Metal, Rubber Buffer, Washer, and finally Nut. Hint: Be careful not to over-tighten the nuts because this will cause the Rubber Buffers to bow out and not remain flat.
Step Six (Diagram #9): Install both the Front and Rear of the Undertray as well as the �Air Buffers�.
Now is the time to install everything that you have just put together. Start by installing the first half of the Beatrush Undertray (Since I had help, I installed everything the way as described, if you only have yourself start in the middle and move forward). Put the first half of the Beatrush Undertray in place and secure the front of the first half with your (8) OEM Black Plastic Fasteners, which you took off when you removed the OEM Undertray. Next take the proper Allen Head Bolts, Crush Washers and Regular Washers and securely fasten the center of the first half of the Beatrush Undertray to the Beatrush Bracket, which is located behind the front tow hook. After you have done that take your (2) �Air Buffers� and place them in their proper positions in front of the wheels and take the proper Allen Head Bolts, Crush Washers and Regular Washers and securely fasten them to the Beatrush Fender Liner Vents/Brackets (It should go Bolts, Crush Washer, Washer, Rubber Buffer Bracket, Undertray, and then the Fender Liner Vents/Brackets�See Diagram #9!) Now Attach the Rear of the Undertray. Using the proper Allen Head Bolts, Crush Washers and Washers (Again, see Diagram #9 if you have any confusion).
Step Seven (Diagram #10): Install Beatrush Undertray Front Tow Hook Cover.
You are almost finished, locate the Tow Hook Cover. Remove the blue protective covering. Locate the (4) Screws and install the Tow Hook Cover. You have now finished the Beatrush Undertray Installation. Enjoy.
Thanks Very Much to Kami Speed for the Beatrush Undertray and to CBRD for allowing me to use their lift to install this sexy work of art.
I will take some detailed pictures when CBRD installs theirs.


Laile: Beatrush Undertray Mitsubishi Evolution VII-IX
Note: This undertray was designed for the Evo IX model but should fit the Evo VII & VIII as well.
Note: This How To is to be used with the factory Japanese Instruction Manual that accompanies the Laile: Beatrush Undertray. Each Step detailed below is numbered in conjunction with the Beatrush Instruction Manual numbered diagrams. It will make sense once you use both of these together.
*Start out by unpacking all of your parts and separating like nuts, bolts, washers and screws. This step will help you out greatly because as you can see all the directions are in Japanese and the parts descriptions are hard to understand�unless you can read Japanese!
Of course the real Step one is to remove your OEM Factory Undertray for all those that need to be told!
Step One (Diagram #2): Install the Four Air Diverters.
Take the Large Front Under Panel and peel off the blue protective backing. You will then install the (4) Air Diverters on this panel. There are (2) Long (one for each side) and (2) Small (Again, one for each side). Take each air diverter and slide them into their proper slots and secure with the proper Allen Head Bolt, Crush Washer and Nut. Make sure you install these on the proper side of the Large panel, because I know someone who installed them on the wrong side and had to redo this step right off the bat! Yes, I am an idiot! Hint: The vents on the panel face down!
Step Two (Diagram #3): Install Front Tow Hook Surround Bracket, FMIC Tab Extension Bracket, and Lower Arm Bar Extension Brackets.
Remove the OEM Center Plastic Bracket that is directly behind the Front Tow Hook. Replace this Bracket with the aluminum Beatrush Bracket that is supplied with your undertray. Use the proper bolt; crush washer and nuts for this step. The bolts go up from the bottom as detailed in the diagram. The second part of this step is to fasten the Beatrush Extension to the OEM FMIC center undertray tab as well (If you have an aftermarket FMIC you will probably skip this step since most aftermarket FMICs don�t have this tab.) The bolts go up from the bottom as detailed in the diagram. Next remove the 2 large bolts that hold your front OEM or Aftermarket Chassis stiffening bar in place (One on each side). And install the Beatrush Undertray Brackets so that the lower end w/ Welded Nut is facing forward (see Diagram, Bottom of Illustration #3). If you are using an Aftermarket Chassis Lower Arm Bar such as the Beatrush or Cusco and are using spacers install the Beatrush Brackets underneath your spacers so the rear of the tray doesn�t rattle!
Step Three (Diagram #4): Install the Lower Fender Liner Bracket Vents/Extensions for the bottom of the Fender Liners.
Now we will install the Lower Rear Fender Liner Vents/Brackets. Take the (2) �Sandwich Brackets�(One for each side). These brackets have the nuts already welded onto the top of them. And place them on the inside of the bottom fender liner. Line them up with the lower bottom fender liner holes (2). Take the Beatrush Fender Liner Vents/Brackets and peel off the blue protective covering and line them up with the Fender liner holes with the Lower part of this bracket facing the front to the car and bolt them onto the �Sandwich Brackets� The (2) bolts will go up through the bottom of the Beatrush Vent/Liner Extension, through the OEM Fender Liner Holes, into the Nuts that are welded on the Beatrush �Sandwich Brackets�. The Lower Rear Fender Liner Vents/Brackets have nuts welded into the bottoms as well to help secure the Undertray in the next couple of steps. Again, Use the proper bolts and washers for this step.
Step Four (Diagram #5): Install the �Nut Tabs� onto the Rear Second Half of the Beatrush Lower Undertray.
This step is pretty much self-explanatory once you see the diagram. Take the (3) �Nut Tabs� and place them over top of the holes on the rear of the undertray after you have removed the protective blue covering. Make sure to put the tabs on the correct side�Hint: The vents should be facing down. And the �Nut Tabs� should have the nuts on the other side of the panel.
Step Five (Diagram #6): Assemble the �Air Buffers�.
Locate the (2) Rubber Buffers and their Mounting brackets. To assemble these you will take the Mounting Bracket with the Upper Mount facing forward and install the (3) Allen Head Bolts through the Holes in the Bracket. Now take your Rubber Buffer and install it behind the mounting bracket onto the exposed Allen Head Bolts. Take (3) Washers and (3) Nuts and secure them onto the exposed Allen Head Bolts. It should go Allen Head Bolt, Metal, Rubber Buffer, Washer, and finally Nut. Hint: Be careful not to over-tighten the nuts because this will cause the Rubber Buffers to bow out and not remain flat.
Step Six (Diagram #9): Install both the Front and Rear of the Undertray as well as the �Air Buffers�.
Now is the time to install everything that you have just put together. Start by installing the first half of the Beatrush Undertray (Since I had help, I installed everything the way as described, if you only have yourself start in the middle and move forward). Put the first half of the Beatrush Undertray in place and secure the front of the first half with your (8) OEM Black Plastic Fasteners, which you took off when you removed the OEM Undertray. Next take the proper Allen Head Bolts, Crush Washers and Regular Washers and securely fasten the center of the first half of the Beatrush Undertray to the Beatrush Bracket, which is located behind the front tow hook. After you have done that take your (2) �Air Buffers� and place them in their proper positions in front of the wheels and take the proper Allen Head Bolts, Crush Washers and Regular Washers and securely fasten them to the Beatrush Fender Liner Vents/Brackets (It should go Bolts, Crush Washer, Washer, Rubber Buffer Bracket, Undertray, and then the Fender Liner Vents/Brackets�See Diagram #9!) Now Attach the Rear of the Undertray. Using the proper Allen Head Bolts, Crush Washers and Washers (Again, see Diagram #9 if you have any confusion).
Step Seven (Diagram #10): Install Beatrush Undertray Front Tow Hook Cover.
You are almost finished, locate the Tow Hook Cover. Remove the blue protective covering. Locate the (4) Screws and install the Tow Hook Cover. You have now finished the Beatrush Undertray Installation. Enjoy.
Thanks Very Much to Kami Speed for the Beatrush Undertray and to CBRD for allowing me to use their lift to install this sexy work of art.
I will take some detailed pictures when CBRD installs theirs.

 Apr 27, 2007, 03:04 PM
#3
Newbie

Join Date: Oct 2005
Location: Ames, IA
Posts: 1
Likes: 0
Received 0 Likes
on
0 Posts
i have the same undertray for my 8 and it fits just fine. I had a little problem having an aftermarket intercooler and trying to get middle screw it. I got rid of the plastic fastners and used bolts to fasten everything down. I did this because i looked under there recently and found half of the plastic fastners missing. They suck so i just replaced them. Overall it fits great and i love having that under my car that the plastic one you get from the factory.
 Apr 30, 2007, 03:49 AM
#7
Newbie

Join Date: Feb 2007
Posts: 6
Likes: 0
Received 0 Likes
on
0 Posts
Hello Faust
I've mounted the same lip, but I miss the three black extension between the lip and the undertray. Did you bought them somewhere, or you made it?
If you made it, do you have some hints how to do it?
Thanks for the reply
Mlocatel
I've mounted the same lip, but I miss the three black extension between the lip and the undertray. Did you bought them somewhere, or you made it?
If you made it, do you have some hints how to do it?
Thanks for the reply
Mlocatel
Trending Topics


 May 1, 2007, 05:21 PM
#14
Evolved Member
Thread Starter
iTrader: (28)
Join Date: Jun 2003
Location: York, PA 17404
Posts: 587
Likes: 0
Received 0 Likes
on
0 Posts
*When you buy the SE lip there are also 2 oem extensions that you need to purchase to match up to your factory underpanel since the SE Lip is a good bit lower then the standard lip. There is nothing to be fabricated they are all OEM parts.
*Yes, you need to re-use the factory plastic rivets for the front of the under panel to the lip connection.
*I have the Ebay Exhaust Downpipe. Clears just fine.
*Hondafan you can have a ride any time you want!
*I have the cusco braces and they fit fine. I stated that in the above how-to:
"Next remove the 2 large bolts that hold your front OEM or Aftermarket Chassis stiffening bar in place (One on each side). And install the Beatrush Undertray Brackets so that the lower end w/ Welded Nut is facing forward (see Diagram, Bottom of Illustration #3). If you are using an Aftermarket Chassis Lower Arm Bar such as the Beatrush or Cusco and are using spacers install the Beatrush Brackets underneath your spacers so the rear of the tray doesn�t rattle!"