YABLT - Yet Another Boost Leak Tester
 Apr 21, 2009, 11:10 PM
#1

YABLT - Yet Another Boost Leak Tester
There's a bunch of threads here on EvoM about boost leak testers. Because variety is the spice of life (or something), this is another one.  I've tried to include as much detail as possible, since a common complaint seems to be that the current tester threads don't include enough detail.
I chose to do my testing using the stock MAS input pipe (as suggested by David Buschur: https://www.evolutionm.net/forums/3665750-post121.html) rather than connecting the tester to the turbo compressor housing (see mpspilot's great writeup on that at https://www.evolutionm.net/forums/ev...er-5-02-a.html). This approach worked for me, and avoided having to jam my meaty paws down past the radiator fan to the turbo.
Anyway, step 1 is to make like Chuck Yeager and get the right stuff:

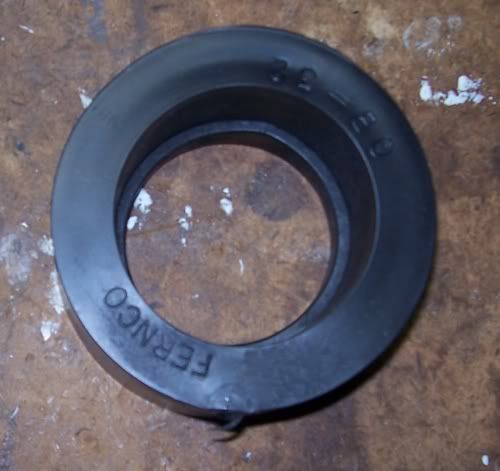
- Fernco PBQ-32 coupler (Home Depot)
- 3 1/2" worm gear clamp (Home Depot - I didn't actually use this)
- End cap - 2 1/2" OD (Home Depot)
- Valve stem (AutoZone)
$10 or something worth of parts.
Step 2 is to build it.
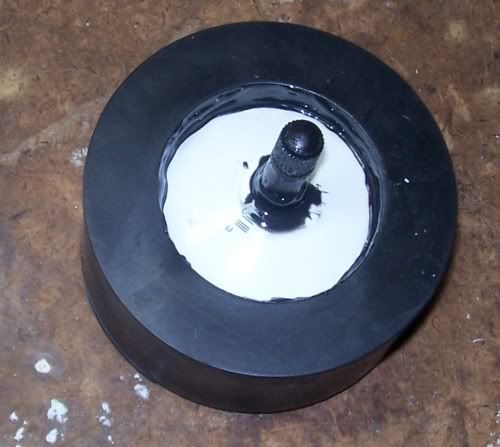
- Drill a hole in the end cap for the valve stem. 3/8" worked for me.
- Load up the valve stem with epoxy, insert it into the end cap, and allow it to dry.
- Load up the inside of the coupler with epoxy, and insert the end-cap-with-valve-stem inside. Allow it to dry. The coupler includes a lip inside it to keep the end cap from popping out, and the lip also provides a good place for the epoxy to bond to.
In each case, don't skimp on the epoxy. The more the merrier.
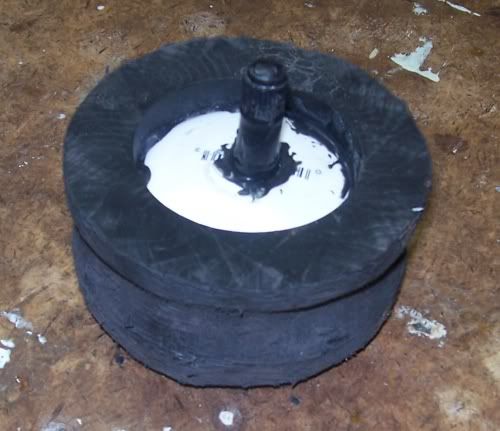
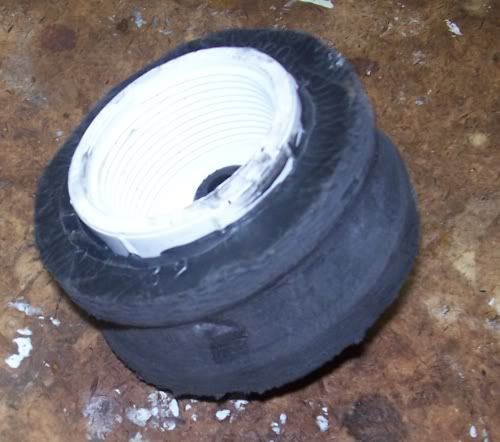
Step 3: rejoice. You think you're done. Here's what I thought was the finished product:
Not so fast, bunky. There are two problems with this design:
- It doesn't quite fit into the stock MAS pipe.
- Once you get it to fit, it's gonna pop out when you pressurize ths system because the coupler is slick. (Don't ask me why I know this...)
Step 4: solve these problems.
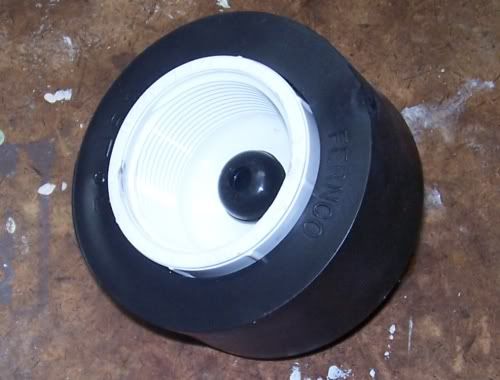
Break out a coarse half-round file and go to town on the coupler.

Use the flat part of the file and take off material all the way around. Stop when the outer diameter is 3 3/8". Then use the half-round part of the file to cut a semicircle in the middle of the coupler to create an inner and outer lip. The lip will keep the coupler from popping out. Don't skip this step, because it costs a lot of money to have your hand sewn back on.
Step 5: rejoice again. The much uglier finished product:
Step 6: go to Walmart and get one of these air tank deals:
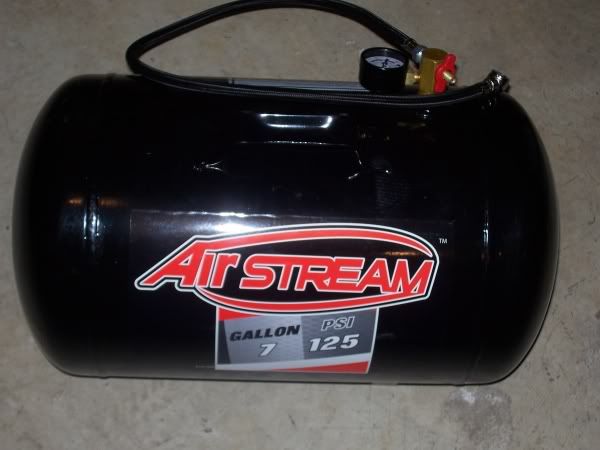
They're $20 or so, and include a pressure gauge (for the air inside the tank - won't help with your car's pressure) and a connector for the valve stem on your YABLT. Swing by your local gas station and fill this baby up. I was able to get 100 PSI for $1.50. The first 20 or so PSI of this will be used to initially fill your intake, intercooler and pipes, and then another 10-20 PSI per pressure test, so you'll get 4-8 tests out of one tank of air.
(I also experimented with a 12 volt tire pump. It worked, but it couldn't really generate more than a few PSI of pressure in exchange for a coupl'a minutes of pumping. Just get the air tank and save yourself the hassle.)
Step 7: break open that hood and get to work.
- Remove your plastic snorkel by yanking upward on it. There's no subtle way to do it.
- Unscrew the clamp that clamps the MAS pipe to the stock air box. A 10 mm socket on a small extension is your friend.
- Remove your stock air box cover (4 latches) and air box (2 10 mm bolts, and it lifts out). Note that you have to un-fasten the MAS connector underneath the air box before removing it.
With the air box out of the way, insert the YABLT into your MAS pipe. It should be nice and tight.
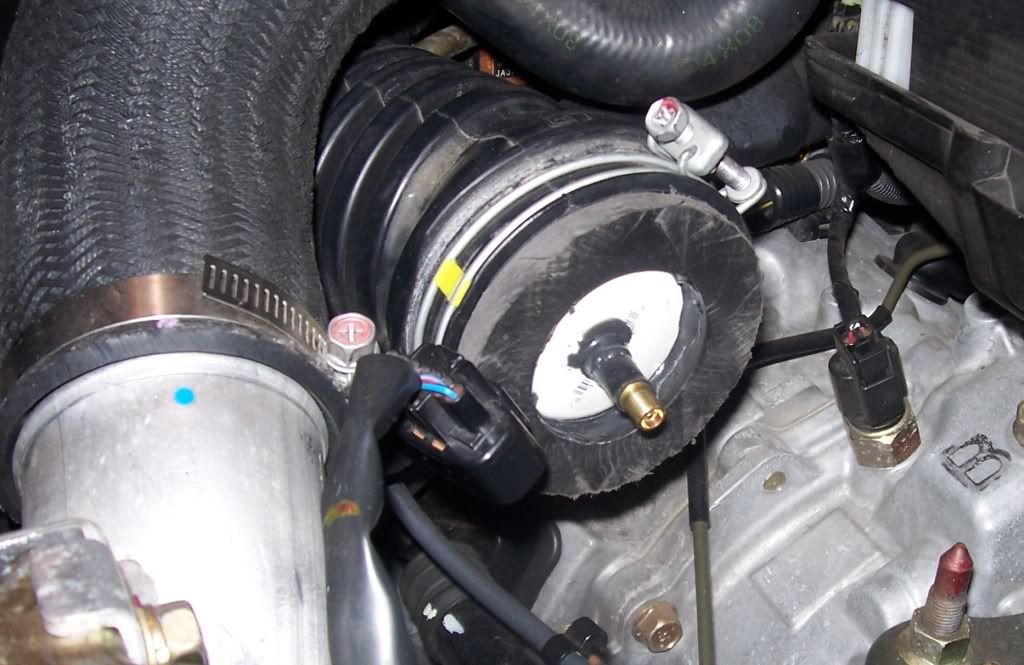
Make sure that the YABLT is in the MAS pipe as shown, and crank down on the clamp until it's really tight and obviously pressing down in the indentation in the YABLT. If you don't want to clamp it down tightly, just remember that I'm not responsible for when your hand gets sheared off.
- Remove the hose that connects between the valve cover and the MAS pipe, and plug the hose with a 1/4" bolt wrapped with thread seal tape. Tie wrap it as well, since this hose will be under pressure (and flying bolts have a nasty habit of seeking out foreheads).
Leave the valve cover nipple open. It will leak some air, but it doesn't matter.
Step 8: now that you're all set up, start testing!
- Stick an old towel or something on your engine bay and sit the air tank on it so you won't scratch anything.
- Attach the air tank to the YABLT valve stem and pressurize the system. You'll need to monitor pressure with your boost gauge or a MAP sensor. I used my MAP sensor, the ECU+, and a laptop. If you're alone, apply 5-10 seconds of air and check the pressure. I found that gave me about 5 PSI per shot, but YMMV. Also, once your system has some pressure in it, you can use the air tank gauge as an approximate read-out ("I have 5 PSI in the system now, if I add air until the tank has 10 PSI less air, I now have 15 PSI in the system." Worked for me.)
- As has been mentioned in other threads, you'll usually hear the leaks. For small leaks, use soapy water (which bubbles as the air leaks out of a hose) to detect and fix. I also used a wrapping paper cardboard roll as a poor-man's stethoscope.
- Try lower pressures first, and work your way up. I found a leak at 5 PSI and another at 17 PSI. Fix your leaks as you go along.
- If you have a MBC, it'll start hissing at 15-20 PSI. That's normal. With my Hallman, I just cranked it down (more boost) two turns and was able to successfully test to mid-20 PSI worth of pressure. If you do this, don't forget to crank it back up (less boost) when you're done the test. Some have suggested clamping off the hose between the compressor housing and the MBC, but just increasing the boost level on the MBC is a lot easier.
- When you're to the point that you no longer have leaks, you'll still find that pressure leaks off of the system, albeit slowly. On my car, no boost leak means 1 PSI of pressure drop in about 8 seconds. Others have reported essentially no pressure drop when they're done. I can't explain this. (I thought it might have something to do with the valve cover's open nipple, but plugging that didn't affect the slow pressure drop in my testing.)
Step 8: you're done.
- De-pressurize the system by pressing on the YABLT valve stem pin, just like you would if you wanted to let air out of a tire.
- Un-screw the MAS pipe clamp and remove the YABLT. It may take some effort to get out, even with the clamp not applying any pressure. This means that you made the right size YABLT. I used a screwdriver to help pry it out, ensuring that the flat head of the screwdriver gouged the YABLT coupler instead of the MAS pipe.
- Remove the bolt from the valve cover hose and reconnect that hose.
- If you cranked your MBC, un-crank it back to normal boost levels.
- Re-connect the MAS pipe to your air box and reinstall the air box. Don't forget about the MAS electrical connector.
- Re-install your snorkel. Don't forget to use both plastic fasteners to hold it down, lest you be plagued with the Bat-talon snorkel-sucker syndrome (BTSSS - https://www.evolutionm.net/forums/5889966-post10.html).
- Check for CELs and reset them. I had a variety of CELs after doing this test because the ignition had to be on to power the MAP sensor, and the stock ECU noticed that the MAS and intake air temperature sensor was no longer connected. I just used the ECU+'s OBD-II Clear Codes function to clear out these bad boys.
- Close the hood, and enjoy the fact that your turbo is no longer trying to pressurize the rest of the earth.
Tom
I've tried to include as much detail as possible, since a common complaint seems to be that the current tester threads don't include enough detail.I chose to do my testing using the stock MAS input pipe (as suggested by David Buschur: https://www.evolutionm.net/forums/3665750-post121.html) rather than connecting the tester to the turbo compressor housing (see mpspilot's great writeup on that at https://www.evolutionm.net/forums/ev...er-5-02-a.html). This approach worked for me, and avoided having to jam my meaty paws down past the radiator fan to the turbo.
Anyway, step 1 is to make like Chuck Yeager and get the right stuff:
- Fernco PBQ-32 coupler (Home Depot)
- 3 1/2" worm gear clamp (Home Depot - I didn't actually use this)
- End cap - 2 1/2" OD (Home Depot)
- Valve stem (AutoZone)
$10 or something worth of parts.
Step 2 is to build it.
- Drill a hole in the end cap for the valve stem. 3/8" worked for me.
- Load up the valve stem with epoxy, insert it into the end cap, and allow it to dry.
- Load up the inside of the coupler with epoxy, and insert the end-cap-with-valve-stem inside. Allow it to dry. The coupler includes a lip inside it to keep the end cap from popping out, and the lip also provides a good place for the epoxy to bond to.
In each case, don't skimp on the epoxy. The more the merrier.
Step 3: rejoice. You think you're done. Here's what I thought was the finished product:
Not so fast, bunky. There are two problems with this design:
- It doesn't quite fit into the stock MAS pipe.
- Once you get it to fit, it's gonna pop out when you pressurize ths system because the coupler is slick. (Don't ask me why I know this...)
Step 4: solve these problems.
Break out a coarse half-round file and go to town on the coupler.
Use the flat part of the file and take off material all the way around. Stop when the outer diameter is 3 3/8". Then use the half-round part of the file to cut a semicircle in the middle of the coupler to create an inner and outer lip. The lip will keep the coupler from popping out. Don't skip this step, because it costs a lot of money to have your hand sewn back on.
Step 5: rejoice again. The much uglier finished product:
Step 6: go to Walmart and get one of these air tank deals:
They're $20 or so, and include a pressure gauge (for the air inside the tank - won't help with your car's pressure) and a connector for the valve stem on your YABLT. Swing by your local gas station and fill this baby up. I was able to get 100 PSI for $1.50. The first 20 or so PSI of this will be used to initially fill your intake, intercooler and pipes, and then another 10-20 PSI per pressure test, so you'll get 4-8 tests out of one tank of air.
(I also experimented with a 12 volt tire pump. It worked, but it couldn't really generate more than a few PSI of pressure in exchange for a coupl'a minutes of pumping. Just get the air tank and save yourself the hassle.)
Step 7: break open that hood and get to work.
- Remove your plastic snorkel by yanking upward on it. There's no subtle way to do it.
- Unscrew the clamp that clamps the MAS pipe to the stock air box. A 10 mm socket on a small extension is your friend.
- Remove your stock air box cover (4 latches) and air box (2 10 mm bolts, and it lifts out). Note that you have to un-fasten the MAS connector underneath the air box before removing it.
With the air box out of the way, insert the YABLT into your MAS pipe. It should be nice and tight.
Make sure that the YABLT is in the MAS pipe as shown, and crank down on the clamp until it's really tight and obviously pressing down in the indentation in the YABLT. If you don't want to clamp it down tightly, just remember that I'm not responsible for when your hand gets sheared off.
- Remove the hose that connects between the valve cover and the MAS pipe, and plug the hose with a 1/4" bolt wrapped with thread seal tape. Tie wrap it as well, since this hose will be under pressure (and flying bolts have a nasty habit of seeking out foreheads).
Leave the valve cover nipple open. It will leak some air, but it doesn't matter.
Step 8: now that you're all set up, start testing!
- Stick an old towel or something on your engine bay and sit the air tank on it so you won't scratch anything.
- Attach the air tank to the YABLT valve stem and pressurize the system. You'll need to monitor pressure with your boost gauge or a MAP sensor. I used my MAP sensor, the ECU+, and a laptop. If you're alone, apply 5-10 seconds of air and check the pressure. I found that gave me about 5 PSI per shot, but YMMV. Also, once your system has some pressure in it, you can use the air tank gauge as an approximate read-out ("I have 5 PSI in the system now, if I add air until the tank has 10 PSI less air, I now have 15 PSI in the system." Worked for me.)
- As has been mentioned in other threads, you'll usually hear the leaks. For small leaks, use soapy water (which bubbles as the air leaks out of a hose) to detect and fix. I also used a wrapping paper cardboard roll as a poor-man's stethoscope.
- Try lower pressures first, and work your way up. I found a leak at 5 PSI and another at 17 PSI. Fix your leaks as you go along.
- If you have a MBC, it'll start hissing at 15-20 PSI. That's normal. With my Hallman, I just cranked it down (more boost) two turns and was able to successfully test to mid-20 PSI worth of pressure. If you do this, don't forget to crank it back up (less boost) when you're done the test. Some have suggested clamping off the hose between the compressor housing and the MBC, but just increasing the boost level on the MBC is a lot easier.
- When you're to the point that you no longer have leaks, you'll still find that pressure leaks off of the system, albeit slowly. On my car, no boost leak means 1 PSI of pressure drop in about 8 seconds. Others have reported essentially no pressure drop when they're done. I can't explain this. (I thought it might have something to do with the valve cover's open nipple, but plugging that didn't affect the slow pressure drop in my testing.)
Step 8: you're done.
- De-pressurize the system by pressing on the YABLT valve stem pin, just like you would if you wanted to let air out of a tire.
- Un-screw the MAS pipe clamp and remove the YABLT. It may take some effort to get out, even with the clamp not applying any pressure. This means that you made the right size YABLT. I used a screwdriver to help pry it out, ensuring that the flat head of the screwdriver gouged the YABLT coupler instead of the MAS pipe.
- Remove the bolt from the valve cover hose and reconnect that hose.
- If you cranked your MBC, un-crank it back to normal boost levels.
- Re-connect the MAS pipe to your air box and reinstall the air box. Don't forget about the MAS electrical connector.
- Re-install your snorkel. Don't forget to use both plastic fasteners to hold it down, lest you be plagued with the Bat-talon snorkel-sucker syndrome (BTSSS - https://www.evolutionm.net/forums/5889966-post10.html).
- Check for CELs and reset them. I had a variety of CELs after doing this test because the ignition had to be on to power the MAP sensor, and the stock ECU noticed that the MAS and intake air temperature sensor was no longer connected. I just used the ECU+'s OBD-II Clear Codes function to clear out these bad boys.
- Close the hood, and enjoy the fact that your turbo is no longer trying to pressurize the rest of the earth.
Tom
 Apr 22, 2009, 07:53 AM
#3
Evolving Member
iTrader: (2)
Join Date: Nov 2006
Location: n'at
Posts: 192
Likes: 0
Received 0 Likes
on
0 Posts
Good stuff, question though. I do this and my Hallman automatically releases (bleeds) pressure. Is it bad unit? I have to sit with my thumb on the bleed hole so it can build pressure.
Apr 23, 2009, 05:19 PM
#4
I'm not an expert on MBC design, but my understanding is that the hole leaks pressure *after* overcoming the spring pressure. When the spring pressure is greater than the boost pressure, the hole just vents the WGA to the atmosphere. So if you crank down (clockwise, more boost), you shouldn't leak from the hole.
Maybe someone else who knows more can answer this for sure.
Tom
Maybe someone else who knows more can answer this for sure.
Tom

Thread
Thread Starter
Forum
Replies
Last Post
Shaun@AWDMotorsports
AWD Motorsports - Florida
20
Jun 14, 2016 10:39 AM
mplspilot
Evo How To Requests / Questions / Tips
63
Jun 18, 2014 11:03 PM
EVO8LTW
Evo Engine / Turbo / Drivetrain
75
Sep 9, 2005 02:39 PM