Review: Magnus Sheet Metal Intake Manifold w/ Dyno Gains
 Mar 11, 2008, 07:09 AM
#1

Review: Magnus Sheet Metal Intake Manifold w/ Dyno Gains
I am posting to share my experience with the install and gains with from a Magnus Sheet Metal Intake Manifold from Magnus Motorsports, the same manifold that can be seen here. I have had the manifold on for a couple of weeks, I figured this would be a good time to give a straight review of the Magnus SMIM. Regardless of any controversy going on right now about SMIM's, I will try to keep the information here as objective as possible.

We installed the SMIM on my 99.99% stock car GG Evo IX SE. The only changes had been a small timing clean up by Emery at StreetTunedMotorsports that bumped timing up a few degrees on the top end and cleaned up a bit of the mid. Nothing else was touched.
The install was pretty straight forward. We removed the stock intake manifold by removing the strut tower brace, disconnecting and removing the battery, detaching the intake pipe from the hard pipe to the throttle body and then moving on to the intake manifold. We removed the throttle body from the intake manifold to try to save any issues with the coolant connection lines but that didn't work out like we had planned as I will describe later. All the solenoids were retained and routed back into the intake manifold with the exception of the EGR valve.
Here is the list of things to watch out for on a stock setup when installing this manifold:
So on to the actual install. Once we got the stock manifold off, we installed the Magnus to do a test fit and discovered to our benefit that the stock flexible intake pipe can be used by just rotating it so no intake piping changes were needed! Score! Clears everything just fine. When we test fit the throttle body up is when we realized we needed to replace the coolant lines. Not a huge change but something to keep in mind. Also due to the change in angle, the throttle cable doesn't line up 100% to the stock alignment. Again, not a deal breaker but something to keep in mind.
Besides that, the install was pretty smooth. We used a phenolic spacer and mounted all the stock components ( fuel rail, injectors, etc. ) with no issues. The Magnus uses 4 threaded nipple ports on the back side angle so its still pretty easy to get to to run the vacuum lines unlike other manifolds.
Now on to the results!
First question I was asked was “why do this on a stock car?” 2 reasons really:
We tested the manifold by running 4 stock dyno runs, 2 in 3rd gear and 2 in 4th. This was to get a base line. We measured the intake manifold and intercooler manifold temperatures after each run to make sure they returned down to close as possible to the original before starting the next pull.
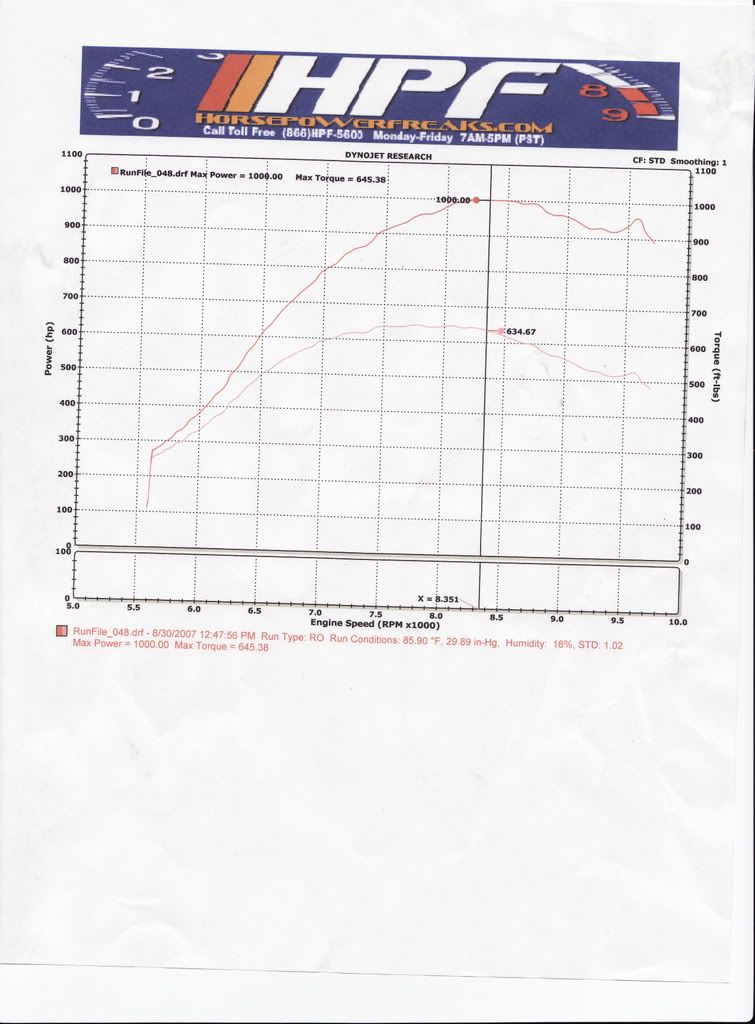
Below are the images of the dynographs for each run ( with permission from Magnus ):
Run 1 - 3rd gear - 255 peak hp, 237 peak torque
Run 2 - 3rd gear - 252 peak hp, 233 peak torque
Run 3 - 4th gear - 241 peak hp, 238 peak torque
Run 4 - 4th gear - 239 peak hp, 237 peak torque
After the dyno runs, we took it back around the to shop and installed the manifold. After the install, I took it up and down the road to verify the install, make sure there weren't any leaks, and make sure the car was running 100%. Once confirmed, we took it back over the dyno and run it again for 4 runs. No timing, fuel or anything at the ecu was touched. The car was setup exactly as it was during the stock intake runs. Granted the environmental variables weren't 100% the same, but short of an engine dyno room with every variable controlled, this was about as close as we were going to get.
Below are the 4 runs we did with the Magnus SMIM installed:
Run 5 - 3rd gear - 262 peak hp, 232 peak torque
Run 6 - 3rd gear - 257 peak hp, 230 peak torque
Run 7 - 4th gear - 252 peak hp, 232 peak torque
Run 8 - 3rd gear - 265 peak hp, 237 peak torque
Here are the overlays of various runs:
Run 1 versus Run 5 ( 3rd Gear )
Run 1 versus Run 8 ( 3rd Gear )
Run 4 versus Run 7 ( 4th Gear )
Below are the full data files for each of the runs:
Run 1 .drf file
Run 2 .drf file
Run 2 EvoScan data file
Run 3 .drf file
Run 3 EvoScan data file
Run 4 .drf file
Run 5 .drf file
Run 5 EvoScan data file
Run 6 .drf file
Run 7 .drf file
Run 7 EvoScan data file
Run 8 .drf file
Run 8 EvoScan data file
The net result was approximately 20 hp across the range from 5500 RPM up to to almost 8000 RPM. The max difference was 31 hp at 7250 RPM. The gains up top I was expecting although I wasn't sure how large the difference would be compared to the gains on the 2G DSM manifold, but I was also very interested in the low to mid range and was looking for the expected loss on the bottom end but found none of what I was expecting. Based on the numbers and when the boost hit, I didn't see any of the expected loss. So overall it seemed a win-win situation.
If anyone wants to see Dyno vids including my impressions, you can find links to the youtube video's on Magnus's Intake Test page.
On the street, although the "butt dyno" is far from proof, the car has none of the fall off of power at the top end that the stock manifold had. Given that the car was completely stock besides the manifold and untuned, I can only expect to have more gains after an exhaust, boost contoller and good tune. Still, for a bolt on and go, 20hp on average is a pretty good gain. I plan on making dyno runs on the next mods so I can keep a decent log of gains per mod and tune.
Overall I couldn't be happier. The car has stock driveability and drives like a champ. Would I suggest a Magnus Sheet Metal intake manifold as anyones first mod? Nope. But then again I wouldn't recommend ANY sheet metal intake as a first mod. There are much bigger gains to be had by doing the BPU mods first. But if the Magnus manifold can give a this much of a bump over a stock manifold on a stock setup, adding the BPU's should only help increase the potential gains.
Hopefully this review has been helpful. I'll try to answer any questions that I can regarding the install and driveability.
We installed the SMIM on my 99.99% stock car GG Evo IX SE. The only changes had been a small timing clean up by Emery at StreetTunedMotorsports that bumped timing up a few degrees on the top end and cleaned up a bit of the mid. Nothing else was touched.
The install was pretty straight forward. We removed the stock intake manifold by removing the strut tower brace, disconnecting and removing the battery, detaching the intake pipe from the hard pipe to the throttle body and then moving on to the intake manifold. We removed the throttle body from the intake manifold to try to save any issues with the coolant connection lines but that didn't work out like we had planned as I will describe later. All the solenoids were retained and routed back into the intake manifold with the exception of the EGR valve.
Here is the list of things to watch out for on a stock setup when installing this manifold:
- Manifold to Head nuts: These can be torqued pretty good from the factory and after a few heat cycles. Careful not to strip anything and make sure you use the right tool for the right section. To get the right advantage point, you may have to switch to multiple tool setups ( socket extensions, swivels, box wrenches, etc.)
- Manifold to Block brace If you aren't aware, there is a triangulation brace that mounts to the underside of the stock intake manifold and bolts to the block. With the manifold in the car, its a major pain in the a$$ to remove the bolts to pull this out.
- Solenoid Mounting: At first this looks like a super easy thing to accomplish. The mounting point for the strut brace looks like the perfect spot to mount a custom bracket to throw the solenoids on. Unfortunately once you mount the evap, it transmits the solenoid actuation to the cabin as a lovely insanely maddening tapping sound. Instead of mounting it there, we mount it directly off of the map sensor mount bolts. We then mounted the fuel pressure solenoid to the other side.
- Throttle body coolant lines We weren't sure if we would be able to keep the stock coolant to throttle body lines as the Sheet Metal intake moves the throttle body down a couple of inches. They **almost** fit, however to make a cleaner better install, we cut 2 lines each about 2" longer than the stocker and routed them. Simple change but be aware that you will probably need to do this per the spacing.
So on to the actual install. Once we got the stock manifold off, we installed the Magnus to do a test fit and discovered to our benefit that the stock flexible intake pipe can be used by just rotating it so no intake piping changes were needed! Score! Clears everything just fine. When we test fit the throttle body up is when we realized we needed to replace the coolant lines. Not a huge change but something to keep in mind. Also due to the change in angle, the throttle cable doesn't line up 100% to the stock alignment. Again, not a deal breaker but something to keep in mind.
Besides that, the install was pretty smooth. We used a phenolic spacer and mounted all the stock components ( fuel rail, injectors, etc. ) with no issues. The Magnus uses 4 threaded nipple ports on the back side angle so its still pretty easy to get to to run the vacuum lines unlike other manifolds.
Now on to the results!
First question I was asked was “why do this on a stock car?” 2 reasons really:
- With a lot of random testing results floating around, I wanted to see for myself the results of the manifold in the only control situation I could come up with which was my own car which I knew 100% the status of the car. Call me crazy, but I like to have results in hand versus taking anybody's word.
- On my 2G DSM autocross car, I used a 2G based Magnus SMIM and was suitably impressed in the results to keep it on the car. Ultimately, I am a very torque conscious "area under the curve" kind of enthusiast. Peak power means far less to me a wide full power band. At first I was skeptical as my 2G was pretty built up engine wise and I did notice a couple of hundred rpm loss in spool time with that setup but the gains at 5500+ were too much to pass up. I was very curious the gains a similar manifold setup would have on a stock Evo setup. I was expecting a similar experience, and maybe even more of a loss on the low end. If so, I would have switched back to the stocker.
We tested the manifold by running 4 stock dyno runs, 2 in 3rd gear and 2 in 4th. This was to get a base line. We measured the intake manifold and intercooler manifold temperatures after each run to make sure they returned down to close as possible to the original before starting the next pull.
Below are the images of the dynographs for each run ( with permission from Magnus ):
Run 1 - 3rd gear - 255 peak hp, 237 peak torque
Run 2 - 3rd gear - 252 peak hp, 233 peak torque
Run 3 - 4th gear - 241 peak hp, 238 peak torque
Run 4 - 4th gear - 239 peak hp, 237 peak torque
After the dyno runs, we took it back around the to shop and installed the manifold. After the install, I took it up and down the road to verify the install, make sure there weren't any leaks, and make sure the car was running 100%. Once confirmed, we took it back over the dyno and run it again for 4 runs. No timing, fuel or anything at the ecu was touched. The car was setup exactly as it was during the stock intake runs. Granted the environmental variables weren't 100% the same, but short of an engine dyno room with every variable controlled, this was about as close as we were going to get.
Below are the 4 runs we did with the Magnus SMIM installed:
Run 5 - 3rd gear - 262 peak hp, 232 peak torque
Run 6 - 3rd gear - 257 peak hp, 230 peak torque
Run 7 - 4th gear - 252 peak hp, 232 peak torque
Run 8 - 3rd gear - 265 peak hp, 237 peak torque
Here are the overlays of various runs:
Run 1 versus Run 5 ( 3rd Gear )
Run 1 versus Run 8 ( 3rd Gear )
Run 4 versus Run 7 ( 4th Gear )
Below are the full data files for each of the runs:
Run 1 .drf file
Run 2 .drf file
Run 2 EvoScan data file
Run 3 .drf file
Run 3 EvoScan data file
Run 4 .drf file
Run 5 .drf file
Run 5 EvoScan data file
Run 6 .drf file
Run 7 .drf file
Run 7 EvoScan data file
Run 8 .drf file
Run 8 EvoScan data file
The net result was approximately 20 hp across the range from 5500 RPM up to to almost 8000 RPM. The max difference was 31 hp at 7250 RPM. The gains up top I was expecting although I wasn't sure how large the difference would be compared to the gains on the 2G DSM manifold, but I was also very interested in the low to mid range and was looking for the expected loss on the bottom end but found none of what I was expecting. Based on the numbers and when the boost hit, I didn't see any of the expected loss. So overall it seemed a win-win situation.
If anyone wants to see Dyno vids including my impressions, you can find links to the youtube video's on Magnus's Intake Test page.
On the street, although the "butt dyno" is far from proof, the car has none of the fall off of power at the top end that the stock manifold had. Given that the car was completely stock besides the manifold and untuned, I can only expect to have more gains after an exhaust, boost contoller and good tune. Still, for a bolt on and go, 20hp on average is a pretty good gain. I plan on making dyno runs on the next mods so I can keep a decent log of gains per mod and tune.
Overall I couldn't be happier. The car has stock driveability and drives like a champ. Would I suggest a Magnus Sheet Metal intake manifold as anyones first mod? Nope. But then again I wouldn't recommend ANY sheet metal intake as a first mod. There are much bigger gains to be had by doing the BPU mods first. But if the Magnus manifold can give a this much of a bump over a stock manifold on a stock setup, adding the BPU's should only help increase the potential gains.
Hopefully this review has been helpful. I'll try to answer any questions that I can regarding the install and driveability.
Last edited by Tevenor; Mar 11, 2008 at 09:57 AM.
 Mar 11, 2008, 07:31 AM
#3
Evolved Member
Join Date: Jan 2008
Location: Australia
Posts: 874
Likes: 0
Received 0 Likes
on
0 Posts
Mar 11, 2008, 07:41 AM
#4

Thats was the only problem i had lol I did re weld the manifold and have had no problems to date.
 Mar 11, 2008, 09:43 AM
#5

Cool! Copy/paste from NABR good work. Looks like the NEW design might actually work, good thing you did not end up with one of the ones that is the old design that they have been selling to evo customers for the last 5 years or so, those ones are junk!
This test should have been done on a mildly tuned car, we all know the stock tune is junk, anything you do to free up a restriction will result in more power.
This test should have been done on a mildly tuned car, we all know the stock tune is junk, anything you do to free up a restriction will result in more power.
Mar 11, 2008, 10:02 AM
#7
")
I can't speak for what was sold by anyone as I didn't sell it. I can only speak to my observed results and gains/losses, whichever the case may be, as a consumer. Let's keep the topic focused on the review of the product instead of making this another e-thugging thread.
Trending Topics
Mar 11, 2008, 11:01 AM
#8
Sorry, it looks amazingly similar to marco's post here: http://www.teamnabr.com/vbb/showthread.php?t=27030
I am not jumping on the bandwagon, and I do not mean to be an e-thug. Just making sure people know that if they go on ebay and buy a used magnus, they should not expect the same results. The new design looks like it might actually work!
I am not jumping on the bandwagon, and I do not mean to be an e-thug. Just making sure people know that if they go on ebay and buy a used magnus, they should not expect the same results. The new design looks like it might actually work!
Mar 11, 2008, 02:12 PM
#9
I bought my Evo (a 2003) in early 2006. The previous owner had installed a Magnus SMIM in the year or so (2004-2005) before I bought the car. The Magnus manifold that came on my car has the same external design as the one shown by the OP, and has the velocity stacks inside, so the Magnus manifold you refer to as the "NEW" one has been the �current� manifold since at least 2005. The Magnus webpage that the OP referenced says that the DSM manifold was updated in 2005 with heavier thickness of material and velocity stacks. The Evo Magnus manifold that was put on my car by the prior owner in 2004-2005 also has these features, so it would seem obvious that the Evo manifold design "updates" go at least that far back. So, I'd guess that the "early" manifold that was used in other reported testing was available at most for part of 2003, and 2004 -- less than 2 years, and it was last sold three or so years ago.
Mar 11, 2008, 05:19 PM
#10
Evolving Member

Join Date: Mar 2007
Location: In front of a Catia screen
Posts: 272
Likes: 0
Received 0 Likes
on
0 Posts
I wonder if Marcos could give us a timeline of his design revisions of the intake manifold... Magnus has been around a very long time... how old was the part BR tested??
Mar 11, 2008, 06:06 PM
#11

Tevenor a question for you if i may. Where is the placement of the map sensor on that manifold ? I am curious to know the placement and exact detail of how its mounted.
I am running into troubles with my own manifold and have had no luck. So Im trying to find out how other companies put the map sensor bung.
I am running into troubles with my own manifold and have had no luck. So Im trying to find out how other companies put the map sensor bung.
Mar 11, 2008, 06:53 PM
#13
Where is the placement of the map sensor on that manifold ? I am curious to know the placement and exact detail of how its mounted.
I am running into troubles with my own manifold and have had no luck. So Im trying to find out how other companies put the map sensor bung.
I am running into troubles with my own manifold and have had no luck. So Im trying to find out how other companies put the map sensor bung.
1. map sensor should be located in-line with a cylinder, per oem & aem ecu.
2. oem fpr pick up point is @ the back of the plenum = closest to the fpr...i put mine @ the end of the plenum, closest to the fpr. i did a map sensor study a while back, with regards to line length / distance the sensor was away from te plenum & I was shocked to see the delay differences between being mounted on the plenum vs. 5" of 1/8 line i.d.....i saw a lag in fueling when i had ~9' of 1/8" line between the plenum & fpr....after relocating the pick-up points, that lag vanished!!
minimize the length of line to the fpr & mount the map sensor on the plenum. i will post the graph when i locate it..
3. i also put the pressure/vacum sourve feeding my bov above a runner, as the oem plenum has it in such a place....amy as well take advantge of some of the technical gains that mitsu spent money on!!
good luck.

