Disabling EGR and fuel pressure solenoids

 Sep 8, 2009, 10:18 PM
#137
Sorry, I'm not sure if there is any more appropriate place to put this for proofreading. Can you guys take a look and tell me what may or may not be wrong? I'll go ahead and post it in the how-to when done...
----
Questions:
1. Is there a bolt to get the FPR Solenoid of the intake manifold stay? ...or do you just kind of bend it off? ...Something to push like the harnesses on the intake manifold?
2. Do I have the right location for the charcoal canister?
3. Should I be recommending to put the check valve on hose 1, 12 (where the canister is now), or #7 as written? (I think this is wrong)
4. Anything I forgot?
-------
As always, no warranty expressed or implied - do this at your own risk. This is for offroad use only. The EGR is a required emissions component on vehicles where it was originally equipped.
How To Disable / Remove your EGR:
Background:
The EGR recirculates EGR gas from your exhaust into the intake to reduce the formulation of Nitrogen Oxides. Newer cars (evo X) prevent the necessity for this with modifiable cam timing that can reduce these emissions to acceptable levels.
Note the location where EGR gasses enter the intake manifold as shown here:

The problem with this is 3 fold:
1. The EGR injects soot filled gases into your clean intake manifold getting it dirty and VERY hot
2. The EGR can open under certain undesirable conditions causing issues with timing / power
3. At higher boost pressures these lines often blow off creating a vacuum leak and robbing power as well as making idle rougher.
4. This will also reduce clutter around your intake manifold.
(A more in-depth explanation of EGR functionality which I believe was quoted from somewhere else):
What you will need:
-An EGR blockoff plate (some people use the pop-can gasket method, but that is ghetto and blockoffs are $5 on ebay)
-12mm wrench (and preferrably a torque wrench)
-2 Vacuum caps and preferrably 2 zip ties.
-1 large vacuum cap (if removing evap canister also)
-1 M8 x 1.25 bolt 16mm long and 1 M8 lock washer (alternatively since this is an uncommon size, you can get a 20mm bolt and add 2 M8 washers, preferrably stainless)
Directions:
1. First locate the EGR valve. It is on the intake runner right under the throttle body and toward the engine. (see below)


-optional: Remove strut bar and UICP - this may not be necessary, but its always easier to work in an open environment
2. Remove the 2 x 12mm bolts on the top and bottom of the EGR Valve. When pulling it off, take care not to damage or lose the gasket. Take note of it's orientation for the best seal when re-assembling with the blockoff plate. Note there are 2-3 vacuum lines that will need to be pulled off the valve when you get it out. This go to the solenoid and you can simply yank them off if you are having a difficult time.
-optional: Apply high-temp RTV to the outer edge of the blockoff plate. This is not necessary unless you lost or damaged the gasket, but will provide a sure-fire seal if allowed to cure properly. Unfortunately it will also make a bit of a mess, especially if you ever need to take off the blockoff plate again.
3. Line up the blockoff and gasket on one of the bolts (with locknut and washers if necessary). Place this over the EGR location on the intake manifold and turn toward loose until the bolt jumps the thread, then hand tighten a few turns. This ensures that you do not cross thread the bolt (see warning below).
4. Once bolt 1 is hand-tight (or at least threaded a few times) line up the second bolt (and lock-nut / washers) and again, turn out, then thread properly and tighten to hand-tight.
5. Get out your torque wrench and tighten both bolts to 20N/M +/- 2 N/m (15 ft/lb +/- 1 ft/lb)
WARNING!! - when tightening the bolts, DO NOT OVERTIGHTEN. Your intake manifold is made of aluminum and will strip very easily!

NOTE: you do not necessarily need to do everything shown in this diagram. You can leave the FPR connected at connection B - L.
6. Pull off the 2 hoses on the top of the throttle body. (hose W and Y). DO NOT loop one of them around since one is pre butterfly and one is post butterfly. Properly cap them with correct-sized nipple caps. As always, it is recommended to zip-tie them to help keep them from being blown off under boost.
7. At this point, you can consider yourself done unless you would like to keep going and remove the solenoid and extra hoses (read: the right way). It's like a choose your destiny novel!
==========
====================
-Optional: Remove the strut bar to provide extra room for yourself (When re-installing, tighten all bolts to 44 N/m or 32 ft/lb)
8.
-Paraphrase: Take off the bracket where the lines go right after the throttle body This will also facilitate removal of the charcoal canister / EVAP purge solenoid.


9. Place the check valve with the side that was connected toward the intake manifold VTA and the other end on the EVAP purge line that comes into the engine bay (the fat one where it would connect to the bracket).
10.Cap the location for this line on the intake manifold. Disconnect and remove the EVAP solenoid.
====================
==========
In the ECU:
-XXX- See Mr Fred Quote Below, might be good anyway- Change Periphery 0 (FAA) bit 11 to 1 (to disable EGR Timing advance)
-XXX- Not necessary if disabled correctly - Change Periphery 2 (FCA) bit 09 to 0 (to disable P0401 EGR Test)
-XXX- Unrelated, but a good change for anyone with problems - Change periphery 4 (FEA) bit 14 to 1 (to disable MAP vs Baro test on startup - not necessary but doesn't hurt)
For emissions:
Update your OBDII tables to report "passed" for the EGR test. I will allow you to find this elsewhere.
==========
====================
==========
Alternative Method / Additional steps: (better but more difficult)
Using this method should significantly reduce temperatures in the intake manifold. It will also facilitate the use of a Phenolic spacer which can leave your intake manifold cool to the touch. Without using this method you risk melting or deforming a phenolic spacer. This happens because you are not blocking the hole in the head before the very hot EGR gasses reach the intake manifold.
Note the small port in this image where EGR gasses pass around the head and back into the intake manifold before the EGR solenoid.

==========
Additional information:
If following the diagram above, you can remove the evaporative emission purge solenoid and evaporative canister as well. In doing so, you will simply need to plug the port on the intake manifold, and vent the evaporative hose coming into the engine bay. The canister itself can be removed and the source hose to the canister vented as seen here:

The Canister should be on the direr's side of the car next to the gas tank / spare:


Please note the check valve is represented backwards in the image shown above, as well as some of the other FSM diagrams. This check valve is useful if you will be removing the charcoal canister as well to prevent anything from getting into your fuel system.
Remove all of this diagram after hose #7, and plug hose #7 with the check valve from the front of the car.

Change periphery 2 (FCA) bit 15 & 14 & 13 to 0 (to disable EVAP checks if you removed these solenoids)
Change periphery 4 (FEA) bit 07 to 0 (to disable FPS if you removed it also) (FCA bit 15 will also take care of this)
Props to anyone who's pictures I didn't quote!
https://www.evolutionm.net/forums/7036083-post82.html
https://www.evolutionm.net/forums/7043356-post89.html
https://www.evolutionm.net/forums/7052598-post93.html
----
Questions:
1. Is there a bolt to get the FPR Solenoid of the intake manifold stay? ...or do you just kind of bend it off? ...Something to push like the harnesses on the intake manifold?
2. Do I have the right location for the charcoal canister?
3. Should I be recommending to put the check valve on hose 1, 12 (where the canister is now), or #7 as written? (I think this is wrong)
4. Anything I forgot?
-------
As always, no warranty expressed or implied - do this at your own risk. This is for offroad use only. The EGR is a required emissions component on vehicles where it was originally equipped.
How To Disable / Remove your EGR:
Background:
The EGR recirculates EGR gas from your exhaust into the intake to reduce the formulation of Nitrogen Oxides. Newer cars (evo X) prevent the necessity for this with modifiable cam timing that can reduce these emissions to acceptable levels.
Note the location where EGR gasses enter the intake manifold as shown here:
The problem with this is 3 fold:
1. The EGR injects soot filled gases into your clean intake manifold getting it dirty and VERY hot
2. The EGR can open under certain undesirable conditions causing issues with timing / power
3. At higher boost pressures these lines often blow off creating a vacuum leak and robbing power as well as making idle rougher.
4. This will also reduce clutter around your intake manifold.
(A more in-depth explanation of EGR functionality which I believe was quoted from somewhere else):
The sole purpose of the EGR system is to reduce the formation of Oxides of Nitrogen (NOx). These are formed when the temperature in the combustion chamber reaches very high levels. To avoid this situation, the EGR system is used to lower combustion chamber temperatures by admitting small amounts of exhaust gas back into the combustion chamber. As you can imagine, exhaust gas does not burn, and does not help the combustion process. If the EGR system would admit exhaust gas into the combustion chamber at idle, it would cause a rough idle, or stalling. As a result, EGR does not allow exhaust gas into the chamber at idle (nor at wide open throttle, more on that later...). To accomplish this, there has to be some way of controlling EGR flow.
The way this is accomplished is actually quite simple. First of all, there is a round, flying saucer - looking part that mounts on the intake manifold. This is called the EGR valve. There is an opening in the intake manifold from the cylinder head that allows exhaust gas to move up to the valve. When vacuum is applied to the valve, it allows the exhaust gases to pass. To control when the valve receives vacuum, an EGR solenoid is used. This part mounts on the passenger side near the back of the intake manifold. It has a vacuum line which supples ported manifold vacuum, and another vacuum line running to the EGR valve. When the ECM requests EGR to be ON, it sends a signal the the EGR solenoid, which then allows vacuum to be applied to the EGR valve. When the ECM wishes EGR to be off, the solenoid will cease to apply vacuum to the EGR valve.
The ECM will turn on the EGR solenoid by grounding it. It does this via pulse width modulation (PWM). This means that the ECM will turn on and off the solenoid many times a second. Just how many times this occurs will affect the amount of vacuum applied to the EGR valve, and therefore the amount of exhaust gas admitted into the combustion chamber. During the time that EGR is requested by the ECM, fuel output and spark advance are also altered. More timing is added, and the fuel mixture is leaned a bit.
During WOT (wide open throttle), the ECM shuts down EGR. Since EGR will play no role whatsoever under WOT, it will not impede the engine's ability to generate horsepower.
How does the ECM know if there is a problem with the EGR system? Well, the answer depends on what year TPI setup you have. If you have an 85-89 setup, then there will be a single wire that goes to the base of the EGR valve. This is basically a temperature switch. When the ECM requests EGR, it will check this wire to see if there is a change in temperature. If no change is detected, the ECM will think there is a problem with the system, and will throw a code 32. Most of the time, the problem is the temperature switch that is bad. However, you should first check for vacuum leaks, check that all vacuum lines are properly routed, check the harness connector at the EGR solenoid with a voltmeter, and make sure that the EGR passages are not clogged with deposits.
The 90-92 TPI setups did not use a temperature switch on the EGR base. Instead, the ECM monitors the MAP voltage to determine if an EGR request was successful or not. When EGR is turned on, engine vacuum will lower a little. The ECM will throw a code 32 if it suspects that the EGR request was not successful.
So what would someone gain by disabling EGR? Just about the only thing would be less parts under the hood. Basically, removing EGR gives you more space (although not much). To correctly disable EGR from your vehicle, you MUST at the very least, disable it in the prom. This is done by setting the minimum temperature to enable EGR to 151 degrees Celsius (maximum allowable temperature), and setting the minimum vehicle speed to enable EGR to 255 mph (maximum allowable speed). Since the engine will never reach either of these conditions, EGR will never be requested by the ECM. Since EGR will never be requested, it does not matter if you leave the EGR system all installed in its original place, or if you remove it from the car. If you decide to remove it, you will need an EGR block off plate to cover the hole in the intake manifold.
If you simply remove the EGR system from the car, but do not disable it in the ECM, you will run into significant problems. You will likely run into detonation, the engine will run very poorly, lack power, and will probably run on the hot side as well. In addition, you will get a code 32 before running very long. If you recall from before, the ECM alters fuel and spark advance when it thinks EGR should be on. If no EGR flow is possible because you removed it, you will have a lean condition which will be further aggravated by advanced timing.
What you will need:
-An EGR blockoff plate (some people use the pop-can gasket method, but that is ghetto and blockoffs are $5 on ebay)
-12mm wrench (and preferrably a torque wrench)
-2 Vacuum caps and preferrably 2 zip ties.
-1 large vacuum cap (if removing evap canister also)
-1 M8 x 1.25 bolt 16mm long and 1 M8 lock washer (alternatively since this is an uncommon size, you can get a 20mm bolt and add 2 M8 washers, preferrably stainless)
Directions:
1. First locate the EGR valve. It is on the intake runner right under the throttle body and toward the engine. (see below)
-optional: Remove strut bar and UICP - this may not be necessary, but its always easier to work in an open environment
2. Remove the 2 x 12mm bolts on the top and bottom of the EGR Valve. When pulling it off, take care not to damage or lose the gasket. Take note of it's orientation for the best seal when re-assembling with the blockoff plate. Note there are 2-3 vacuum lines that will need to be pulled off the valve when you get it out. This go to the solenoid and you can simply yank them off if you are having a difficult time.
-optional: Apply high-temp RTV to the outer edge of the blockoff plate. This is not necessary unless you lost or damaged the gasket, but will provide a sure-fire seal if allowed to cure properly. Unfortunately it will also make a bit of a mess, especially if you ever need to take off the blockoff plate again.
3. Line up the blockoff and gasket on one of the bolts (with locknut and washers if necessary). Place this over the EGR location on the intake manifold and turn toward loose until the bolt jumps the thread, then hand tighten a few turns. This ensures that you do not cross thread the bolt (see warning below).
4. Once bolt 1 is hand-tight (or at least threaded a few times) line up the second bolt (and lock-nut / washers) and again, turn out, then thread properly and tighten to hand-tight.
5. Get out your torque wrench and tighten both bolts to 20N/M +/- 2 N/m (15 ft/lb +/- 1 ft/lb)
WARNING!! - when tightening the bolts, DO NOT OVERTIGHTEN. Your intake manifold is made of aluminum and will strip very easily!
NOTE: you do not necessarily need to do everything shown in this diagram. You can leave the FPR connected at connection B - L.
6. Pull off the 2 hoses on the top of the throttle body. (hose W and Y). DO NOT loop one of them around since one is pre butterfly and one is post butterfly. Properly cap them with correct-sized nipple caps. As always, it is recommended to zip-tie them to help keep them from being blown off under boost.
7. At this point, you can consider yourself done unless you would like to keep going and remove the solenoid and extra hoses (read: the right way). It's like a choose your destiny novel!
==========
====================
-Optional: Remove the strut bar to provide extra room for yourself (When re-installing, tighten all bolts to 44 N/m or 32 ft/lb)
8.
I found it easier to remove the strut tower bar to make it easier to reach back there. You'll need 12mm either deep socket or ratcheting wrench. There will be 4 bolts holding that gold vacuum plumbing to the intake manifold. You will then find the large hose coming from the driver's side. I had to cut mine because there was no way that thing was coming off the nipple without some serious force.
9. Place the check valve with the side that was connected toward the intake manifold VTA and the other end on the EVAP purge line that comes into the engine bay (the fat one where it would connect to the bracket).
10.Cap the location for this line on the intake manifold. Disconnect and remove the EVAP solenoid.
====================
==========
In the ECU:
-XXX- See Mr Fred Quote Below, might be good anyway- Change Periphery 0 (FAA) bit 11 to 1 (to disable EGR Timing advance)
-XXX- Not necessary if disabled correctly - Change Periphery 2 (FCA) bit 09 to 0 (to disable P0401 EGR Test)
-XXX- Unrelated, but a good change for anyone with problems
- Change periphery 4 (FEA) bit 14 to 1 (to disable MAP vs Baro test on startup - not necessary but doesn't hurt)Ok, after some more disassem of the EGR routines, I have found that Periphery 0 (FAA) bit11 does not actually shut off the EGR system until the coolant temp passes ~68C. Its ok to use if you plan on ripping out all the EGR stuff. However, it turns out that there is a byte length value that completely disables the EGR system and is a better choice to use.
For USDM Evo 8 94170008-15 use:
For USDM Evo 8 96420007-11, 96940011, USDM Evo 9 88590013-15, and EDM Evo 8 96530006 use:
A value of "0" disables the EGR system and sets the EGR duty to 0% all the time. "1" enables the EGR system.
For USDM Evo 8 94170008-15 use:
Code:
<table name="EGR System Enable/Disable" category="Emissions EGR" address="103D" type="1D" level="2" scaling="uint8"/>
Code:
<table name="EGR System Enable/Disable" category="Emissions EGR" address="1041" type="1D" level="2" scaling="uint8"/>
For emissions:
Update your OBDII tables to report "passed" for the EGR test. I will allow you to find this elsewhere.
==========
====================
==========
Alternative Method / Additional steps: (better but more difficult)
Using this method should significantly reduce temperatures in the intake manifold. It will also facilitate the use of a Phenolic spacer which can leave your intake manifold cool to the touch. Without using this method you risk melting or deforming a phenolic spacer. This happens because you are not blocking the hole in the head before the very hot EGR gasses reach the intake manifold.
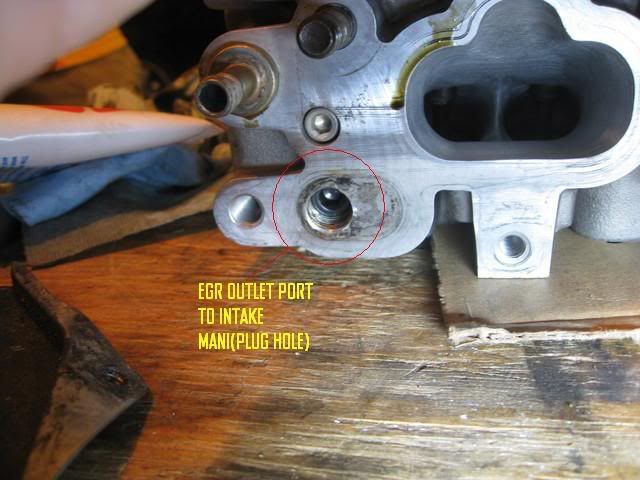
Note the small port in this image where EGR gasses pass around the head and back into the intake manifold before the EGR solenoid.
While I had the head off the car, I was poking around it and was trying to think of a way to totally block off the EGR port to keep the hot exhaust gasses out of the intake manifold itself. See, too many people worry about putting the heat spacers in between the manifold and head when it really doesn't do much because you still have 900*+ exhaust gasses inside of the EGR runner on the intake manifold.
Basically, to make a long story short, I pulled out my digital verniers and measured the hole diameter and it dang near came out to exactly the tap drill diameter for a standard old 1/8" NPT thread. So, I stuck my 1/8" NPT tap in there, and ran the tap in about 2". I ordered a stainless 1/8" NPT plug, and tightened it in there really good. It currently sits in the hole about 0.5" deep, away from the intake manifold mating surface. Since I have had it in there, I have put estimated 15,000 miles on the car, and every time I pull the intake manifold off, I check it to make sure it hasnt come loose. So far, no issues to report.
It's really that simple. Measure your port hole (Because it is a cast in runner "tube" if you will) and as long as it is really close and not too big, then just oil up an 1/8" NPT tap and have at it. I would definately stay away from a brass plug though due to the heat.
You technically could do it with the head on the car, and just vacuum out the port to get all the shavings out of the hole. It will work because the other end of the port is in the exhaust chanmber, and open to atmospheric pressure, so if you stick the vacuum on the hole it should get all your shavings out no problem.
==========
Additional information:
If following the diagram above, you can remove the evaporative emission purge solenoid and evaporative canister as well. In doing so, you will simply need to plug the port on the intake manifold, and vent the evaporative hose coming into the engine bay. The canister itself can be removed and the source hose to the canister vented as seen here:
The Canister should be on the direr's side of the car next to the gas tank / spare:
Please note the check valve is represented backwards in the image shown above, as well as some of the other FSM diagrams. This check valve is useful if you will be removing the charcoal canister as well to prevent anything from getting into your fuel system.
Remove all of this diagram after hose #7, and plug hose #7 with the check valve from the front of the car.
Change periphery 2 (FCA) bit 15 & 14 & 13 to 0 (to disable EVAP checks if you removed these solenoids)
Change periphery 4 (FEA) bit 07 to 0 (to disable FPS if you removed it also) (FCA bit 15 will also take care of this)
Props to anyone who's pictures I didn't quote!
https://www.evolutionm.net/forums/7036083-post82.html
https://www.evolutionm.net/forums/7043356-post89.html
https://www.evolutionm.net/forums/7052598-post93.html
Last edited by fostytou; Sep 8, 2009 at 10:29 PM.
 Sep 9, 2009, 04:39 AM
#139
Evolved Member
iTrader: (30)

Join Date: Dec 2003
Location: USA
Posts: 929
Likes: 0
Received 0 Likes
on
0 Posts
Frosty, what are you using this for:
1 M8 x 1.25 bolt 16mm long and 1 M8 lock washer (alternatively since this is an uncommon size, you can get a 20mm bolt and add 2 M8 washers, preferrably stainless)
Also I am not following the use of the check valves. Is there 2 and each one is re-used at either end of the EVAP lines?
Proofread catch:
The Canister should be on the direr's side of the car next to the gas tank / spare:
Change to driver's.
Sep 9, 2009, 09:59 AM
#140
Frosty, what are you using this for:
1 M8 x 1.25 bolt 16mm long and 1 M8 lock washer (alternatively since this is an uncommon size, you can get a 20mm bolt and add 2 M8 washers, preferrably stainless)
Also I am not following the use of the check valves. Is there 2 and each one is re-used at either end of the EVAP lines?
Proofread catch:
The Canister should be on the direr's side of the car next to the gas tank / spare:
Change to driver's.
1 M8 x 1.25 bolt 16mm long and 1 M8 lock washer (alternatively since this is an uncommon size, you can get a 20mm bolt and add 2 M8 washers, preferrably stainless)
Also I am not following the use of the check valves. Is there 2 and each one is re-used at either end of the EVAP lines?
Proofread catch:
The Canister should be on the direr's side of the car next to the gas tank / spare:
Change to driver's.

The 2 bolts are required because the actual EGR bolts are much longer since they pass through the whole EGR valve. The blockoff plate is only 1/8" thick. I'll add that detail.
I'll try to clarify the check valve thing more and put an either/or. There is only 1 valve on the lines, and it should be used at 1 location if keeping the canister, and at the other if you are getting rid of it. Essentially you are just moving it "upstream" to prevent any vapors from going into the fuel tank wherever you terminate the lines.
Sep 9, 2009, 12:12 PM
#141
I commend your efforts to collect all the information into just one post Fostytou. Now can you help with the cold start/warm up procedure? It's just down right terrible for my IX, and I've already talked with several people about a fix, but to no avail. It's upsetting because the car is much more responsive with the EGR bits turned off.
Last edited by SWOLN; Sep 9, 2009 at 12:17 PM.
Sep 9, 2009, 12:21 PM
#142
I commend your efforts to collect all the information into just one post Fostytou. Now can you help with the cold start/warm up procedure? It's just down right terrible for my IX, and I've already talked with several people about a fix, but to no avail. It's upsetting because the car is much more responsive with the EGR bits turned off.
-XXX- See Mr Fred Quote Below, might be good anyway- Change Periphery 0 (FAA) bit 11 to 1 (to disable EGR Timing advance)
-XXX- Not necessary if disabled correctly - Change Periphery 2 (FCA) bit 09 to 0 (to disable P0401 EGR Test)
<table name="EGR System Enable/Disable" category="Emissions EGR" address="1041" type="1D" level="2" scaling="uint8"/>
(set to 0)
If that does not help, have you properly adjusted your startup IPW and initial ISCV positions? Is it possible you scaled your MAF strangely?
 Sep 9, 2009, 05:58 PM
#144
Sorry, I'm not sure if there is any more appropriate place to put this for proofreading. Can you guys take a look and tell me what may or may not be wrong? I'll go ahead and post it in the how-to when done...
----
Questions:
1. Is there a bolt to get the FPR Solenoid of the intake manifold stay? ...or do you just kind of bend it off? ...Something to push like the harnesses on the intake manifold?
2. Do I have the right location for the charcoal canister?
3. Should I be recommending to put the check valve on hose 1, 12 (where the canister is now), or #7 as written? (I think this is wrong)
4. Anything I forgot?
-------
1. Is there a bolt to get the FPR Solenoid of the intake manifold stay? ...or do you just kind of bend it off? ...Something to push like the harnesses on the intake manifold?
10mm bolt. Shorty 10mm with a smallish socket, you may need an pivot joint to reach, or to make life easier.
2. Do I have the right location for the charcoal canister?
Yes, Driver's side..tucked next to the bumper. It's not as heavy as others reported, maybe 4-5lbs
3. Should I be recommending to put the check valve on hose 1, 12 (where the canister is now), or #7 as written? (I think this is wrong)
No need for checkvalves, the hose that comes from the rear of the car is just a vent hose and you can vent to air. The hose that had the checkvalve just needs to be capped off at the nipple on the intakemanifold or you can use it for boost source reference.
4. Anything I forgot?
Pretty thorough write up. I would add for visual aid(i like using this phrase) a picture courtesy of "scheides and his wife" what egr port looks like on the head once plugged up. 1/8npt plug + tap + vacuum for shavings = no egr gases to reach intake mani.
Last edited by Evoryder; Sep 9, 2009 at 06:01 PM.
Sep 9, 2009, 06:43 PM
#145
I commend your efforts to collect all the information into just one post Fostytou. Now can you help with the cold start/warm up procedure? It's just down right terrible for my IX, and I've already talked with several people about a fix, but to no avail. It's upsetting because the car is much more responsive with the EGR bits turned off.
Sep 9, 2009, 08:17 PM
#148
Evolving Member
iTrader: (2)
Join Date: Feb 2009
Location: State College, PA
Posts: 109
Likes: 0
Received 0 Likes
on
0 Posts
Originally Posted by mrfred
Ok, after some more disassem of the EGR routines, I have found that Periphery 0 (FAA) bit11 does not actually shut off the EGR system until the coolant temp passes ~68C. Its ok to use if you plan on ripping out all the EGR stuff. However, it turns out that there is a byte length value that completely disables the EGR system and is a better choice to use.
For USDM Evo 8 94170008-15 use:
Code:
For USDM Evo 8 96420007-11, 96940011, USDM Evo 9 88590013-15, and EDM Evo 8 96530006 use:
Code:
A value of "0" disables the EGR system and sets the EGR duty to 0% all the time. "1" enables the EGR system.
Ok, after some more disassem of the EGR routines, I have found that Periphery 0 (FAA) bit11 does not actually shut off the EGR system until the coolant temp passes ~68C. Its ok to use if you plan on ripping out all the EGR stuff. However, it turns out that there is a byte length value that completely disables the EGR system and is a better choice to use.
For USDM Evo 8 94170008-15 use:
Code:
Code:
<table name="EGR System Enable/Disable" category="Emissions EGR" address="103D" type="1D" level="2" scaling="uint8"/>
Code:
Code:
<table name="EGR System Enable/Disable" category="Emissions EGR" address="1041" type="1D" level="2" scaling="uint8"/>
Sep 9, 2009, 08:21 PM
#149
NOTE: When removing the entire solenoids and hoses disable the following periphery bits.
Periphery 0/FAA:
-EGR(ign advance) Bit 11 disable(some people leave it on, up to you)
Periphery 2/FCA:
- EVAP> Bit 13,14,15 Disable
- EGR > Bit 9 Disable
Periphery 4/FEA:
- FPR> Bit 7 Disable(When you also disable FCA/P2 Bit 15 that will also take care of the FPR)
Periphery 0/FAA:
-EGR(ign advance) Bit 11 disable(some people leave it on, up to you)
Periphery 2/FCA:
- EVAP> Bit 13,14,15 Disable
- EGR > Bit 9 Disable
Periphery 4/FEA:
- FPR> Bit 7 Disable(When you also disable FCA/P2 Bit 15 that will also take care of the FPR)