Patch how-to: manifold air temperature logging
 Apr 25, 2008, 08:59 PM
#1
Patch how-to: manifold air temperature logging
NOTE: How-to is in the second post in this thread.
I'm excited. I just finished up a patch this evening that will allow the ECU to read manifold air temperature on USDM Evos. I'm taking over the ADC input that is used for monitoring fuel temperature on USDM Evos. Fuel temperature is monitored only for emissions performance. It is not used to control emissions equipment. The patch includes code to simulate the fuel temperature and allow the fuel temperature scaling to be replaced with GM IAT sensor scaling. The car will pass emissions with this setup. Basically, there is absolutely nothing to lose with this patch. :-) I've got the patch completed for the 88590015 ROM. It should be pretty easy to port to other ROMs, but don't know how quickly I'll get to it. Perhaps tephra will incorporate it into his next set of pre-patched ROMs.
Hardware needed will be a GM IAT sensor, NPT fitting, a sensor wiring pigtail, and a pin for your ECU. Total cost for hardware is around $60. Weld the NPT fitting to one of your UICPs. One wire from the sensor will need to go to the fuel temperature signal input on the ECU. The other wire goes to ground (bolt it to the engine block).
The sensor part numbers are:
GM #25036751
GP SORENSEN 779-19001
AC DELCO 213-190
NIEHOFF IGNITION TS83631 was DR-136W
WELLS SU107 MSD 2320 (includes connector)
The pigtail PN is 12102620.
Summit Racing has 3/8" NPT bungs that are suitable for welding to the UICP.
Manifold air temperature measurement can be very handy for several reasons:
1) Finally a good way to monitor MAT for speed density. Its better than highjacking the IAT sensor input because the IAT sensor is used to control quite a few things in the ECU. By using the fuel temperature ADC input, the IAT sensor can be kept intact and working.
2) Good for monitoring turbo performance. We can finally see how hot the air is getting from the stock turbo at 7500 rpm after the turbo and IC.
3) Good for testing intercooler performance. We finally have a tool that allows us to easily measure the effect of an aftermarket IC on intake air temperature at the manifold.
On a side note, with the addition of a pressure sensor between the turbo and the IC, I would have enough info to do some high quality intercooler testing. There is yet another ADC input that I could use for this pressure sensor. I'm very tempted to pickup where the "real intercooler test" thread died off. Or perhaps someone else would like to do this with a little help from me?
Anyhow, more details in a day or so.
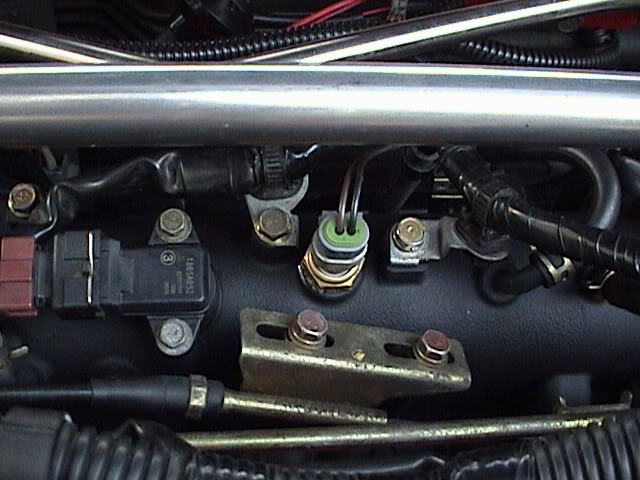
Here is a pic showing my setup. The loom with the signal wire turns down at the left end of the intake manifold, runs down the firewall, and into the tranny tunnel. The loom ends at the through-hole that people use for wiring O2 sensors. I ran the wire through that same hole and right up to the ECU.

I'm excited. I just finished up a patch this evening that will allow the ECU to read manifold air temperature on USDM Evos. I'm taking over the ADC input that is used for monitoring fuel temperature on USDM Evos. Fuel temperature is monitored only for emissions performance. It is not used to control emissions equipment. The patch includes code to simulate the fuel temperature and allow the fuel temperature scaling to be replaced with GM IAT sensor scaling. The car will pass emissions with this setup. Basically, there is absolutely nothing to lose with this patch. :-) I've got the patch completed for the 88590015 ROM. It should be pretty easy to port to other ROMs, but don't know how quickly I'll get to it. Perhaps tephra will incorporate it into his next set of pre-patched ROMs.
Hardware needed will be a GM IAT sensor, NPT fitting, a sensor wiring pigtail, and a pin for your ECU. Total cost for hardware is around $60. Weld the NPT fitting to one of your UICPs. One wire from the sensor will need to go to the fuel temperature signal input on the ECU. The other wire goes to ground (bolt it to the engine block).
The sensor part numbers are:
GM #25036751
GP SORENSEN 779-19001
AC DELCO 213-190
NIEHOFF IGNITION TS83631 was DR-136W
WELLS SU107 MSD 2320 (includes connector)
The pigtail PN is 12102620.
Summit Racing has 3/8" NPT bungs that are suitable for welding to the UICP.
Manifold air temperature measurement can be very handy for several reasons:
1) Finally a good way to monitor MAT for speed density. Its better than highjacking the IAT sensor input because the IAT sensor is used to control quite a few things in the ECU. By using the fuel temperature ADC input, the IAT sensor can be kept intact and working.
2) Good for monitoring turbo performance. We can finally see how hot the air is getting from the stock turbo at 7500 rpm after the turbo and IC.
3) Good for testing intercooler performance. We finally have a tool that allows us to easily measure the effect of an aftermarket IC on intake air temperature at the manifold.
On a side note, with the addition of a pressure sensor between the turbo and the IC, I would have enough info to do some high quality intercooler testing. There is yet another ADC input that I could use for this pressure sensor. I'm very tempted to pickup where the "real intercooler test" thread died off. Or perhaps someone else would like to do this with a little help from me?
Anyhow, more details in a day or so.
Here is a pic showing my setup. The loom with the signal wire turns down at the left end of the intake manifold, runs down the firewall, and into the tranny tunnel. The loom ends at the through-hole that people use for wiring O2 sensors. I ran the wire through that same hole and right up to the ECU.
Last edited by mrfred; Apr 15, 2010 at 11:16 AM.
 Apr 25, 2008, 09:00 PM
#2
Updates
June 5, 2008 - Added some additional detail on finding a suitable bung to use when attaching the sensor to the UICP.
January 13, 2009 - After doing some additional testing of the fuel temperature control circuit in the ECU, I determined that the GM IAT temperature scaling values needed to be revised. The revised GM IAT temperature scaling values are in the links to the patched ROMs. You should see your MAT temperature measurements drop by 2-4 degrees F.
February 23, 2009 - Made some minor changes to the instructions.
February 24, 2009 - Completely revamped instructions. All ported ROMs now convered in this post.
Introduction
This post is a how-to for using the factory ECU to read and log manifold (post IC) air temperature. An outline of the setup process is as follows:
1) Perform some modifications to your ROM.
2) Setup EvoScan or Mitsulogger to read the data that the ECU will measure.
3) Purchase and install a GM IAT (about $50 for all the parts).
Supported ROMs
88590015
96530006
94170015
Background
I've always thought it would be nice to be able to be able to measure post-IC air temperature to compare to IAT so that I could have a feel intercooler and turbo performance. This mod is also a key step in a clean speed density patch as it allows the IAT sensor to remain in place.
Instructions for modifying ECUFlash definitions and your ROM
In this section are the current instructions for modifying ECUFlash and your ROM. Instructions for modifying the EvoScan "Data.xml" file are a little further down. I'll add more ROMs as I have time.
Note: The ECUFlash definitions as listed here are compatible with ECUFlash v1.31+. To use these defs with older versions of ECUFlash, change <endian="big"> to <endian="little">.
There is a zipped file below for each supported ROM. In the zipped file, you'll find:
A) An stock ROM with the patch applied.
B) A set of ECUFlash definitions that point to all the areas of the ROM that need to be modified.
C) A set of basic instructions on how to perform the patch. The instructions are listed here in this thread as well.
The basic steps apply this patch are:
1) Close ECUFlash if its already running.
2) Copy the xml definitions in the zipped file over to your ECUFlash "ROMID".xml file, e.g. 88590015.xml. The entries can be placed anyhere between the <rom> and </rom> tags. Most people place the new entries towards the end. After copying over the entries, save the file.
3) Launch ECUFlash, open the stock patched ROM included in the zipped file, and find the new tables. They'll be in a new subsection called "MAT".
4) Open a copy of your current ROM, and copy the patch table data from the patched stock ROM over to your current ROM. Do not copy all the tables from your current ROM to the patched stocked ROM. That's the wrong direction. Note that fuel temperature scaling table is very long. Use "Select All" to copy the values from the patched stock ROM. Save your ROM file.
5) Upload your patched ROM to your ECU. That's it for applying the patch. Next steps are the hardware mods and EvoScan mods which are covered in the next sections.
Patched ROM and xml files are here
88590015 ROM Patched
96530006 ROM Patched
94170015 ROM Patched
Instructions for EvoScan
Note: This entry is written to work with EvoScan v2.1 - v2.5. Should work with versions newer than v2.5 as well. To make it work with older versions of EvoScan may require removing some of the descriptors in the entry. Not sure which ones though. Its been a while since I used older versions of EvoScan.
Add the following entry to your EvoScan "Data.xml" file:
----- (don't add the "-----")
<DataListItem DataLog="Y" Color="" Display="Manifold Air Temp" LogReference="MAT" RequestID="09" Eval="1.8*x-40" Unit="deg F" MetricEval="" MetricUnit="" ResponseBytes="1" GaugeMin="-40" GaugeMax="300" ChartMin="-40" ChartMax="300" ScalingFactor="1" Notes=""/>
-----
Save the Data.xml file. That's it for the software modifications.
GM IAT Installation
Before getting started, be sure that you have a few female ECU pins handy. The pins for Evo 8s are widely available. Jack_of_Trades has posted the part number on this *page*. (You'll need to scroll down a little ways to find the pin part number.). Evo 9 ECU pins are available from Jack_of_Trades. (He is the only source for new Evo 9 ECU pins in the USA and perhaps worldwide.) PM him to get a few.
The sensor should be installed somewhere after the DV/BOV branch. Easiest spot is the UICP section before the intake manifold, but the best spot is on the intake manifold itself. There is a spot on the manifold that is ideal for tapping for the sensor. (Its the spot where a MAT is installed on JDM Evos). The GM sensor has 3/8" NPT pipe threads on it. To install it on the UICP requires welding on a 3/8" FNPT bung. An aluminum bung is needed for an aluminum UICP, and a stainless bung is recommended for a stainless UICP. These can be hard to find locally. Easiest place to get one is Summit Racing. Their in-house 3/8" bung is what I used. Installing on the intake manifold requires drilling and tapping the intake manifold.
After installing the sensor, run one wire to ground on the engine block, and run the other wire to the fuel temp sensor input pin on your ECU plug. For Evo 8s, this is pin #77. For Evo 9s, this is pin #96. Evo 8 ECU pinout is here:
http://www.roadraceengineering.com/e...-ecuwiring.htm
Evo 9 ECU pinout is here:
https://www.evolutionm.net/forums/sh...d.php?t=313670
Remove the fuel temp sensor wire and tape it back out of the way. Jack_of_Trades has instructions on this *page* (again scroll down) on how to do the removal and install for the Evo 8. Instructions for the Evo 9 are *here*. Pinout diagram for the USDM Evo 8 is *here*. The diagram for the Evo 9 is *here*.
That's it.
Last edited by mrfred; Feb 24, 2009 at 10:18 AM.
 haha
haha

 Apr 26, 2008, 08:22 AM
#7

Awesome, mrfred.
Actually, I just ordered up my GM sensor and pigtal a few days back, so good timing. I wanted to use it to measure the stock IC performance before I upgrade the unit to an ETS 3.5" or ETS 4" so that I can have some data for comparison and review.
I have Innovate's SSI-4, which is a little box that gives me 4 0-5V inputs, so I don't need this extra ECU input for now, but it's absolutely awesome that you are freeing up inputs like this. It's great to be able to log additional sensors directly into the stock ECU.
Here are the part numbers for the sensor and pigtail and a couple of places/prices:
GM sensor # 25036751 (3/8 NPT) ($22.77 gmpartsdirect.com) http://www.bmotorsports.com/shop/pro...roducts_id/400 (14.99)
GM pigtail # 12102620 ($13.47 gmpartsdirect.com) http://www.bmotorsports.com/shop/pro...roducts_id/408 (5.99)
I just ordered mine from the bmotorsports site, since it was a bit cheaper. Should be here any day now.
I won't post the scaling, since I'm sure mrfred will add that to his post or post#2 when he gets time to add the code and details. The scaling will depend on the resistor value that is being used.
Anyway, for the 96940011 ROM, when mrfred posts up the code and locations for his ROM, I will see if I can do it for the 05 ROM. I can't promise anything at this point, but I'll see if I can get some time and apply what mrfred is doing to the 05 ROM.
Eric
Last edited by l2r99gst; Apr 26, 2008 at 08:26 AM.
Trending Topics
Apr 26, 2008, 08:40 AM
#8
Awesome, mrfred.
Actually, I just ordered up my GM sensor and pigtal a few days back, so good timing. I wanted to use it to measure the stock IC performance before I upgrade the unit to an ETS 3.5" or ETS 4" so that I can have some data for comparison and review.
I have Innovate's SSI-4, which is a little box that gives me 4 0-5V inputs, so I don't need this extra ECU input for now, but it's absolutely awesome that you are freeing up inputs like this. It's great to be able to log additional sensors directly into the stock ECU.
Here are the part numbers for the sensor and pigtail and a couple of places/prices:
GM sensor # 25036751 (3/8 NPT) ($22.77 gmpartsdirect.com) http://www.bmotorsports.com/shop/pro...roducts_id/400 (14.99)
GM pigtail # 12102620 ($13.47 gmpartsdirect.com) http://www.bmotorsports.com/shop/pro...roducts_id/408 (5.99)
I just ordered mine from the bmotorsports site, since it was a bit cheaper. Should be here any day now.
I won't post the scaling, since I'm sure mrfred will add that to his post or post#2 when he gets time to add the code and details. The scaling will depend on the resistor value that is being used.
Anyway, for the 96940011 ROM, when mrfred posts up the code and locations for his ROM, I will see if I can do it for the 05 ROM. I can't promise anything at this point, but I'll see if I can get some time and apply what mrfred is doing to the 05 ROM.
Eric
Actually, I just ordered up my GM sensor and pigtal a few days back, so good timing. I wanted to use it to measure the stock IC performance before I upgrade the unit to an ETS 3.5" or ETS 4" so that I can have some data for comparison and review.
I have Innovate's SSI-4, which is a little box that gives me 4 0-5V inputs, so I don't need this extra ECU input for now, but it's absolutely awesome that you are freeing up inputs like this. It's great to be able to log additional sensors directly into the stock ECU.
Here are the part numbers for the sensor and pigtail and a couple of places/prices:
GM sensor # 25036751 (3/8 NPT) ($22.77 gmpartsdirect.com) http://www.bmotorsports.com/shop/pro...roducts_id/400 (14.99)
GM pigtail # 12102620 ($13.47 gmpartsdirect.com) http://www.bmotorsports.com/shop/pro...roducts_id/408 (5.99)
I just ordered mine from the bmotorsports site, since it was a bit cheaper. Should be here any day now.
I won't post the scaling, since I'm sure mrfred will add that to his post or post#2 when he gets time to add the code and details. The scaling will depend on the resistor value that is being used.
Anyway, for the 96940011 ROM, when mrfred posts up the code and locations for his ROM, I will see if I can do it for the 05 ROM. I can't promise anything at this point, but I'll see if I can get some time and apply what mrfred is doing to the 05 ROM.
Eric
The patch is actually very easy. Only one block of code to replace, and all the ROMs should have almost the exact same code segment to search for.
Hope you'll be posting up the intercooler data. I'm thinking about the ETS 3.5" for myself eventually. Since there are four inputs, will you be monitoring pressure and temperature before/after?
 Apr 26, 2008, 09:39 AM
#10
I was thinking about it, but I am more interested in pre/post IC temps at this point. It would be great to have pre/post pressure as well, but I don't know if I want to buy another map sensor just for this purpose. It would be great data, though.
Eric
Apr 26, 2008, 01:12 PM
#11
So because I have MAFT Pro for my speed density conversion I have the GM IAT and wiring. I am thinking that I can vampire that and run it in like you described? This is really cool...Good work MAN!!!
I have been monitoring the MIAT with the MAFT pro but havent been able to log it. It will also be cool to see what effect things like the intercooler sprayer actually have on the temps.
I have been monitoring the MIAT with the MAFT pro but havent been able to log it. It will also be cool to see what effect things like the intercooler sprayer actually have on the temps.
Apr 26, 2008, 05:02 PM
#12
I think I am going to mount the GM IAT on my intake manifold in the area that is used for IAT on the uk models, it is the bung we have on our USDM models but is not tapped.
I am swapping out my intake manifold soon for a ported one so it will be the prefect time to do it.
I am swapping out my intake manifold soon for a ported one so it will be the prefect time to do it.
Apr 26, 2008, 07:24 PM
#14

I think I am going to mount the GM IAT on my intake manifold in the area that is used for IAT on the uk models, it is the bung we have on our USDM models but is not tapped.
I am swapping out my intake manifold soon for a ported one so it will be the prefect time to do it.
I am swapping out my intake manifold soon for a ported one so it will be the prefect time to do it.