Help with FMIC install (Pic included)
 May 28, 2009, 05:18 PM
#1
Newbie
Thread Starter
Join Date: Jan 2009
Location: Far far away...
Posts: 80
Likes: 0
Received 0 Likes
on
0 Posts
Help with FMIC install (Pic included)
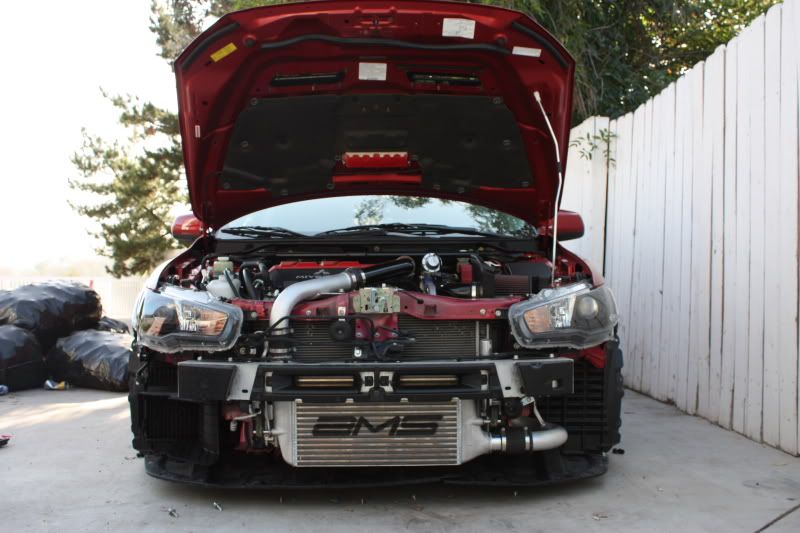
So I take off the oem fmic and get ready to install the AMS one, only to find out that the holes don't line up at all.
The oem holes are vertical and directly behind the fmic... while the AMS mount has them horizontal and outwards.
I included a pic incase I made no sense
Help please!

The oem holes are vertical and directly behind the fmic... while the AMS mount has them horizontal and outwards.
I included a pic incase I made no sense
Help please!
 May 28, 2009, 05:36 PM
#3
Newbie
Thread Starter
Join Date: Jan 2009
Location: Far far away...
Posts: 80
Likes: 0
Received 0 Likes
on
0 Posts
So it's the right intercooler right? I was thinking they gave me the wrong one....
So is this the part where you bolted it to? Sorry for the cell pics


So is this the part where you bolted it to? Sorry for the cell pics


Trending Topics
May 28, 2009, 08:34 PM
#8
Newbie

Join Date: Feb 2008
Location: Livermore CA.
Posts: 32
Likes: 0
Received 0 Likes
on
0 Posts
May 28, 2009, 09:37 PM
#9
Newbie
Thread Starter
Join Date: Jan 2009
Location: Far far away...
Posts: 80
Likes: 0
Received 0 Likes
on
0 Posts
Sweet thank you guys! 
I didn't have enough to time finish tonight, but will definitely do so tomorrow.
Note to self allow more than 2 hours to complete a job when doing so for the first time!
I didn't have enough to time finish tonight, but will definitely do so tomorrow.
Note to self allow more than 2 hours to complete a job when doing so for the first time!
May 29, 2009, 05:18 PM
#10
Newbie

Join Date: May 2009
Location: USA CA
Posts: 1
Likes: 0
Received 0 Likes
on
0 Posts
 , but does anyone know the part number for the lower fmic bracket (if that's whats it called, the frame piece with the dead weight bolted on top) in I Phantom I's first pic? Thanks
 May 30, 2009, 02:06 AM
#13
") May 30, 2009, 04:48 AM
May 30, 2009, 04:48 AM
#15
Evolving Member
iTrader: (4)
Join Date: Jun 2007
Location: NorCal
Posts: 223
Likes: 0
Received 0 Likes
on
0 Posts
OT, but the weight is very low in the car's center of gravity whereas the fenders and hood are much higher. Adding weight that low definitely helps with the overall balance of the car. Albeit I would just remove the weight and then remove the interior of the trunk, balance re-achieved lol.
On the VIII MR's and IX MR's, Mitsubishi stated that adding an aluminum roof lowered the cars center of gravity by 3 inches.
On the VIII MR's and IX MR's, Mitsubishi stated that adding an aluminum roof lowered the cars center of gravity by 3 inches.