HOW TO - Control boost using ECUFLash and 3 port GM boost solenoid
 Jun 11, 2007, 11:30 PM
#1
HOW TO - Control boost using ECUFLash and 3 port GM boost solenoid
DISCLAIMER
This mod will change boost charateriscs drasticallly. Do at your own risk.
BIG THANKS TO
Everyone at NorCalEvo.net (razorlab,ST, spoolin, XVeloX, etc) Malibu Jack, mrfred, jcsbanks, and anybody else that has helped in the development of ECU controlled boost.
You will need:
Tools
3/8 rachet
10mm socket
phillips screwdriver
regular (flat) screwdriver
regular pliars
needle nose pliars
soldering gun
heat gun
From the store(s):
5/32 (4mm) vaccum hose (3-4 ft)
heat shrink
10 ohm 1 watt resistor
From GM dealer or online:
*** All prices here are old and wrong. I will update it shortly. Prices now are around 50 for solenoid and 20-30 for pigtail***
Got it from Rock Auto (http://www.rockauto.com)
GM 3 port: 12.69. AC Delco part number 214-474.
GM pigtails for 15.64. AC Delco part number PT 374.
GM boost solenoid, GM Part # 1997152
Pigtails, GM Part # 12102747
Total at the dealer was around 50$
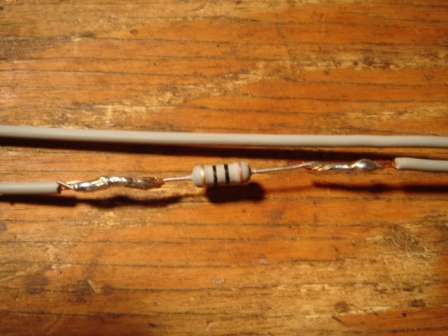
Step 1
You need to solder the resistor inline on one of the wire on the pigtails.
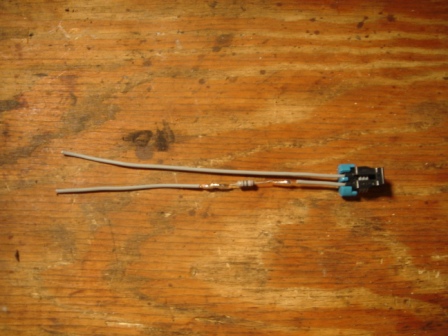
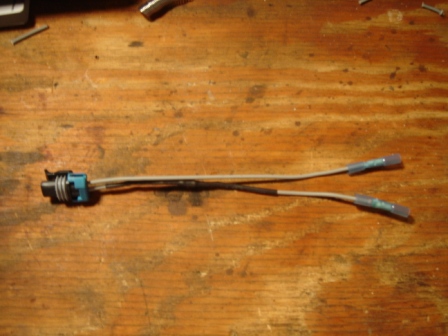
Step 2
Cover the connection with heat shrink
Step 3
Remover air filer and stock boost control lines and solenoid. Use the last how to for info on this.
https://www.evolutionm.net/forums/sh...d.php?t=227006
Step 4
By now you have the stuff removed. Connect the pigtail to the stock wire. I cut off the solenoid and connected with butt connect that were included with the pigtails. There is also alternatives, you could solder it and you could also use in-line taps, so you dont have to cut the stock plug off.
This mod will change boost charateriscs drasticallly. Do at your own risk.
BIG THANKS TO
Everyone at NorCalEvo.net (razorlab,ST, spoolin, XVeloX, etc) Malibu Jack, mrfred, jcsbanks, and anybody else that has helped in the development of ECU controlled boost.
You will need:
Tools
3/8 rachet
10mm socket
phillips screwdriver
regular (flat) screwdriver
regular pliars
needle nose pliars
soldering gun
heat gun
From the store(s):
5/32 (4mm) vaccum hose (3-4 ft)
heat shrink
10 ohm 1 watt resistor
From GM dealer or online:
*** All prices here are old and wrong. I will update it shortly. Prices now are around 50 for solenoid and 20-30 for pigtail***
Got it from Rock Auto (http://www.rockauto.com)
GM 3 port: 12.69. AC Delco part number 214-474.
GM pigtails for 15.64. AC Delco part number PT 374.
GM boost solenoid, GM Part # 1997152
Pigtails, GM Part # 12102747
Total at the dealer was around 50$
Step 1
You need to solder the resistor inline on one of the wire on the pigtails.
Step 2
Cover the connection with heat shrink
Step 3
Remover air filer and stock boost control lines and solenoid. Use the last how to for info on this.
https://www.evolutionm.net/forums/sh...d.php?t=227006
Step 4
By now you have the stuff removed. Connect the pigtail to the stock wire. I cut off the solenoid and connected with butt connect that were included with the pigtails. There is also alternatives, you could solder it and you could also use in-line taps, so you dont have to cut the stock plug off.
Last edited by Evo_Jay; Nov 25, 2009 at 06:41 AM.

The following users liked this post:
MV auto (Feb 16, 2019)
Jun 11, 2007, 11:32 PM
#2
Step 5
Now you have to mount the solenoid. The first way I mounted it DID NOT work with the stock intake, but will work with an aftermarket intake.
This way will work with the stock airbox.

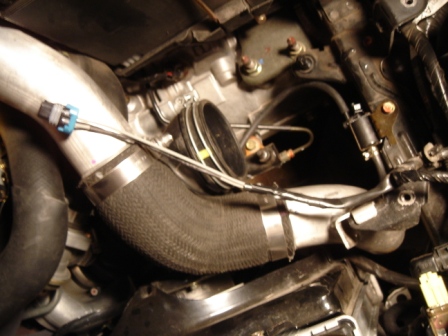
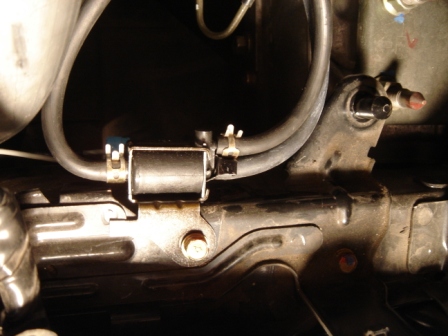
Step 6
Now you have to run the vacuum lines. You WONT NEED ANY brass restrictors/boost pills or tee's. Here is a pic of the GM BCS. Pretty self explanatory. Port "A" goes to the wastegate. Port "B" goes to the lil port on the bottom of the stock intake (If using a aftermarket intake, the line can just VTA, if there is no lil port on the aftermarket intake). Port "C" goes to the the nipple on the turbo/turbo outlet pipe (or other source of vac/boost)

Now you have to mount the solenoid. The first way I mounted it DID NOT work with the stock intake, but will work with an aftermarket intake.
This way will work with the stock airbox.
Step 6
Now you have to run the vacuum lines. You WONT NEED ANY brass restrictors/boost pills or tee's. Here is a pic of the GM BCS. Pretty self explanatory. Port "A" goes to the wastegate. Port "B" goes to the lil port on the bottom of the stock intake (If using a aftermarket intake, the line can just VTA, if there is no lil port on the aftermarket intake). Port "C" goes to the the nipple on the turbo/turbo outlet pipe (or other source of vac/boost)
Last edited by Evo_Jay; Nov 25, 2009 at 06:42 AM.
The following users liked this post:
MV auto (Feb 16, 2019)

 Jun 12, 2007, 12:10 AM
#4
DONT DRIVE UNTIL YOU HAVE ATLEAST LOWERED THE WGDC TO 50
Step 7 - Tuning
The following maps will need to be changed for basic boost control
Max WGDG/Basline WGDC (NOTE: map will be titled MAX WGDC or Baseline WGDC, based on what definitions your using. They are the same map.)
Boost Desired Engine Load
Boost Control Load Offset
Turbo Boost Error Correction
Boost Limit - This is the famous "Boost/fuel Cut". Set this about 20 higher then your max load.
PROCESS
***When taking the car out for the first test drive, roll on to boost SLOWLY and constantly monitor boost. If it starts to boost more then a safe amount for your octane and tune, LET OFF THE GAS.
Zero out the right side of the "Turbo Boost Error Correction" map. (keep a copy of the stock settings somewhere)
Then use the "Max WGDG/Basline WGDC" to get your desired boost curve in 3rd gear.
**Here is an example
RPM - WG duty
2000 - 70
2500 - 60
3000 - 50
3500 - 50
4000 - 50
4500 - 50
5000 - 55
5500 - 55
6000 - 60
6500 - 65
7000 - 70
After you have your desired boost curve, log your load (preferable 2byte load) in 3rd gear from 2500-7500RPM.
Set "Boost Control Load Offset" and the "Boost Desired Engine Load" so when they are added together, they add up to the load in your log (@ the same RPM point). ie if you logged 240 load @ 3500RPM, then the "Boost Control Load Offset" would be 100 and the "Boost Desired Engine Load" to be 140 @ 3500RPM.
After you have your "Boost Desired Engine Load" completely filled out, using your logs for load amounts, then re-enter the stock setting on the right side of the "Turbo Boost Error Correction" map (Stock setting can work, but you may have to tune this map)
It will take some tuning to get everything perfect. Log Load, boost, WGDC, Load Error and WGDC Correction and make correction based on those.
Also, here is a great description on how the error correction work. Thanks mrfred
*BDEL=Boost Desired Engine Load
The "Max WGDC" table is poorly named. It should be called "Baseline WGDC" table. When you are cruising, the car is at 0% WGDC (at least that's what EvoScan says), and when you stomp on the gas, the ECU looks at the engine RPM, then goes to the Baseline WGDC table, reads the WGDC number, and applies that value to the BCS. At that point, the ECU then starts comparing the actual load to the target load (BDEL + boost offset) about once every 0.4 seconds. If the actual load matches the target load, then the ECU continues to follow the WGDC value (vs RPM) in the baseline WGDC table. However, if the ECU sees a discrepancy between actual and target load, then it can/will apply a correction to the WGDC. The amount of correction depends on the values in the boost error correction table. The correction is simply to raise or lower the entire Baseline WGDC curve. So after the correction is applied, the ECU follows the raised/lowered curve. It checks again 0.4 seconds later, and if necessary, raises or lowers the curve again. This is why the correction table isn't a function of RPM. The graph shows the behavior well. The blue arrows show when corrections are made, and its apparent that the ECU is simply raising/lowering the baseline WGDC curve.

Last edited by Evo_Jay; Jul 10, 2009 at 08:44 PM.
Trending Topics
Jun 12, 2007, 08:42 AM
#8
There may be some disadvantages, but I have not found one yet. Maybe razorlab can chime in with some pros and cons of this system.
Last edited by Evo_Jay; Jun 12, 2007 at 08:45 AM.
Jun 12, 2007, 09:15 AM
#9
Evolved Member
iTrader: (38)

Join Date: Aug 2005
Location: NorCal
Posts: 555
Likes: 0
Received 0 Likes
on
0 Posts
Informative post. Thanks.
The instructions don't say which wire on the new harness is supposed to get the resistor...does it matter? Also, you don't specify which wire connects to which from the new harness into the stock BCS harness...does it matter?
The instructions don't say which wire on the new harness is supposed to get the resistor...does it matter? Also, you don't specify which wire connects to which from the new harness into the stock BCS harness...does it matter?
Jun 12, 2007, 09:25 AM
#10
Its not suppose to matter what wire gets the resistor or what wire you connect to the factory wiring. But when I was connecting the solenoid harness, I noticed the the out of the factory wires, the red w/ stripe seemed thicker then the other, so I hooked up the wire w/ resistor to it.
The following users liked this post:
Racing boost (Dec 4, 2022)
Jun 12, 2007, 10:29 AM
#12
Here is what I have seen when moving to GM 3-port solenoids.
If you are tuning it yourself, it is much easier to tune compared to the stock solenoid. It's a faster responding unit and is very responsive to WGDC settings.
It's a 3-port and will be much more precise and responsive in boost management. This is something that can be felt in the performance of the car and boost response.
Con's are taping or soldering into factory harness and it doesn't look as OEM as OEM.
I actually found the company that made the connectors for the OEM harness but unfortunatly they do not produce a female plug as that is part of the OEM solenoid packaging.
Jun 12, 2007, 12:47 PM
#14
Here is what I have seen when moving to GM 3-port solenoids.
If you are tuning it yourself, it is much easier to tune compared to the stock solenoid. It's a faster responding unit and is very responsive to WGDC settings.
It's a 3-port and will be much more precise and responsive in boost management. This is something that can be felt in the performance of the car and boost response.
Con's are taping or soldering into factory harness and it doesn't look as OEM as OEM.
I actually found the company that made the connectors for the OEM harness but unfortunatly they do not produce a female plug as that is part of the OEM solenoid packaging.
If you are tuning it yourself, it is much easier to tune compared to the stock solenoid. It's a faster responding unit and is very responsive to WGDC settings.
It's a 3-port and will be much more precise and responsive in boost management. This is something that can be felt in the performance of the car and boost response.
Con's are taping or soldering into factory harness and it doesn't look as OEM as OEM.
I actually found the company that made the connectors for the OEM harness but unfortunatly they do not produce a female plug as that is part of the OEM solenoid packaging.
Like he said, its a lot easier. I have only roughly tuned the boost map (read made boost maps with one guess) and its already controlling boost well. Also I think this can be tuned two way, the first and better is like the factory way, using BDEL and the error correction. But I think you could also zero out the error correction and just use the duty cycle like a EBC. I havent tried it and dont know how well it would work, but it seems like it would work rather well. Bryan has alot of knowledge on the 3 port, so maybe he'll comment on using just the duty cycle with no error correction, like some EBCs.
