Finally did it..
 Apr 21, 2005, 08:22 PM
#1
Evolved Member
Thread Starter
iTrader: (3)
Join Date: Dec 2003
Location: Jersey, USA
Posts: 674
Likes: 0
Received 0 Likes
on
0 Posts
Orbital Prestige 2-DIN Dash Conversion Kit (Lancer/EVO)
I'd like to thank everyone who has been in support of this thread as well as my efforts for the past year.
I've invested a great deal of time and money into designing the ultimate interior upgrade for the USDM Lancer/EVO, the Orbital Prestige 2-DIN Dash-Conversion Kit.
If you read the next 30 pages, you are bound to find the answer to any as well as every question you could possibly have about this kit. However, to save your time and energy, i'm going to post some basic information about the kit here in this very post.
Major Points:
The original kit has been redesigned to accomodate your existing climate controls via our proprietary custom bezel, resulting in a totally plug & play interior upgrade that can be completed in under 35 minutes with basic tools.
The redesigned kit is 40% less expensive than the original. Price for the new kit will be $295 versus $495 for the old one. The first 100 people in the GB will receive this kit @ $250.
Current options include the DEFI Single-DIN Gauge Pack (matching red on black for a perfect blend to interior lights) and 2-DIN Headunits (Eclipse, Pioneer, Kenwood)
The kit includes everything you need to convert your USDM Single-DIN Dash to a true 2-DIN featuring ABS Plastic, Injection-Molded Mid/Lower Bezels that are second in quality to noneother than the factory itself. It also includes miscellaneous hardware and an illustrated instruction manual to maximize ease of installation.
Payment will be accepted @ our webstore, which will be announced upon the kits release and our formal acknowledgement as an evoM vendor.
We will be offering an array of high-end parts and accessories to this kit as well as the interior of the Lancer/EVO after the release and success of this project. I can't tell you how much I appreciate everyone's support in getting this out to the community. I hope everyone is as happy as I am with the results.
Please PM me to be added to the list below, so we can keep the 30 pages of thread to a minimum for Q&A. Thanks
Original Version


Newer, Redesigned Version

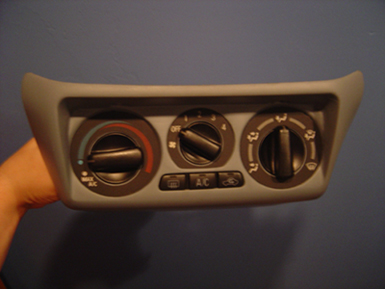
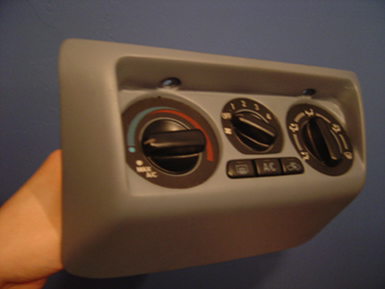
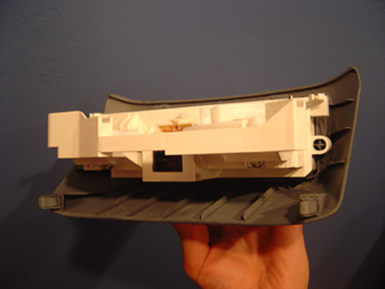
NOTE: The final production piece will match the grain and color of the oem dash.


Group-Buy List (Updated Daily)
1. platinumspecv
2. Evovette
3. zstryder
4. marmutz
5. digital509
6. wiz
7. mike1023
8. tama_mog
9. Bom's Evo
10. yellowevo21
11. alby988
12. wilson1
13. 05evo
14. GotLeon
15. BANKS (lower DIN)
16. DANERS_03
17. edtxag
18. slowevo4me
19. 04WWRS
20. greenpsycho
21. RedAustinIX
22. BoOsTinGEVO190
23. ewoevo
24. Rival
25. SterlingEvo
26. NocturnalEVO
27. ~evilevo~
28. Insidious Evo
29. joebo viii
30. NEO-EVO
31. 7m6m4
32. SeattleEvo
33. Pitbul09
34. MPORT2NR
35. en1gma19 (lower DIN)
36. 1 low mx6
37. Mr. SUAVE
38. bogey8
39. spamsucks
40. raiceboi697
41. jonpfive
42. M00kiE
43. vletnguyen
44. MyCre8n=Evlshn
45. purplegodzilla
46. NYREDEVO
47. onesicklambo
48. alan0108
49. NIGHTMARE
50. Rmhaffa04
51. Derek Baker
52. Adrey
53. cmo-06
54. EVOLOVE
55. J8dailo
56. andyjd
57. Spooldyou
58. stantheman (orbitaluser)
59. Bigpuna
60. DesmoEVO
61. dryad001
62. Guyver
63. HRi Evolution
64. cletus323
65. CRVdrftR05
66. mikenjulie
67. Jrod@Buschur
68. kstewart
69. viciousv322
70. EvoG8r
71. MBaran
72. MadAboutSpeed
73. divaDavid
74. M3this
75. JdmGraphiteMR
76. joesevo8
77. GootBoost
78. edtxag
79. Slowryd
80. thatsMR2u
81. e v o
82. jonpfive
83. mercedevo
84.
85.
86.
87.
88.
89.
90.
PM when ready List: (not adding any more people)
1. brandonbigdog
2. dv8_evo
3. htsai14752
4. northernevo
5. mike@forge
6. showoff
7. EVOking8
8. Eggy
9. Reine
10. vanisher
11. donmeca2020
12. speedracer2169
13. Lacoste
14. BlueFastEvoVIII
15. mchuang
16. bonestockevo8
17. andenbre
18. tritech
19. IDRINKV8
20. evo8rcr
21. rraulston
I've invested a great deal of time and money into designing the ultimate interior upgrade for the USDM Lancer/EVO, the Orbital Prestige 2-DIN Dash-Conversion Kit.
If you read the next 30 pages, you are bound to find the answer to any as well as every question you could possibly have about this kit. However, to save your time and energy, i'm going to post some basic information about the kit here in this very post.
Major Points:
The original kit has been redesigned to accomodate your existing climate controls via our proprietary custom bezel, resulting in a totally plug & play interior upgrade that can be completed in under 35 minutes with basic tools.
The redesigned kit is 40% less expensive than the original. Price for the new kit will be $295 versus $495 for the old one. The first 100 people in the GB will receive this kit @ $250.
Current options include the DEFI Single-DIN Gauge Pack (matching red on black for a perfect blend to interior lights) and 2-DIN Headunits (Eclipse, Pioneer, Kenwood)
The kit includes everything you need to convert your USDM Single-DIN Dash to a true 2-DIN featuring ABS Plastic, Injection-Molded Mid/Lower Bezels that are second in quality to noneother than the factory itself. It also includes miscellaneous hardware and an illustrated instruction manual to maximize ease of installation.
Payment will be accepted @ our webstore, which will be announced upon the kits release and our formal acknowledgement as an evoM vendor.
We will be offering an array of high-end parts and accessories to this kit as well as the interior of the Lancer/EVO after the release and success of this project. I can't tell you how much I appreciate everyone's support in getting this out to the community. I hope everyone is as happy as I am with the results.
Please PM me to be added to the list below, so we can keep the 30 pages of thread to a minimum for Q&A. Thanks
Original Version
Newer, Redesigned Version
NOTE: The final production piece will match the grain and color of the oem dash.
Group-Buy List (Updated Daily)
1. platinumspecv
2. Evovette
3. zstryder
4. marmutz
5. digital509
6. wiz
7. mike1023
8. tama_mog
9. Bom's Evo
10. yellowevo21
11. alby988
12. wilson1
13. 05evo
14. GotLeon
15. BANKS (lower DIN)
16. DANERS_03
17. edtxag
18. slowevo4me
19. 04WWRS
20. greenpsycho
21. RedAustinIX
22. BoOsTinGEVO190
23. ewoevo
24. Rival
25. SterlingEvo
26. NocturnalEVO
27. ~evilevo~
28. Insidious Evo
29. joebo viii
30. NEO-EVO
31. 7m6m4
32. SeattleEvo
33. Pitbul09
34. MPORT2NR
35. en1gma19 (lower DIN)
36. 1 low mx6
37. Mr. SUAVE
38. bogey8
39. spamsucks
40. raiceboi697
41. jonpfive
42. M00kiE
43. vletnguyen
44. MyCre8n=Evlshn
45. purplegodzilla
46. NYREDEVO
47. onesicklambo
48. alan0108
49. NIGHTMARE
50. Rmhaffa04
51. Derek Baker
52. Adrey
53. cmo-06
54. EVOLOVE
55. J8dailo
56. andyjd
57. Spooldyou
58. stantheman (orbitaluser)
59. Bigpuna
60. DesmoEVO
61. dryad001
62. Guyver
63. HRi Evolution
64. cletus323
65. CRVdrftR05
66. mikenjulie
67. Jrod@Buschur
68. kstewart
69. viciousv322
70. EvoG8r
71. MBaran
72. MadAboutSpeed
73. divaDavid
74. M3this
75. JdmGraphiteMR
76. joesevo8
77. GootBoost
78. edtxag
79. Slowryd
80. thatsMR2u
81. e v o
82. jonpfive
83. mercedevo
84.
85.
86.
87.
88.
89.
90.
PM when ready List: (not adding any more people)
1. brandonbigdog
2. dv8_evo
3. htsai14752
4. northernevo
5. mike@forge
6. showoff
7. EVOking8
8. Eggy
9. Reine
10. vanisher
11. donmeca2020
12. speedracer2169
13. Lacoste
14. BlueFastEvoVIII
15. mchuang
16. bonestockevo8
17. andenbre
18. tritech
19. IDRINKV8
20. evo8rcr
21. rraulston
Last edited by spoolingEVOx; Feb 28, 2006 at 08:56 PM.

 Apr 21, 2005, 08:31 PM
#5
Evolved Member
Thread Starter
iTrader: (3)
Join Date: Dec 2003
Location: Jersey, USA
Posts: 674
Likes: 0
Received 0 Likes
on
0 Posts
Originally Posted by UT_Evo
Move the climate control down into the cubby? Is that what that is and how you did that?
up top, i used an oem UK-SPEC 2-DIN dash panel that i obtained through my motorsport company with the oem pocket and infinity headunit. i have a jdm metallic-look overlay on order to match the console.
like i said in my first post, the next step is an eclipse AVN system. defi amber BF auxilliary gauges will be mounted on the pillar via a lotek 60mm triple gauge mount.
btw.. am i the first to do this?
Apr 21, 2005, 08:33 PM
#6
Well...you went and did it now...you'd better post a how to on moving the climate controls down because EVERYONE is going to ask. I've been contemplating doing this myself but my car is garaged elsewhere and my tools are at work...so it was only a matter of time before someone beat me to it! LOL
Where did you source the JDM Dash panel for the Radio?
Where did you source the JDM Dash panel for the Radio?
Apr 21, 2005, 08:33 PM
#7
So the big question is...How did you relocate the HVAC?
Im planning a set-up similar to yours only using a touch screen in the newly aquired double DIN hole to control a mini PC. I'm in the process of modding a 99 Galant control to work in the lower cubby with the radio relocation kit.
edit........Dang. 7 replies before I even got my post up. I notice in your reply you said your installer matched the pigtails. Thats ecactly where Im at in my conversion with the Galant unit and it is a PITA. I need the FSM so I can match up the approiate wire for the AC, def. and recirculate. The cables for the fan and position selector matched up perfect. Once I figure what wire is which this swap will be a breeze and should'nt take anyone more than a couple hours to do. FWIW I got the galant unit for 30 bucks from a local junk yard. Ill post up a complete how too with pics when Im done.
Last edited by sr20det91; Apr 21, 2005 at 08:42 PM.
Trending Topics
Apr 21, 2005, 08:37 PM
#9
Evolved Member
Thread Starter
iTrader: (3)
Join Date: Dec 2003
Location: Jersey, USA
Posts: 674
Likes: 0
Received 0 Likes
on
0 Posts
'99 galant hvac controls should work as well; as will 3G eclipse (as i used) and montero controls.
the install was a *****. our affiliate sound shop took care of the install. i was going to go for it in my garage, but my installer is a pro and i don't trust anyone else with my car. my motorsport company has all the connections with sources in the UK for parts. it was just a matter of waiting for the availability for the part.
the install was a *****. our affiliate sound shop took care of the install. i was going to go for it in my garage, but my installer is a pro and i don't trust anyone else with my car. my motorsport company has all the connections with sources in the UK for parts. it was just a matter of waiting for the availability for the part.
Apr 21, 2005, 08:38 PM
#11
Evolved Member
Thread Starter
iTrader: (3)
Join Date: Dec 2003
Location: Jersey, USA
Posts: 674
Likes: 0
Received 0 Likes
on
0 Posts
Originally Posted by Dragon41673
Well I guess I got my answer! LOL Sorry about that...posted my response as soon as you posted your explanation!
Apr 21, 2005, 08:42 PM
#12
Evolved Member
Thread Starter
iTrader: (3)
Join Date: Dec 2003
Location: Jersey, USA
Posts: 674
Likes: 0
Received 0 Likes
on
0 Posts
Originally Posted by Bom's Evo
oh ****! thats freawkin hot man. how much does that cost and time?
it is not cheap!!!
once i become a registered vendor with EvoM, i'll try to put together a package for interested members as well as some kind of discount at my friends sound shop for install for those who need it. we'll see.
Apr 21, 2005, 08:49 PM
#14
I think if you can do it yourself it will be relatively cheap.
Radio relocation is around $70 and the control unit can be found for around $40 give or take. So say a little more than $100 and a little time splicing some wires and there you have it. Thats about what Im gonna have in mine anyway.
Radio relocation is around $70 and the control unit can be found for around $40 give or take. So say a little more than $100 and a little time splicing some wires and there you have it. Thats about what Im gonna have in mine anyway.
Apr 21, 2005, 08:53 PM
#15
Evolved Member
Thread Starter
iTrader: (3)
Join Date: Dec 2003
Location: Jersey, USA
Posts: 674
Likes: 0
Received 0 Likes
on
0 Posts
Originally Posted by sr20det91
I think if you can do it yourself it will be relatively cheap.
Radio relocation is around $70 and the control unit can be found for around $40 give or take. So say a little more than $100 and a little time splicing some wires and there you have it. Thats about what Im gonna have in mine anyway.
Radio relocation is around $70 and the control unit can be found for around $40 give or take. So say a little more than $100 and a little time splicing some wires and there you have it. Thats about what Im gonna have in mine anyway.
that brings your material cost up from $100 to somewhere around $400.. i don't think thats cheap.
add labor cost for the install and you have a pretty pricey little mod..
Last edited by spoolingEVOx; Apr 21, 2005 at 08:59 PM.