How to: Upper/Lower IC pipes & EvoX Intercooler
 Oct 3, 2009, 08:14 PM
#1

How to: Upper/Lower IC pipes & EvoX Intercooler
Alright this isn't terribly in-depth and will be assuming that you can handle some things like removing the bumper and figuring out where the bolts are and which sizes they are.
I've got a comparison of the stock RA and EvoX intercoolers, too: https://www.evolutionm.net/forums/09...ore-sizes.html
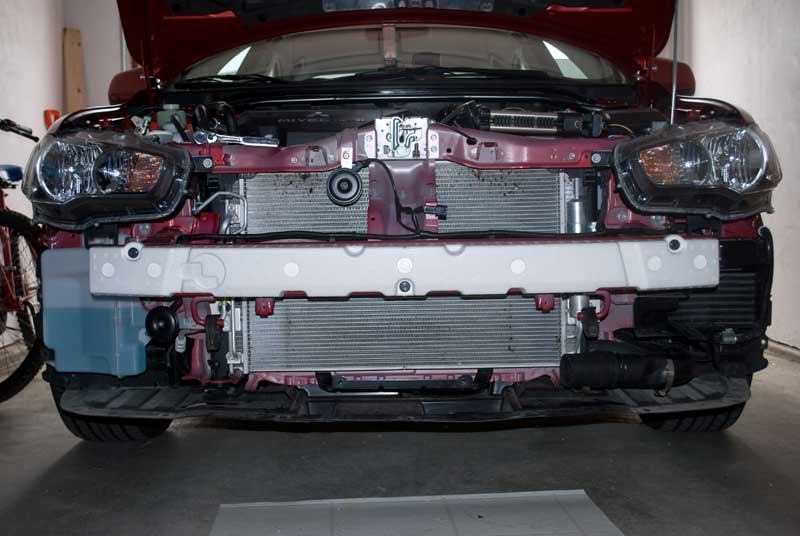
First up, remove the bumper and unscrew the hose clamps from the turbo outlet and intercooler inlet. Pull off the stock upper IC pipe.
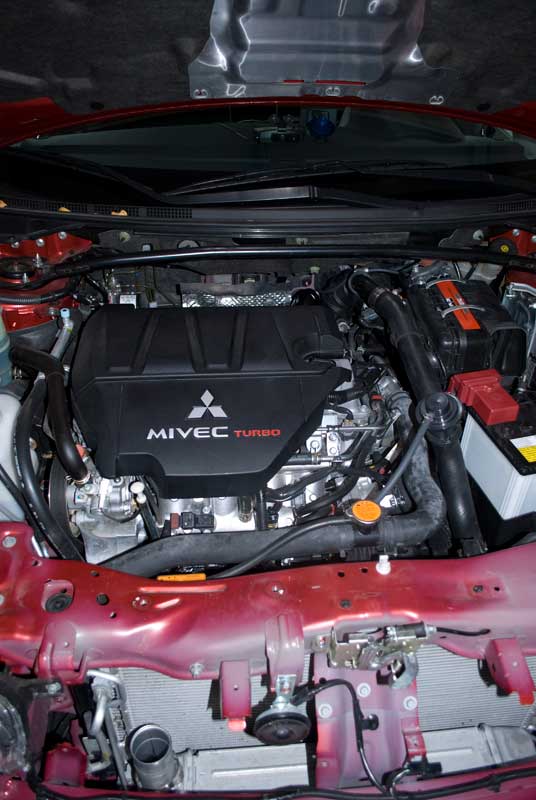
Unbolt the intercooler (two bolts underneath it) and remove the hose clamps on the intercooler outlet and stock lower IC pipe. Pull the intercooler off of the rubber hangers and remove.
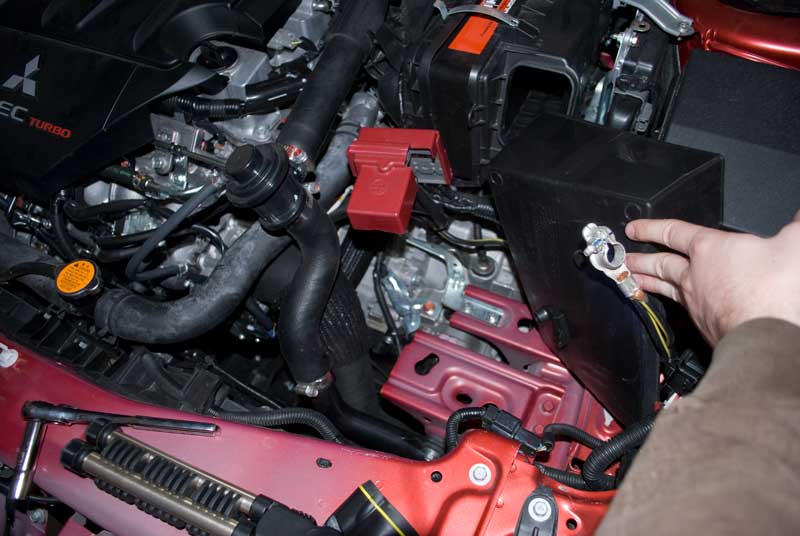
Unfortunately, that was the easy part. Get ready, cause the lower IC pipe is a lot of fun. Remove the battery shielding, disconnect the negative and positive battery terminals, unbolt the battery tie-down clamps, and remove the battery. You can push this battery tray out of your way.
To reach some of the bolts and such, the transmission cooler air dam has gotta go. Three pop-type plastic clips hold it on.

At this point, you're gonna want to attack the lower IC pipe from about every angle and remove all of the hose clamps and bolts that are securing it. There's a couple hard-to-reach bolts attaching the IC pipe to a radiator line. Once everything's loose, you can pull out the lower IC pipe from the bottom. The large rubber throttle body coupler and plastic pipe (that goes to the BPV) can be pulled up through the top.
Here's how the stock RA LICP looks next to the EvoX LICP w/ T1R hard pipe:
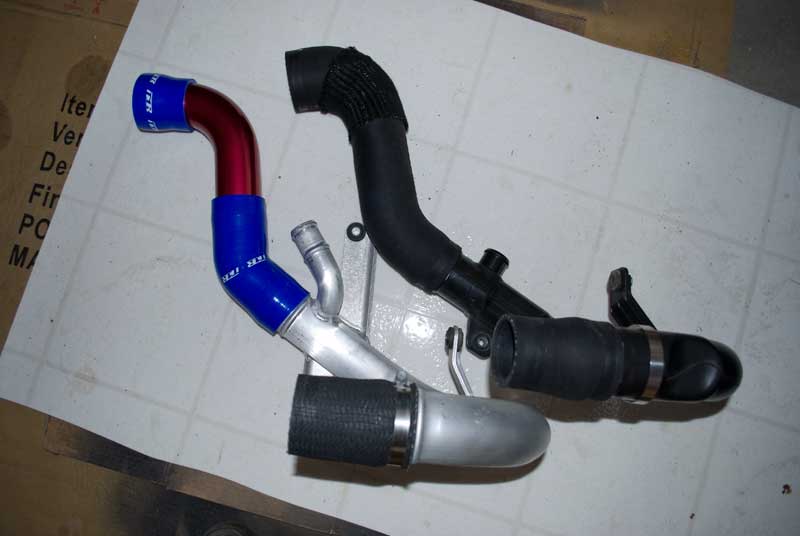
Note the difference in the outlet that runs to the BPV. The RA's is short, and the EvoX's is longer and angled.
Back up top, the new, larger turbo outlet funnel will go on.
Comparison of T1R's funnel and the stock RA:

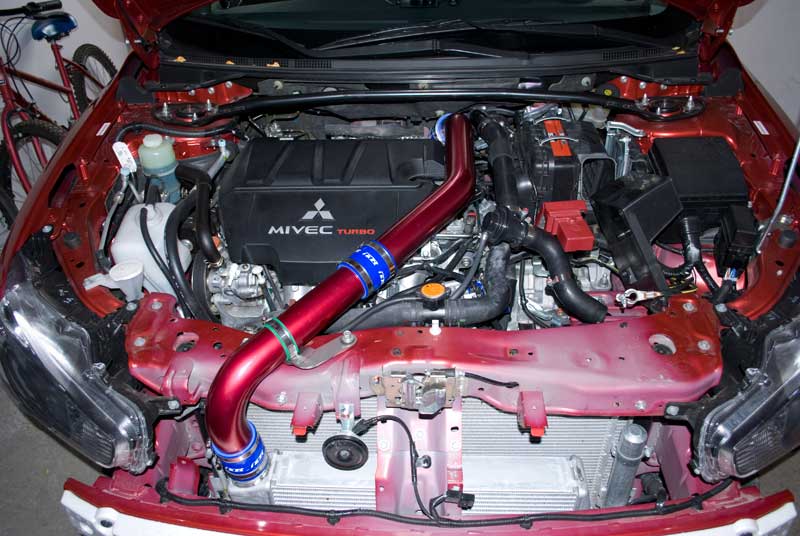
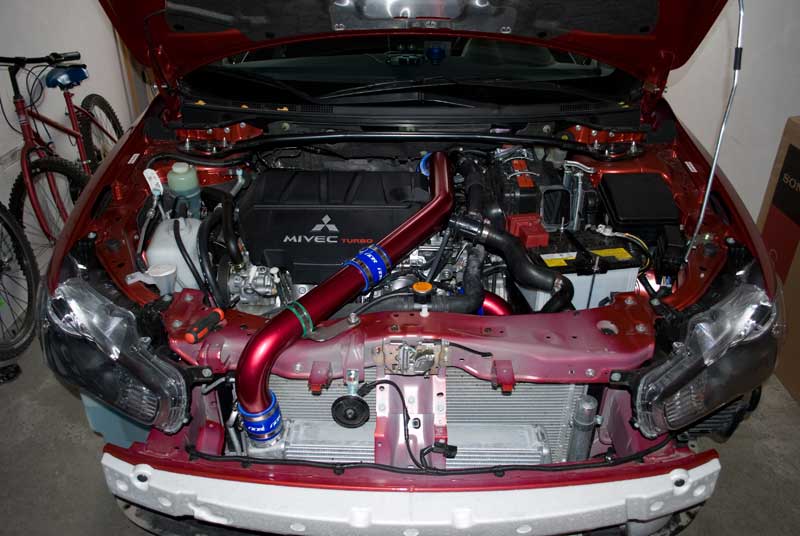
At this point, I installed the EvoX intercooler and ran the T1R upper piping and tightened down the bolts/clamps when things were lined up.
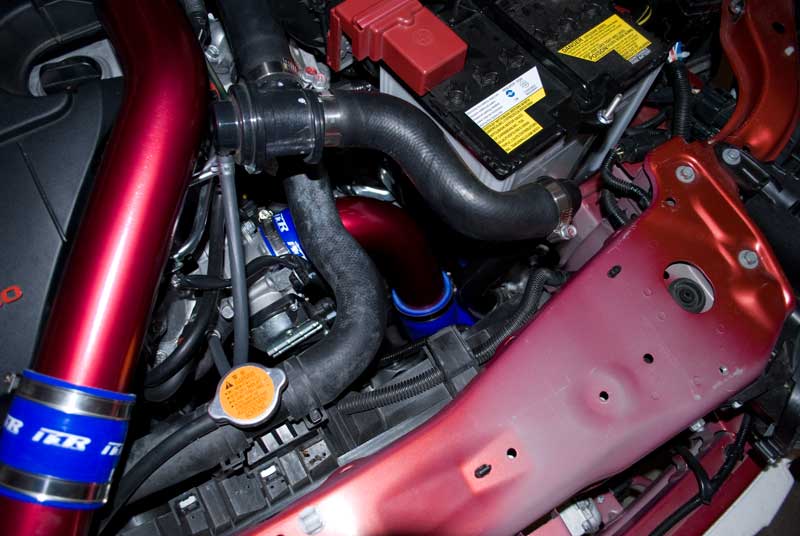
Next I got the lower IC pipe parts in place, and bolted everything up. Again, this is the hardest part here. After my best efforts of nudging, pulling, twisting, etc. to get everything lined up perfectly, everything went together pretty well except for one bolt attaching the "U" part of the LICP to the frame, which was about 1/2" from being lined up. The rest of the pipe was held securely so I decided to leave this part unattached.
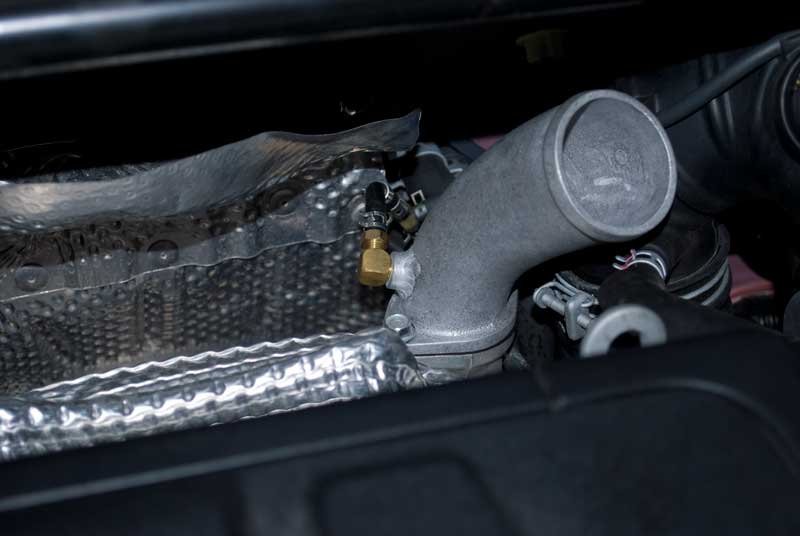
As I continued to reassemble, up comes the issue of that BPV outlet on the EvoX pipe. It's at a strange angle which makes using the RA's plastic piece difficult. I managed to get the pipe to work ghetto-style and piece the car back together so I could drive to the hardware store to look for a new pipe to use here. Basically I installed the RA's plastic pipe upside-down and adjusted the BPV tubing to make everything connect up. It's not pretty....see how they stick up awkwardly:
What you need here is a piece of tubing 6" long and about 1-1/4 to 1-1/2" in diameter:
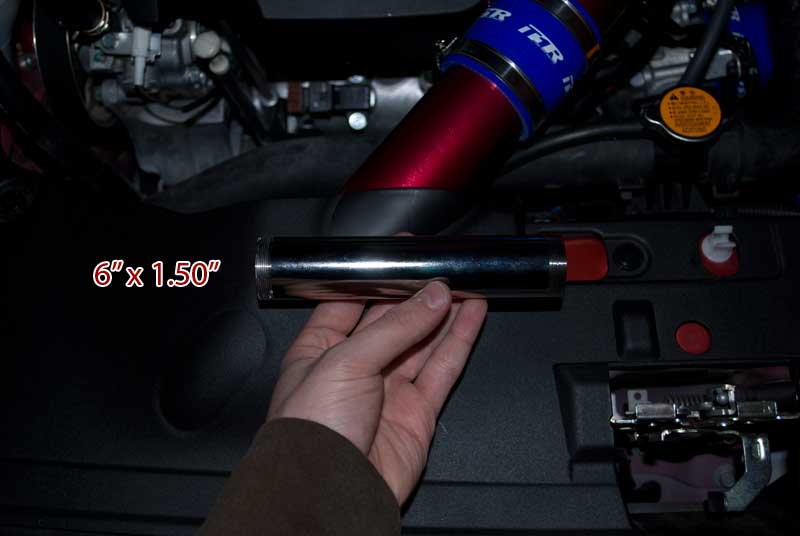
I found this little section of sink drain at Home Depot worked almost perfectly...this one is 1-1/4" in diameter, but a slightly larger pipe would work better. This will work temporarily.
EDIT: I ended up ordering this piece from HRPWorld.com http://www.hrpworld.com/googlebase.c...action=product It's a bit larger, and the ends have a bead to prevent pieces from blowing apart.

Once I replaced the plastic RA crazy tube with this straight one, the rest of the BPV piping fit much better. Now the snorkel fits again and everything can go back together.

Make sure everything is tightened down before you put the car back together Have fun
I've got a comparison of the stock RA and EvoX intercoolers, too: https://www.evolutionm.net/forums/09...ore-sizes.html
First up, remove the bumper and unscrew the hose clamps from the turbo outlet and intercooler inlet. Pull off the stock upper IC pipe.
Unbolt the intercooler (two bolts underneath it) and remove the hose clamps on the intercooler outlet and stock lower IC pipe. Pull the intercooler off of the rubber hangers and remove.
Unfortunately, that was the easy part. Get ready, cause the lower IC pipe is a lot of fun. Remove the battery shielding, disconnect the negative and positive battery terminals, unbolt the battery tie-down clamps, and remove the battery. You can push this battery tray out of your way.
To reach some of the bolts and such, the transmission cooler air dam has gotta go. Three pop-type plastic clips hold it on.
At this point, you're gonna want to attack the lower IC pipe from about every angle and remove all of the hose clamps and bolts that are securing it. There's a couple hard-to-reach bolts attaching the IC pipe to a radiator line. Once everything's loose, you can pull out the lower IC pipe from the bottom. The large rubber throttle body coupler and plastic pipe (that goes to the BPV) can be pulled up through the top.
Here's how the stock RA LICP looks next to the EvoX LICP w/ T1R hard pipe:
Note the difference in the outlet that runs to the BPV. The RA's is short, and the EvoX's is longer and angled.
Back up top, the new, larger turbo outlet funnel will go on.
Comparison of T1R's funnel and the stock RA:
At this point, I installed the EvoX intercooler and ran the T1R upper piping and tightened down the bolts/clamps when things were lined up.
Next I got the lower IC pipe parts in place, and bolted everything up. Again, this is the hardest part here. After my best efforts of nudging, pulling, twisting, etc. to get everything lined up perfectly, everything went together pretty well except for one bolt attaching the "U" part of the LICP to the frame, which was about 1/2" from being lined up. The rest of the pipe was held securely so I decided to leave this part unattached.
As I continued to reassemble, up comes the issue of that BPV outlet on the EvoX pipe. It's at a strange angle which makes using the RA's plastic piece difficult. I managed to get the pipe to work ghetto-style and piece the car back together so I could drive to the hardware store to look for a new pipe to use here. Basically I installed the RA's plastic pipe upside-down and adjusted the BPV tubing to make everything connect up. It's not pretty....see how they stick up awkwardly:
What you need here is a piece of tubing 6" long and about 1-1/4 to 1-1/2" in diameter:
I found this little section of sink drain at Home Depot worked almost perfectly...this one is 1-1/4" in diameter, but a slightly larger pipe would work better. This will work temporarily.
EDIT: I ended up ordering this piece from HRPWorld.com http://www.hrpworld.com/googlebase.c...action=product It's a bit larger, and the ends have a bead to prevent pieces from blowing apart.
Once I replaced the plastic RA crazy tube with this straight one, the rest of the BPV piping fit much better. Now the snorkel fits again and everything can go back together.
Make sure everything is tightened down before you put the car back together
Have fun
Last edited by velocityhead; Nov 12, 2009 at 05:33 PM.

 Oct 6, 2009, 06:53 PM
#6
Newbie
Join Date: May 2009
Location: Georgia
Posts: 62
Likes: 0
Received 0 Likes
on
0 Posts
Might sound like a retard, but would this upgrade require a tune, as does most engine mods/upgrades on this car do? After seeing the size comparison of the stock vs Evo X, I almost crapped. I have a guy at work with a WW Evo X who's been trying to get me to buy his. But after this lil write-up... omfg.
Last edited by Krimsin; Oct 6, 2009 at 06:54 PM. Reason: retard moment
Oct 6, 2009, 07:13 PM
#7
Evolved Member
iTrader: (1)

Join Date: Sep 2009
Location: Auburn, WA
Posts: 528
Likes: 0
Received 0 Likes
on
0 Posts
Might sound like a retard, but would this upgrade require a tune, as does most engine mods/upgrades on this car do? After seeing the size comparison of the stock vs Evo X, I almost crapped. I have a guy at work with a WW Evo X who's been trying to get me to buy his. But after this lil write-up... omfg.
-Taranis
Trending Topics
Oct 7, 2009, 05:29 PM
#8
Newbie
Join Date: May 2009
Location: Georgia
Posts: 62
Likes: 0
Received 0 Likes
on
0 Posts
will the stock LICP work with the EvoX FMIC and T1R hardpipe as pictured here:
basically what Im asking is if I order the entire T1R IC pipe set and acquire just the EvoX Stock IC Core, will the stock RA LICP (with the shorter BPV) work. Or does stock EvoX LICP on the left side of the image come with the T1R set (or something similar)... or will I have to find my own pipe/coupler combo.
basically what Im asking is if I order the entire T1R IC pipe set and acquire just the EvoX Stock IC Core, will the stock RA LICP (with the shorter BPV) work. Or does stock EvoX LICP on the left side of the image come with the T1R set (or something similar)... or will I have to find my own pipe/coupler combo.
Last edited by Krimsin; Oct 7, 2009 at 06:22 PM.
Oct 8, 2009, 07:50 AM
#9
Yes, if you order the T1R set and an EvoX intercooler, it will work without having the EvoX lower IC pipe.
BUT...at a minimum, you will need to get a larger coupler to connect the RA's LICP to the EvoX IC. The EvoX IC has larger diameter outlets than the RA's stock IC outlets (you might be able to tell by the photo). You will need a reducing coupler, I'm guessing a 2.5in-to-2.0in coupler would do the trick, but I don't remember the exact diameter of the EvoX outlet and RA pipe.
BUT...at a minimum, you will need to get a larger coupler to connect the RA's LICP to the EvoX IC. The EvoX IC has larger diameter outlets than the RA's stock IC outlets (you might be able to tell by the photo). You will need a reducing coupler, I'm guessing a 2.5in-to-2.0in coupler would do the trick, but I don't remember the exact diameter of the EvoX outlet and RA pipe.
Oct 8, 2009, 08:59 PM
#10
Newbie
Join Date: May 2009
Location: Georgia
Posts: 62
Likes: 0
Received 0 Likes
on
0 Posts
Yes, if you order the T1R set and an EvoX intercooler, it will work without having the EvoX lower IC pipe.
BUT...at a minimum, you will need to get a larger coupler to connect the RA's LICP to the EvoX IC. The EvoX IC has larger diameter outlets than the RA's stock IC outlets (you might be able to tell by the photo). You will need a reducing coupler, I'm guessing a 2.5in-to-2.0in coupler would do the trick, but I don't remember the exact diameter of the EvoX outlet and RA pipe.
BUT...at a minimum, you will need to get a larger coupler to connect the RA's LICP to the EvoX IC. The EvoX IC has larger diameter outlets than the RA's stock IC outlets (you might be able to tell by the photo). You will need a reducing coupler, I'm guessing a 2.5in-to-2.0in coupler would do the trick, but I don't remember the exact diameter of the EvoX outlet and RA pipe.
 Glad it's useful.
Oct 24, 2009, 05:11 PM
Glad it's useful.
Oct 24, 2009, 05:11 PM
#12
Newbie
Join Date: May 2009
Location: Georgia
Posts: 62
Likes: 0
Received 0 Likes
on
0 Posts
Just installed everything today! Blacked out my chrome ring and emblem while bumper was off. Was kind of last minute decision, but glad I made it! You're write up help alot, especially with theo 6" 1.5" drain pipe... saved a load of aggravation. Only issue was with the battery tray and cover... had to scrap the cover to get the snorkel to fit back on properly.

 Oct 26, 2009, 11:25 AM
#15
Looks good Krimsin.
I seem to remember having some difficulty getting the battery tray (under the battery) to sit back in it's proper little indentation. I did manage to get it to fit back in there and everything else fit back where it was supposed to go. I'm willing to bet this is why you weren't able to re-use your battery cover. If that plastic tray isn't in it's original location, the battery and battery cover would stick up about 1/2" higher than normal.
I seem to remember having some difficulty getting the battery tray (under the battery) to sit back in it's proper little indentation. I did manage to get it to fit back in there and everything else fit back where it was supposed to go. I'm willing to bet this is why you weren't able to re-use your battery cover. If that plastic tray isn't in it's original location, the battery and battery cover would stick up about 1/2" higher than normal.